Location, entrance and quick route
Open the exact Double Vision atlas pin in Russet Highlands. The marker sits at 2775, 423 on the AniimoVerse atlas. Older editorial notes call this room Keen Gaze; the map and the entrance card both use Double Vision.
| Check | Value |
|---|---|
| Area | Russet Highlands |
| Atlas coordinate | 2775, 423 |
| Entrance | 1 challenger · 0/3 optional chests |
| Trial form used |  Helgon · supplied inside the room Helgon · supplied inside the room |
| Perspective action | Bilateral · PC binding T |
| Wall-breaking action | Melee · PC binding Q |
| First-clear panel | One item icon ×1 and EXP 200 · the currency is Lumin Amber |
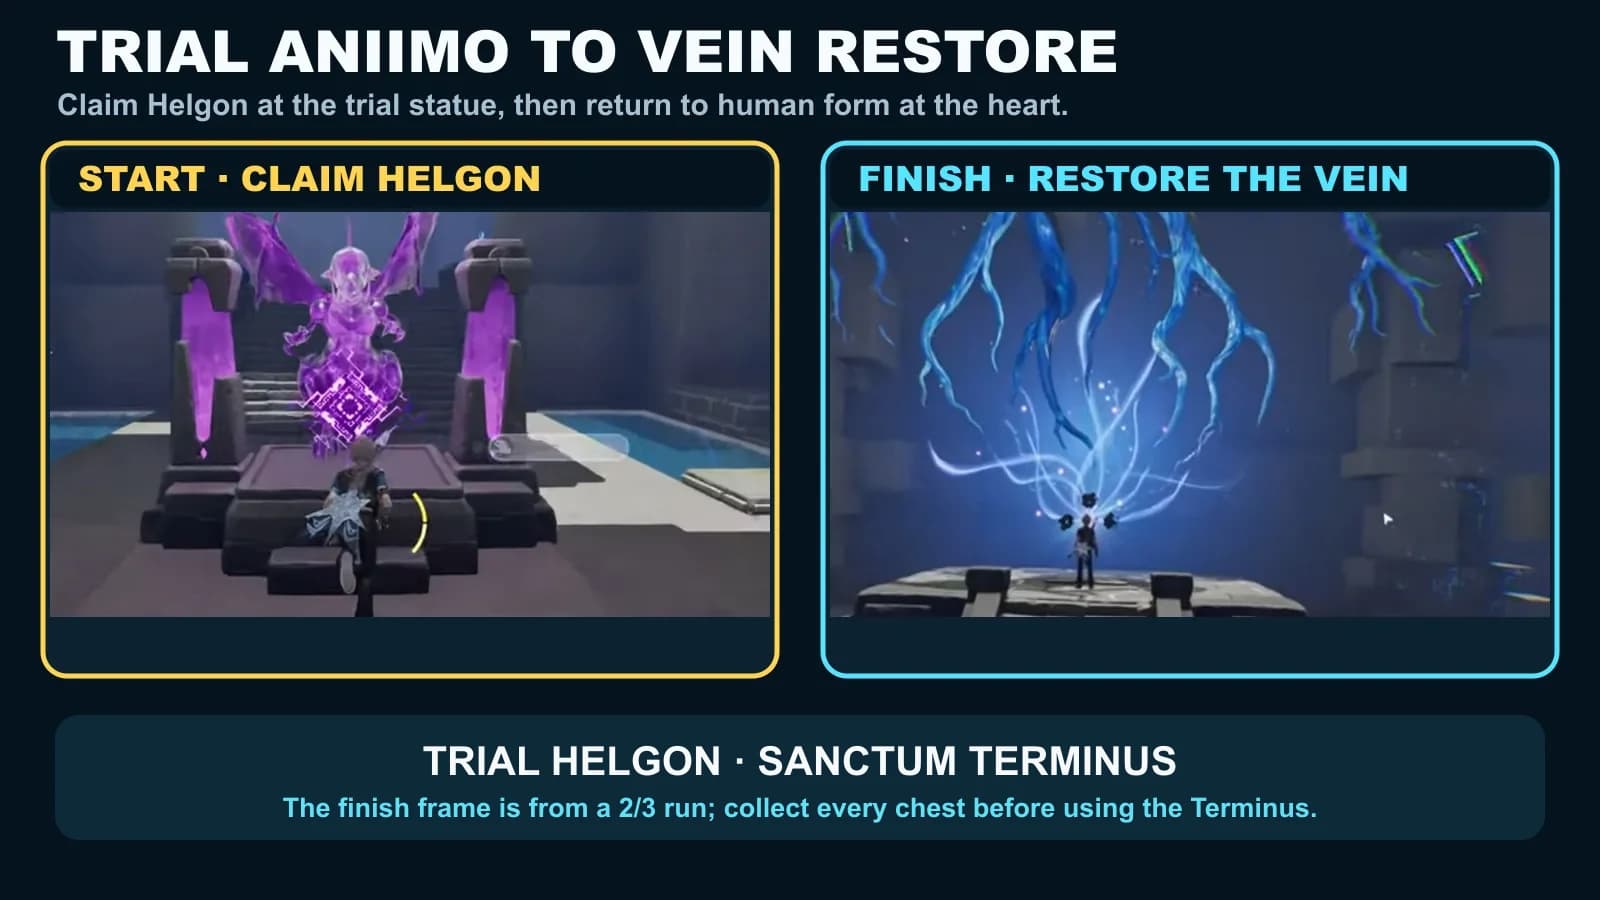
- 1Claim trial Helgon and solve sightlines 1–2
Use the supplied trial form, align the entry gate and lower-ledge eye, then collect chest 1 in the flooded side trench before continuing.
- 2Solve sightline 3 and place the raft
Untwine, press Q on the water-drop-marked raft when the HUD says Manipulate, Drag it into the crossing lane and Drop it rather than Throwing it.
- 3Solve sightlines 4–5
Use the low water-edge view and then the upper-water-wall view. There is no chest between these two alignments and the lift.
- 4Ride the running water columns and break the wall
Twine Helgon, ascend with the columns, use flight to correct the climb and use the Q Melee action on the cracked wall.
- 5Solve sightline 6 and collect chest 2
Align the post-wall arch, cross it, climb the short stairs and open the chest on the dry landing.
- 6Solve sightlines 7–9
Climb the two vertical alignments, then solve the next eye gate from the landing in front of it.
- 7Use Move Platform and solve sightline 10
The separate Move Platform interaction comes after sightline 9 and before the final corridor alignment.
- 8Collect chest 3 and finish
Open the chest on the final central landing, confirm 3/3, then continue to the Sanctum Terminus and restore the Vein.
Bilateral perspective alignment
Helgon’s perspective action is called Bilateral: it shifts the viewpoint so separated eye fragments can overlap. The in-room tutorial also uses the wording Split-Sight for the same mechanic. The action is not called “Bilateral Vision.”
- Use the named normal-view landmark first. Reach the described landing and face the stated wall before entering the perspective view.
- Enter Bilateral. On PC the prompt is T.
- Move the camera in small increments. Join the separated eye halves without walking off the marked landing.
- Wait for confirmation. A registered eye turns gold and the relevant wall or route changes to cyan.
- Leave the view before traversal. Return to normal play before jumping, flying or manipulating an object.
Sightlines 1–3 and chest 1
The opening sequence sets the repeatable pattern: copy the standing point, face the marked wall, enter Bilateral and adjust until the eye registers. Collect the first chest immediately after sightline 2; it is not an upper-ledge reward after sightline 5.
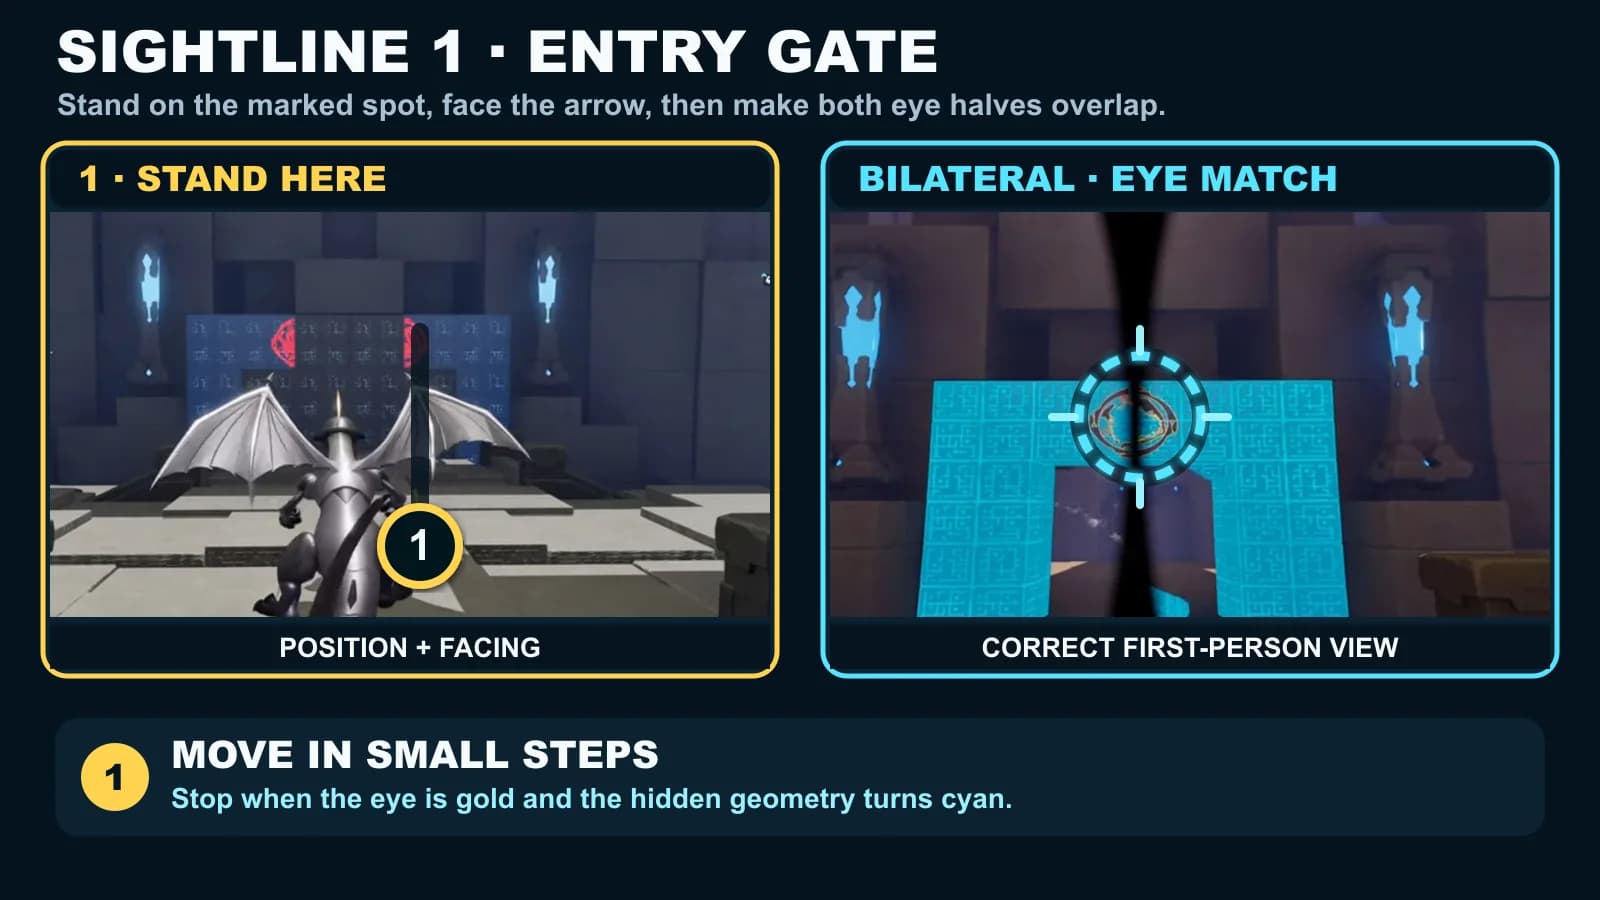
1. Entry gate
Stand here: stop on the center approach tiles before the first patterned wall. Face this: square the wall so the red eye halves sit at the same height. Enter Bilateral, center the seam between them and make a small horizontal correction until the eye turns gold and the doorway turns cyan.
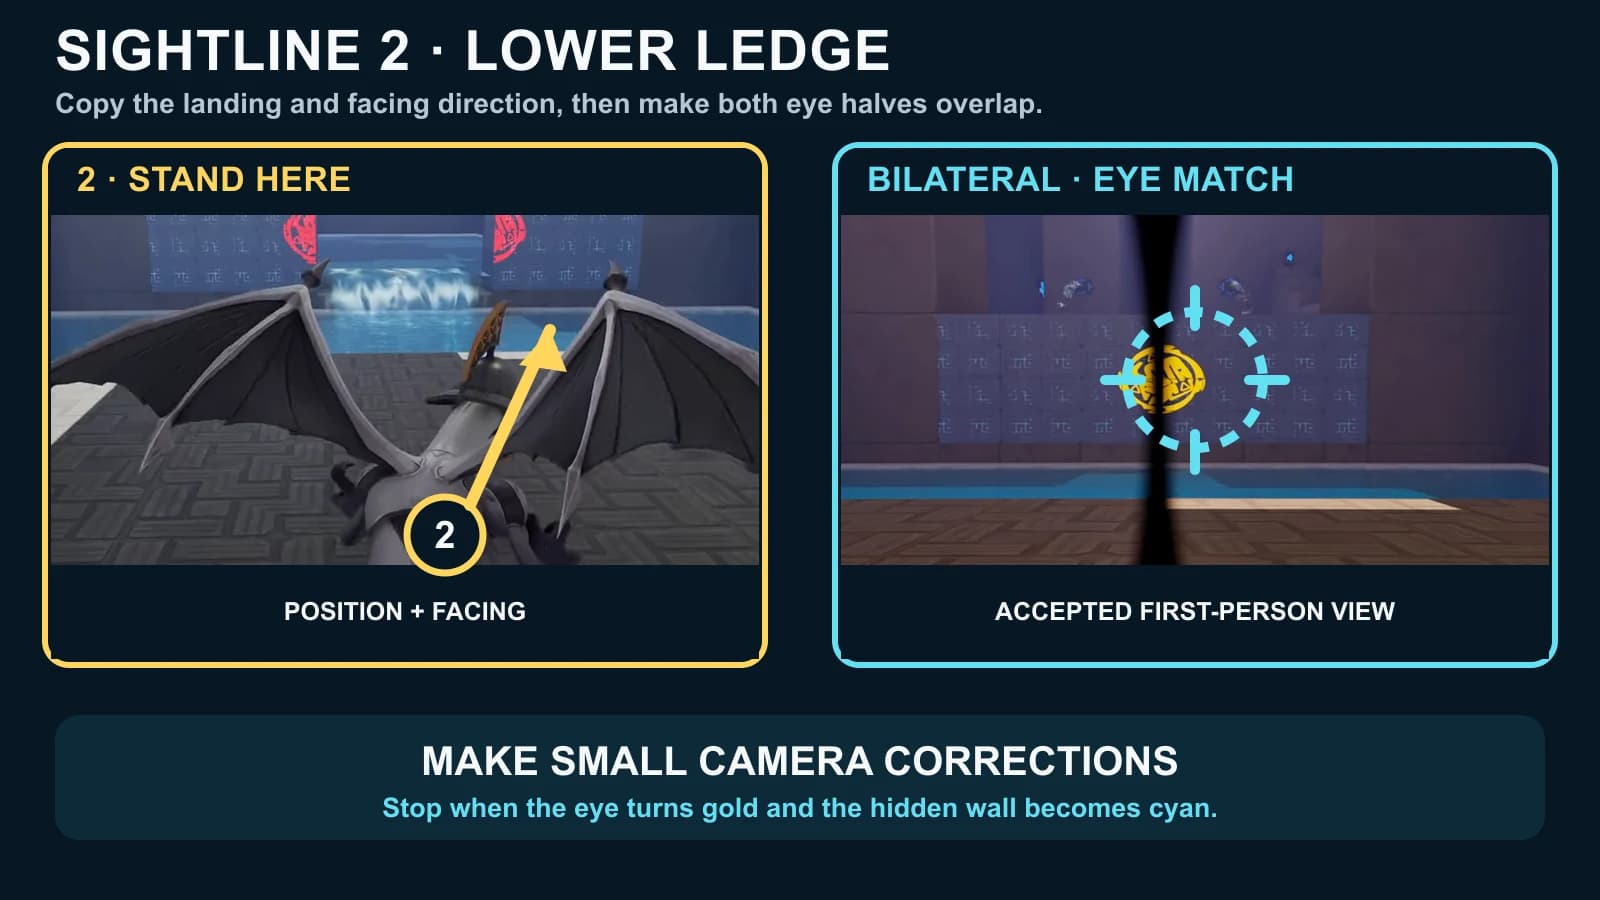
2. Lower ledge, then chest 1
Stand here: cross the first gate and stop on the narrow lower ledge immediately beyond it. Face this: look toward the far patterned wall and slightly upward. Enter Bilateral and close the small gap between the eye halves; the accepted eye sits high in the view.
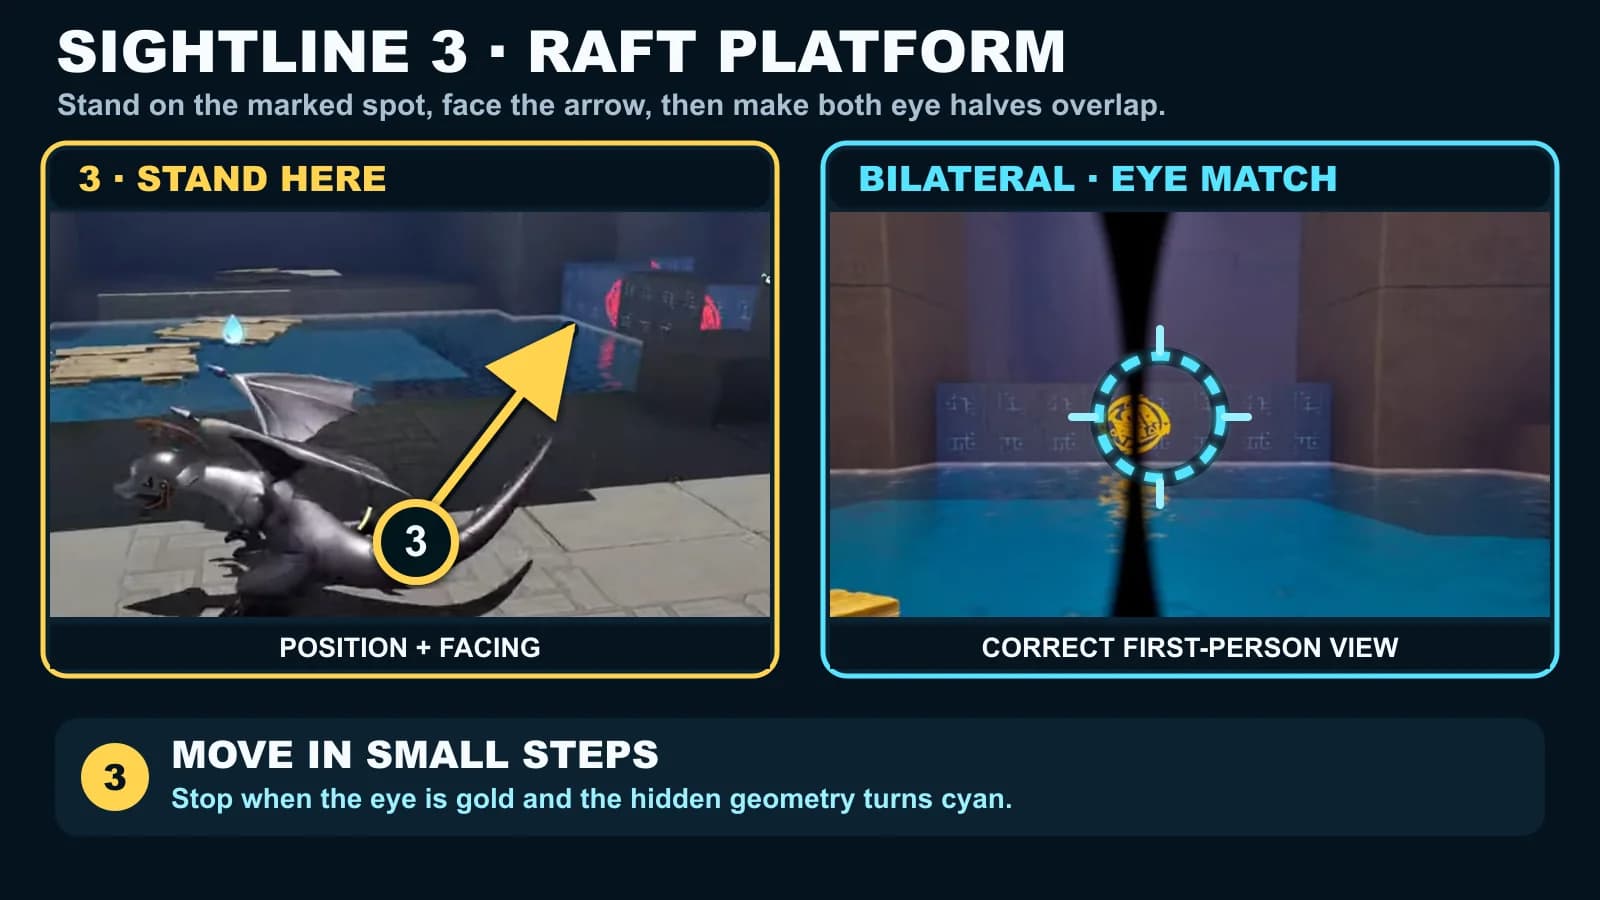
3. Raft platform
Stand here: move to the stone lip beside the first wooden raft, with water to the left. Face this: aim diagonally across the pool at the wall carrying the red fragments. Enter Bilateral and bring the halves together above the waterline. Wait for the registered eye and changed geometry before leaving the ledge.
Place the water-marked raft with Drag and Drop
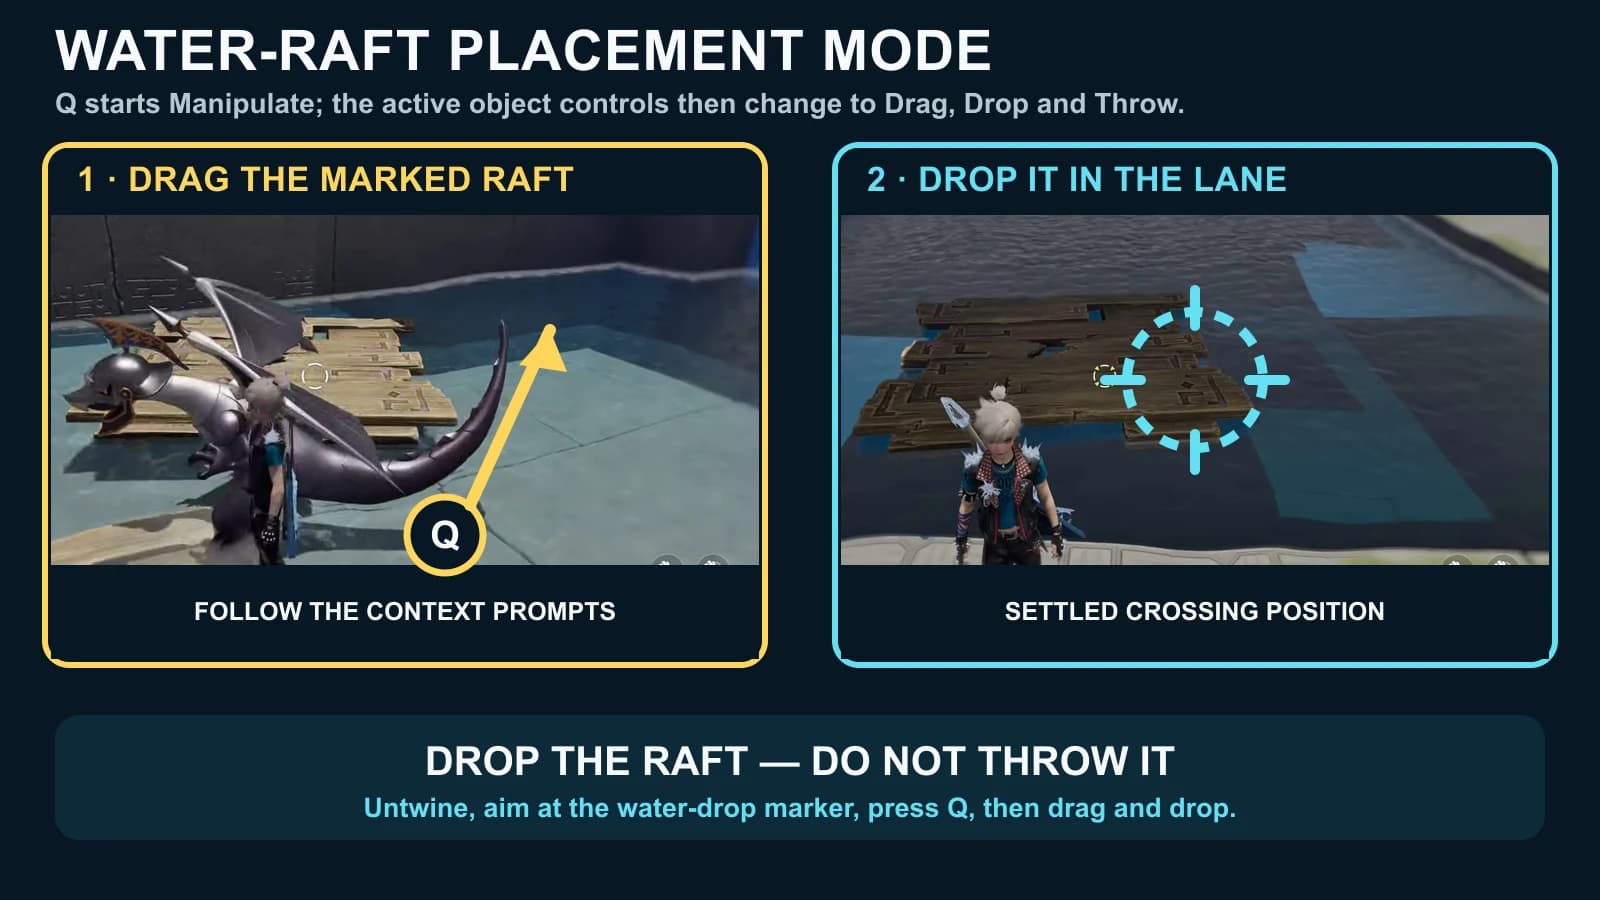
After sightline 3, Untwine to Pathfinder form and aim at the wooden raft carrying the water-drop marker. Press Q when the HUD says Manipulate. The active object controls then change to Drag / Stop dragging and Drop / Throw. Drag the raft into the crossing lane and choose Drop so it settles; do not Throw it. Cross, then Twine with Helgon again.
Sightlines 4–5 across the water
These two registrations use the water section from different heights. Solve the low far-wall view, then climb to the upper view. No chest sits between sightline 5 and the lift.
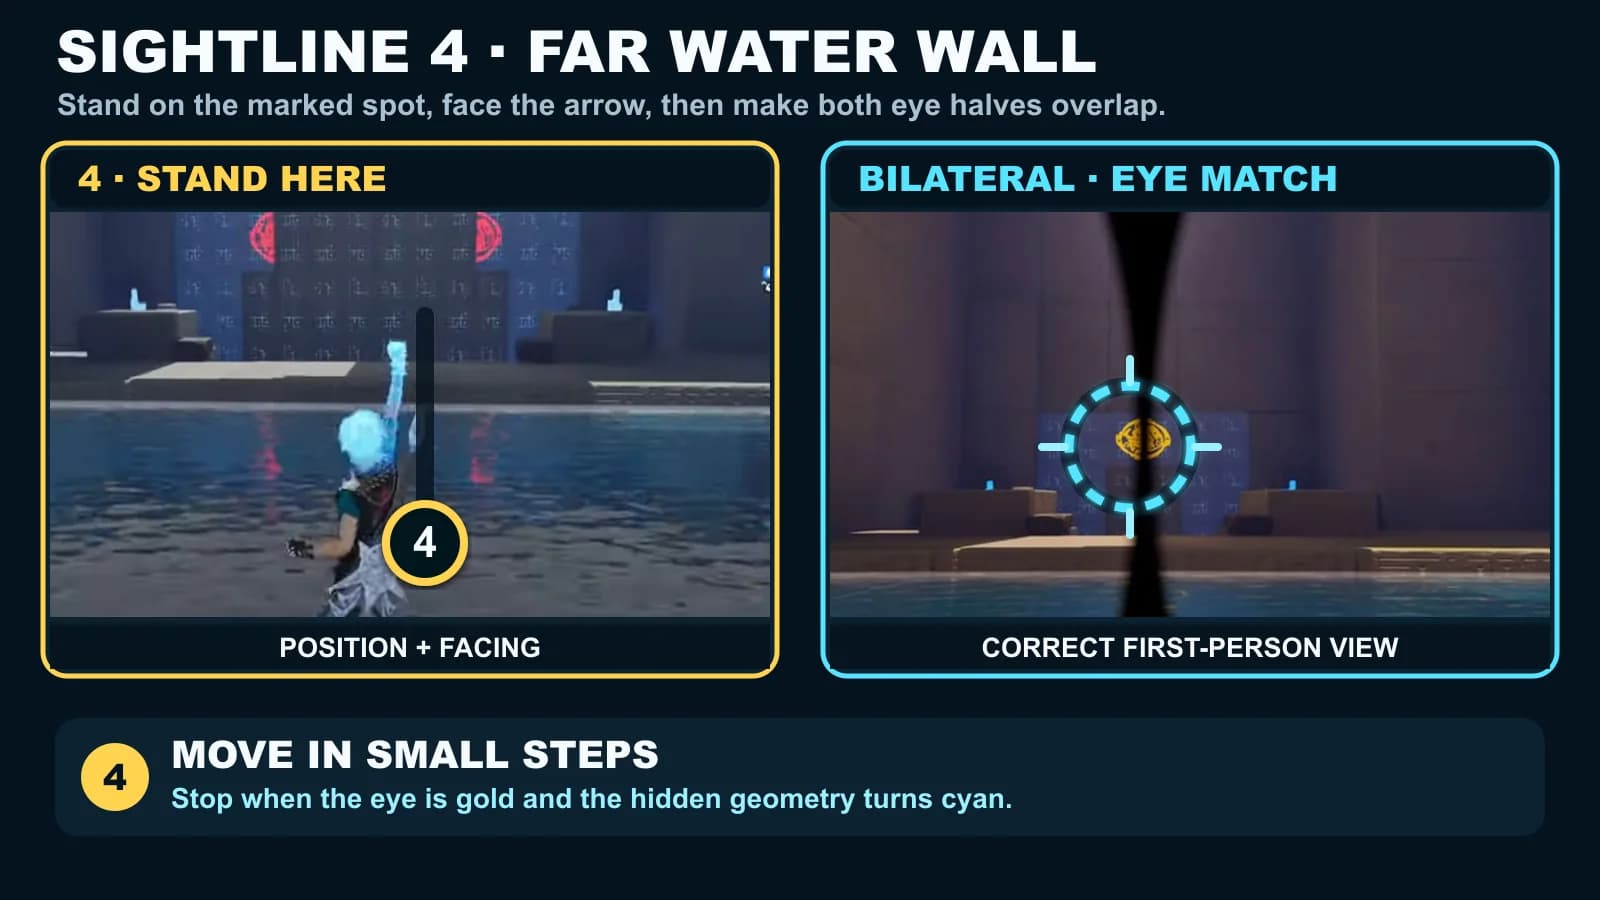
4. Far water wall
Stand here: step off at the shallow water edge and stay at that low height. Face this: center the distant wall and the low eye halves above its base. Enter Bilateral, tilt slightly downward and close the eye over the center block.
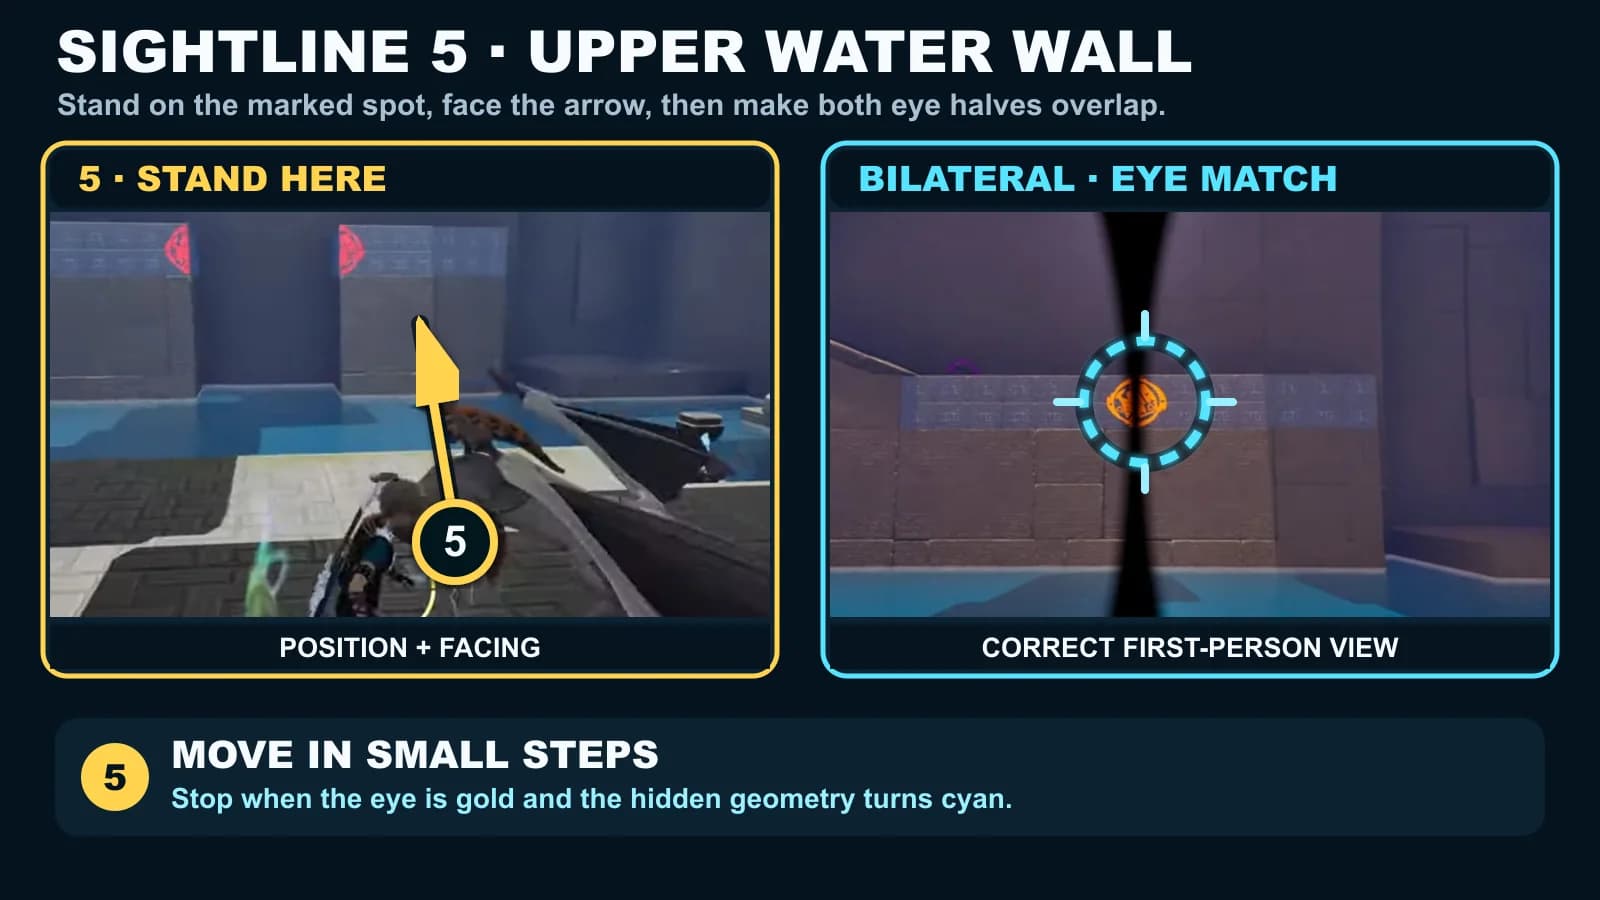
5. Upper water wall
Stand here: climb to the upper dry ledge beside the central pillar and stop at its lip. Face this: look across the pool, using the pillar edge to keep the fragments level. Enter Bilateral and make a short horizontal correction until the eye registers.
Ride the water columns and break the wall
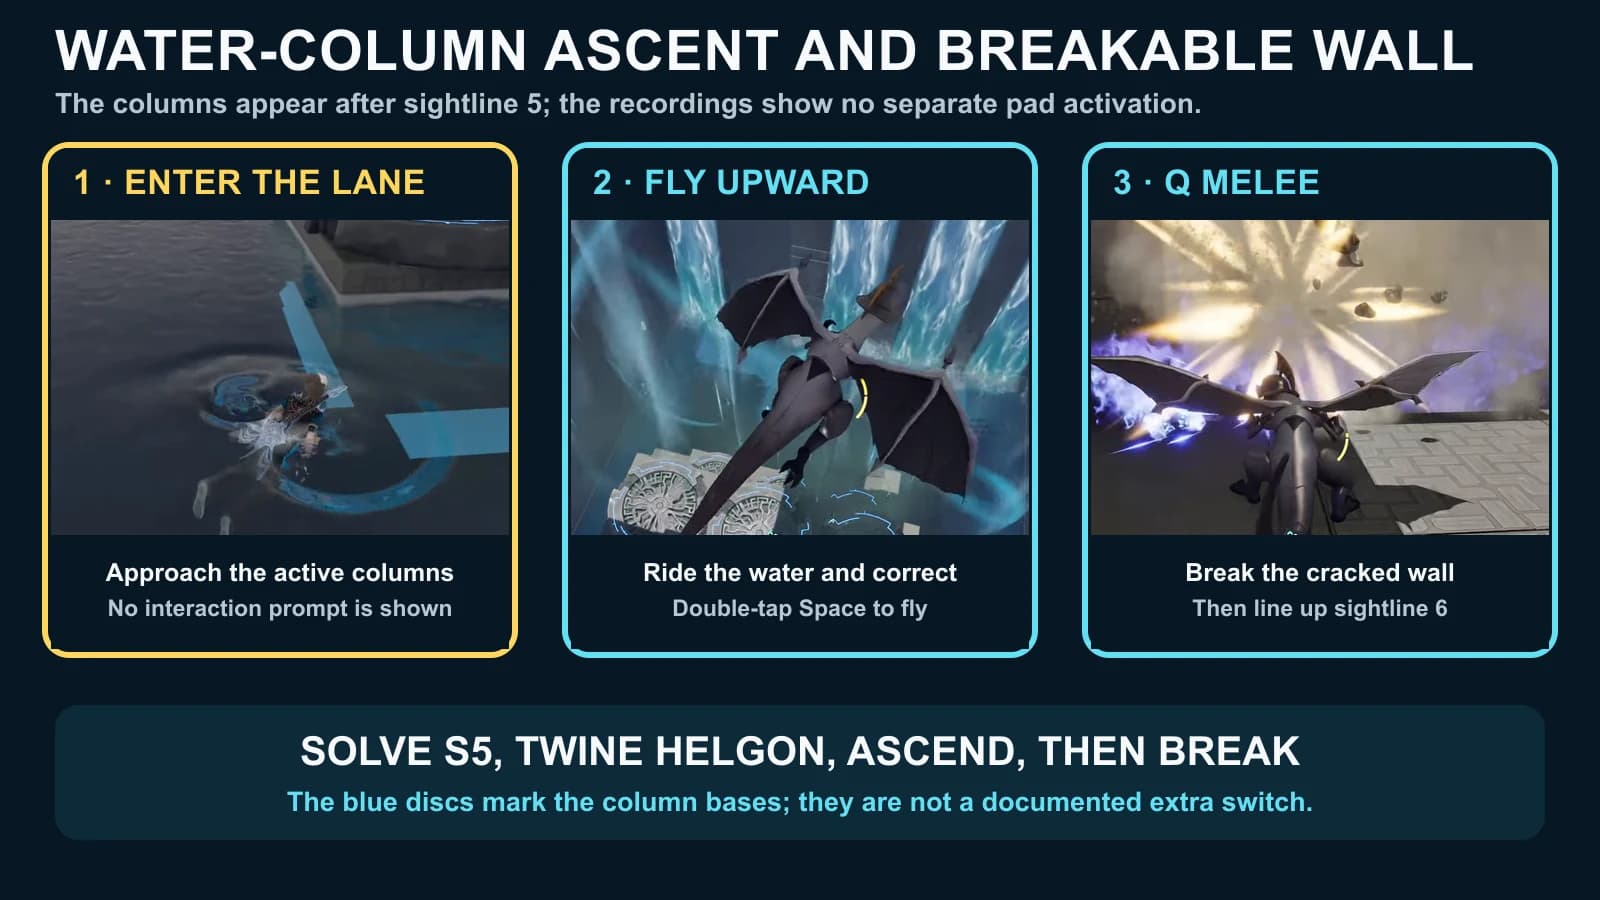
Sightline 5 opens the next doorway. Circular blue-rimmed fixtures sit at the base of the lane, but the water columns already running are the lift, and there is no separate pad interaction. Enter the lane, Twine Helgon, ride the columns upward and use flight to correct the final climb. On PC, double-tap Space for flight.
- Enter the active lane. Walk into the running water; there is no switch to find first.
- Ascend in Helgon form. Use the columns for height and flight for lateral correction.
- Break the cracked wall. Face it from the high landing and use the Q Melee context action.
- Prepare sightline 6. The eye fragments are beyond the newly broken wall.
Sightlines 6–10 and chests 2–3
Five registrations remain after the cracked wall. Sightline 6 opens the route to chest 2. Sightlines 7 and 8 climb the vertical section; sightline 9 is a full eye gate. Move Platform comes after sightline 9, followed by the separate tenth alignment and chest 3.
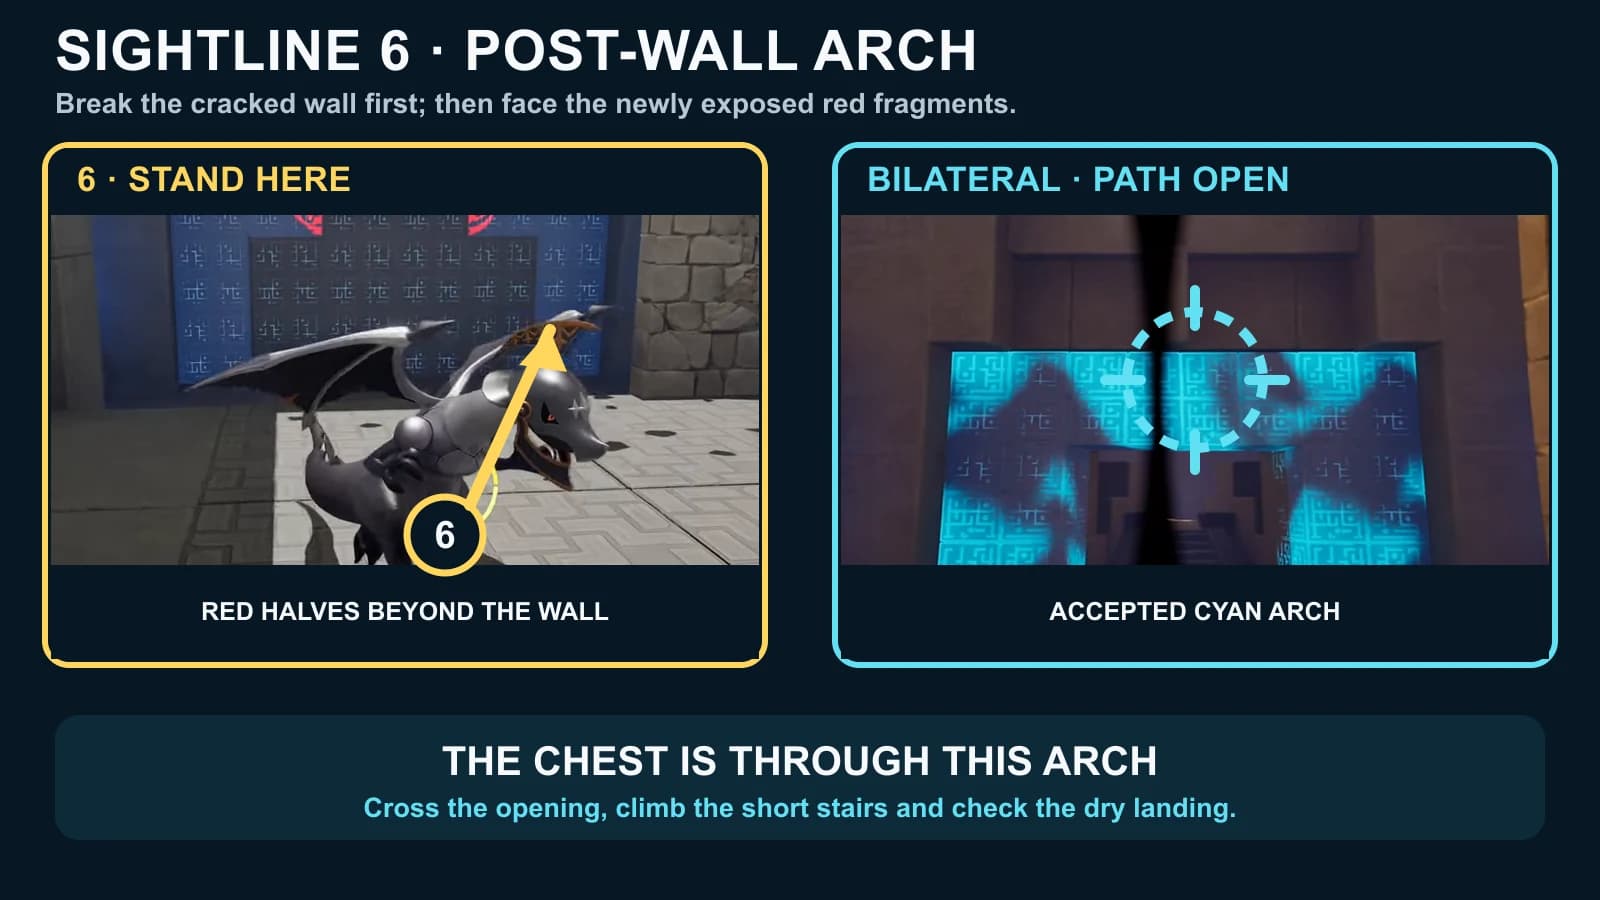
6. Post-wall arch, then chest 2
Stand here: pass through the broken wall and stop where the exposed red fragments face the landing. Face this: center the new arch and enter Bilateral until the route becomes cyan. Cross the opening, climb the short stairs and open chest 2 on the dry landing before climbing away.
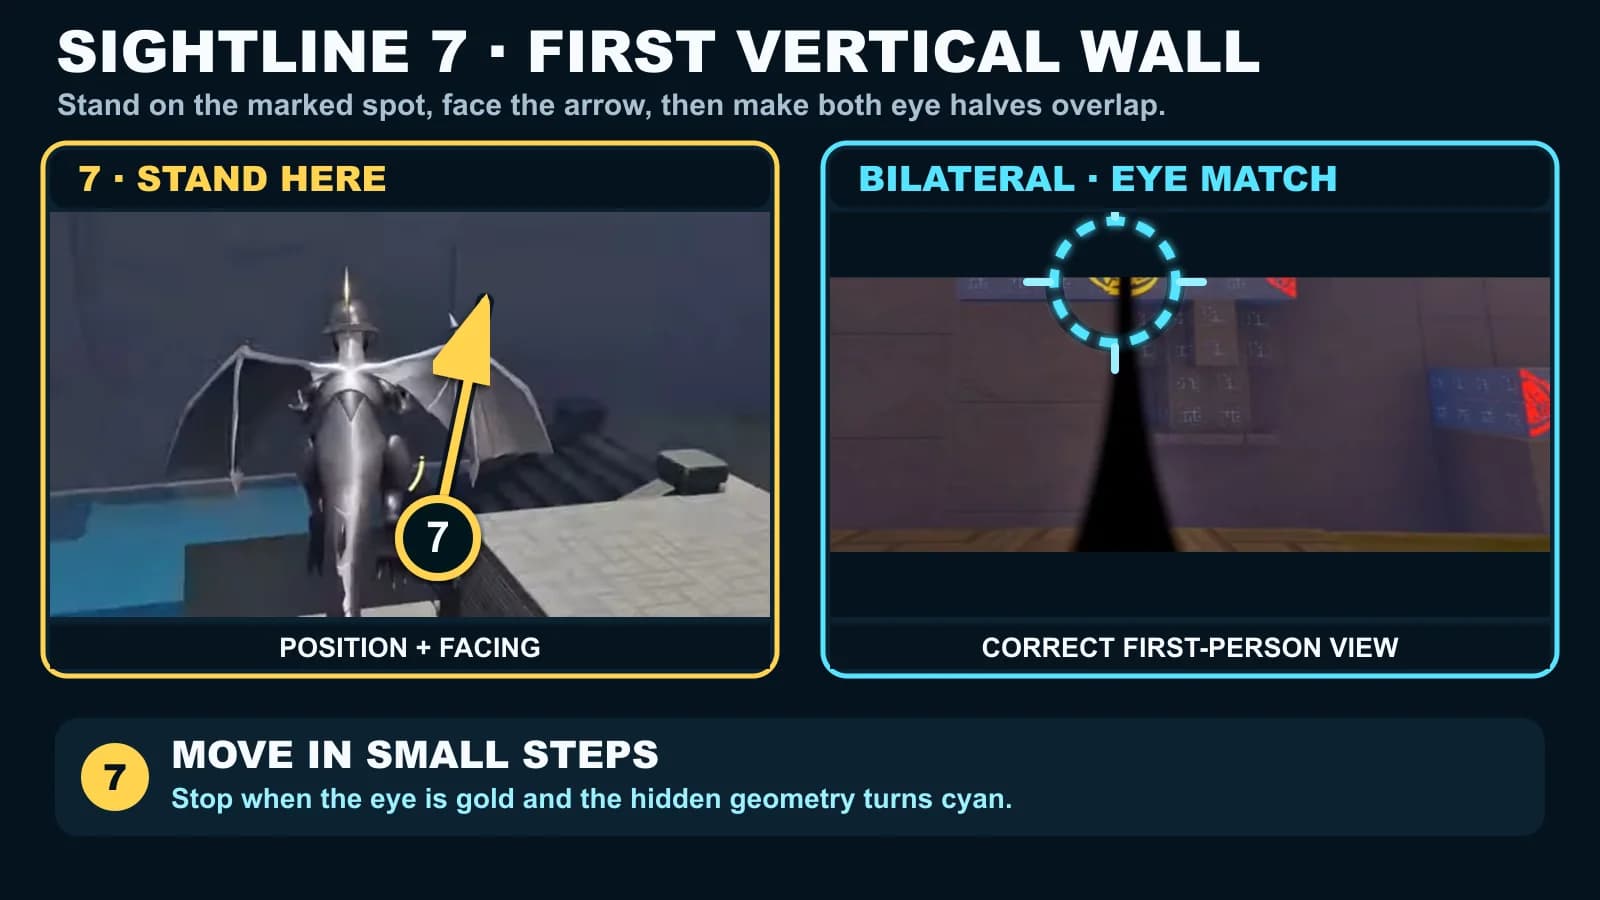
7. First vertical wall
Stand here: climb to the first exposed upper shelf, with the water below to the left. Face this: look high at the split eye above the wall stack. Enter Bilateral and tilt upward until the eye closes near the top of the view. Keep Helgon still while the route changes.
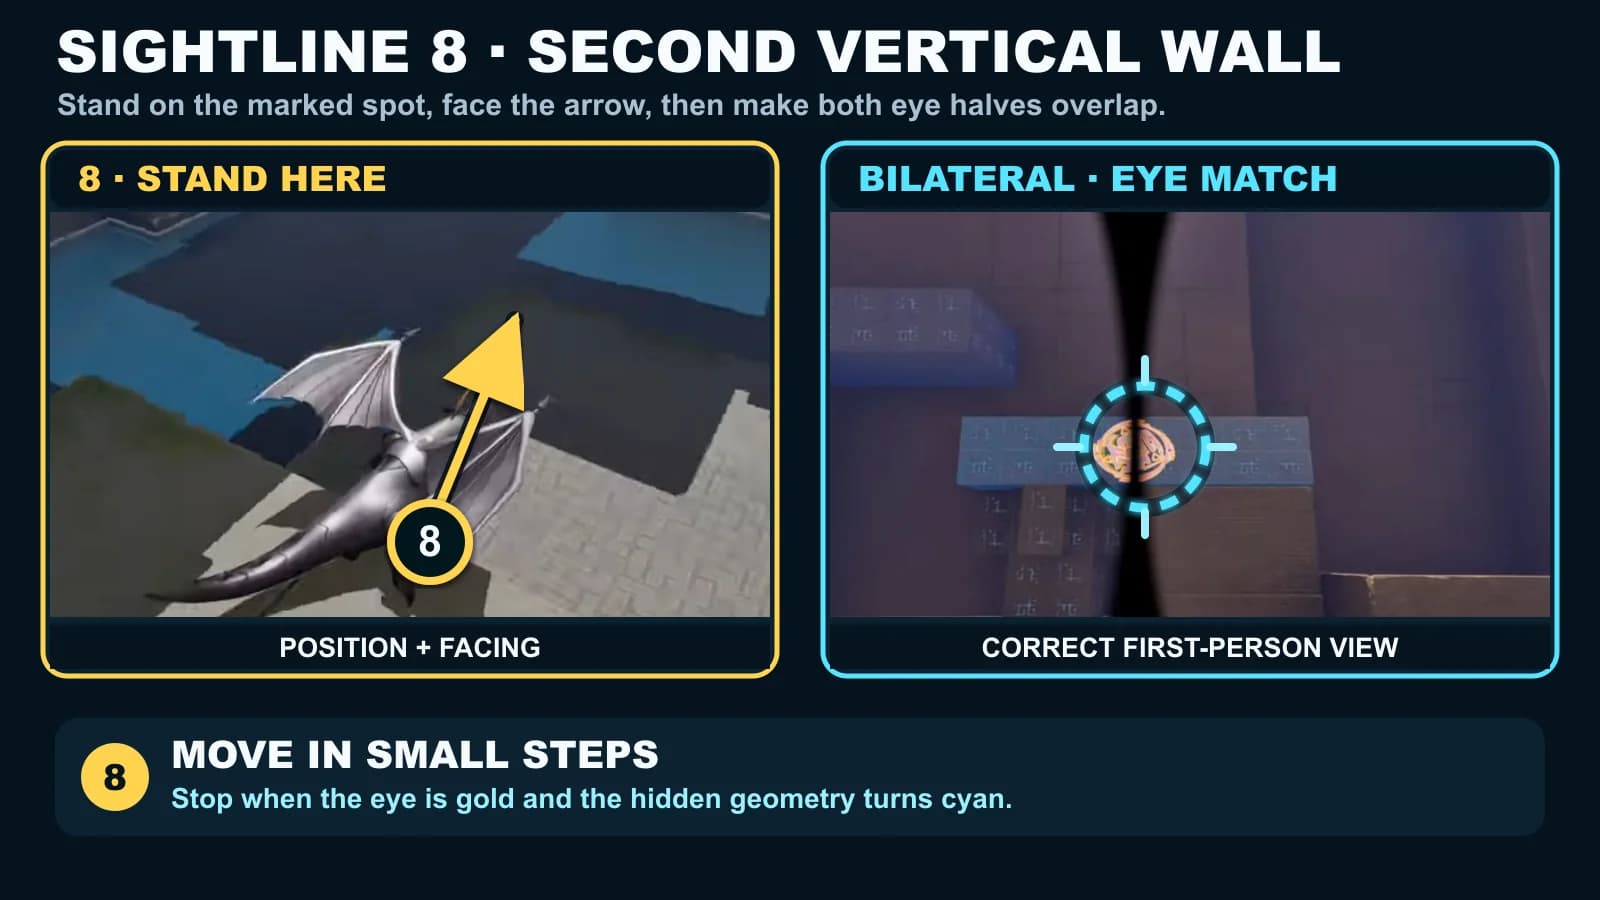
8. Second vertical wall
Stand here: move onto the next pale corner platform. Face this: center the T-shaped stack on the opposite wall and align the eye at its horizontal crosspiece. Wait for the gold registration and changed geometry before crossing.
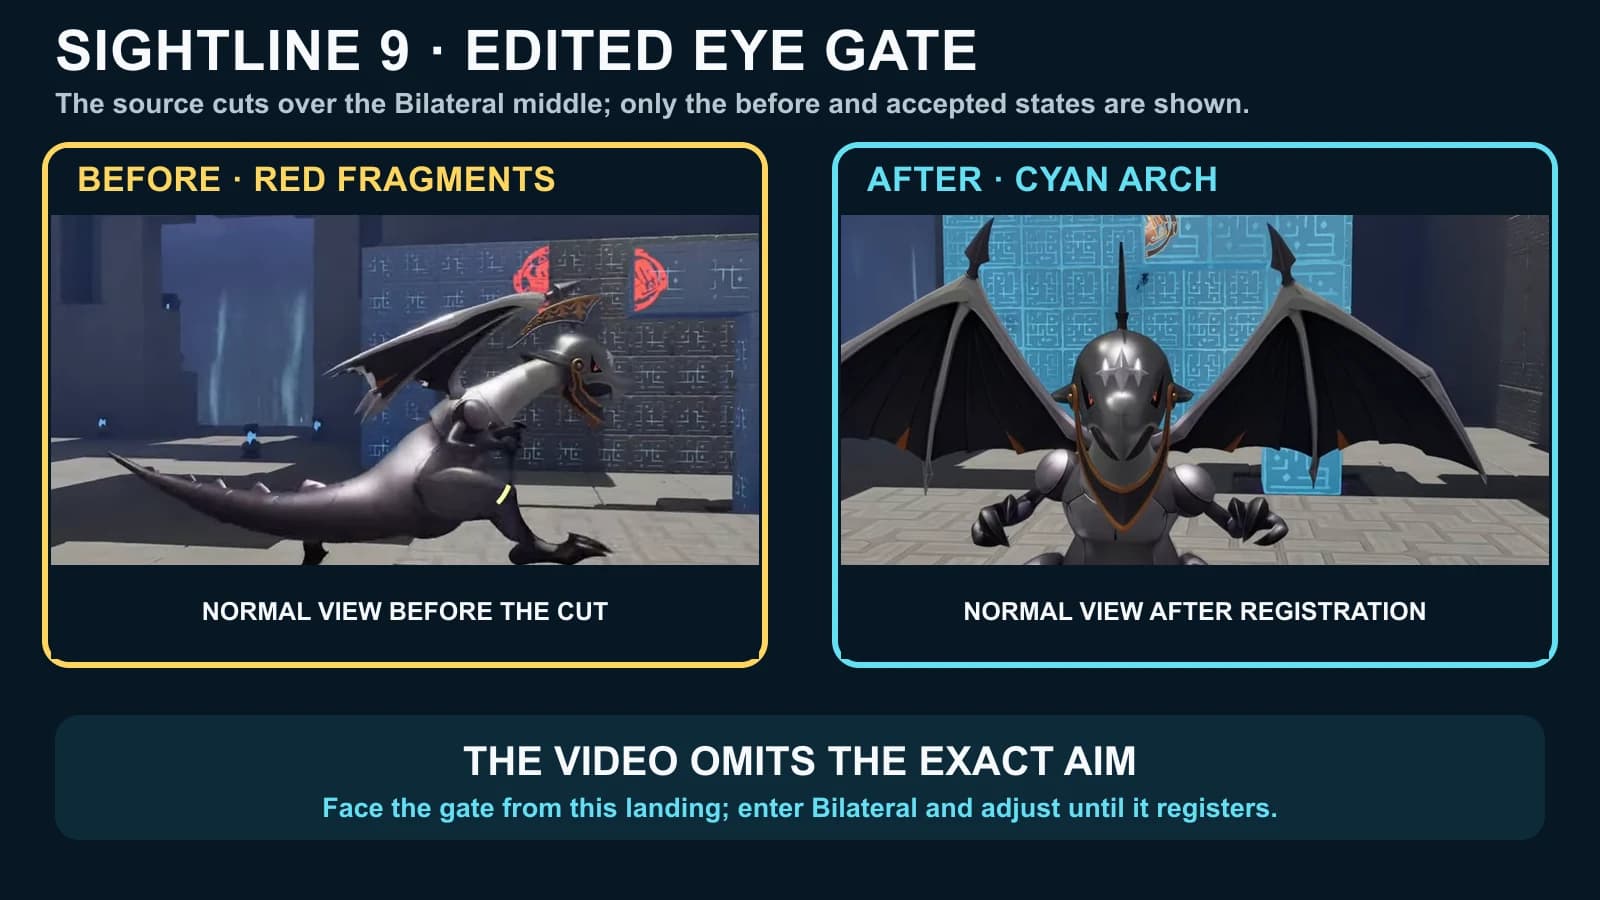
9. Upper eye gate
Stand here: after sightline 8, stop on the landing facing the next red-fragment gate. Face this: center the two fragments across the opening. Enter Bilateral and adjust in small steps until the eye turns gold and the gate turns cyan. Stay on the landing while you aim; walking toward the gate pulls the halves apart.
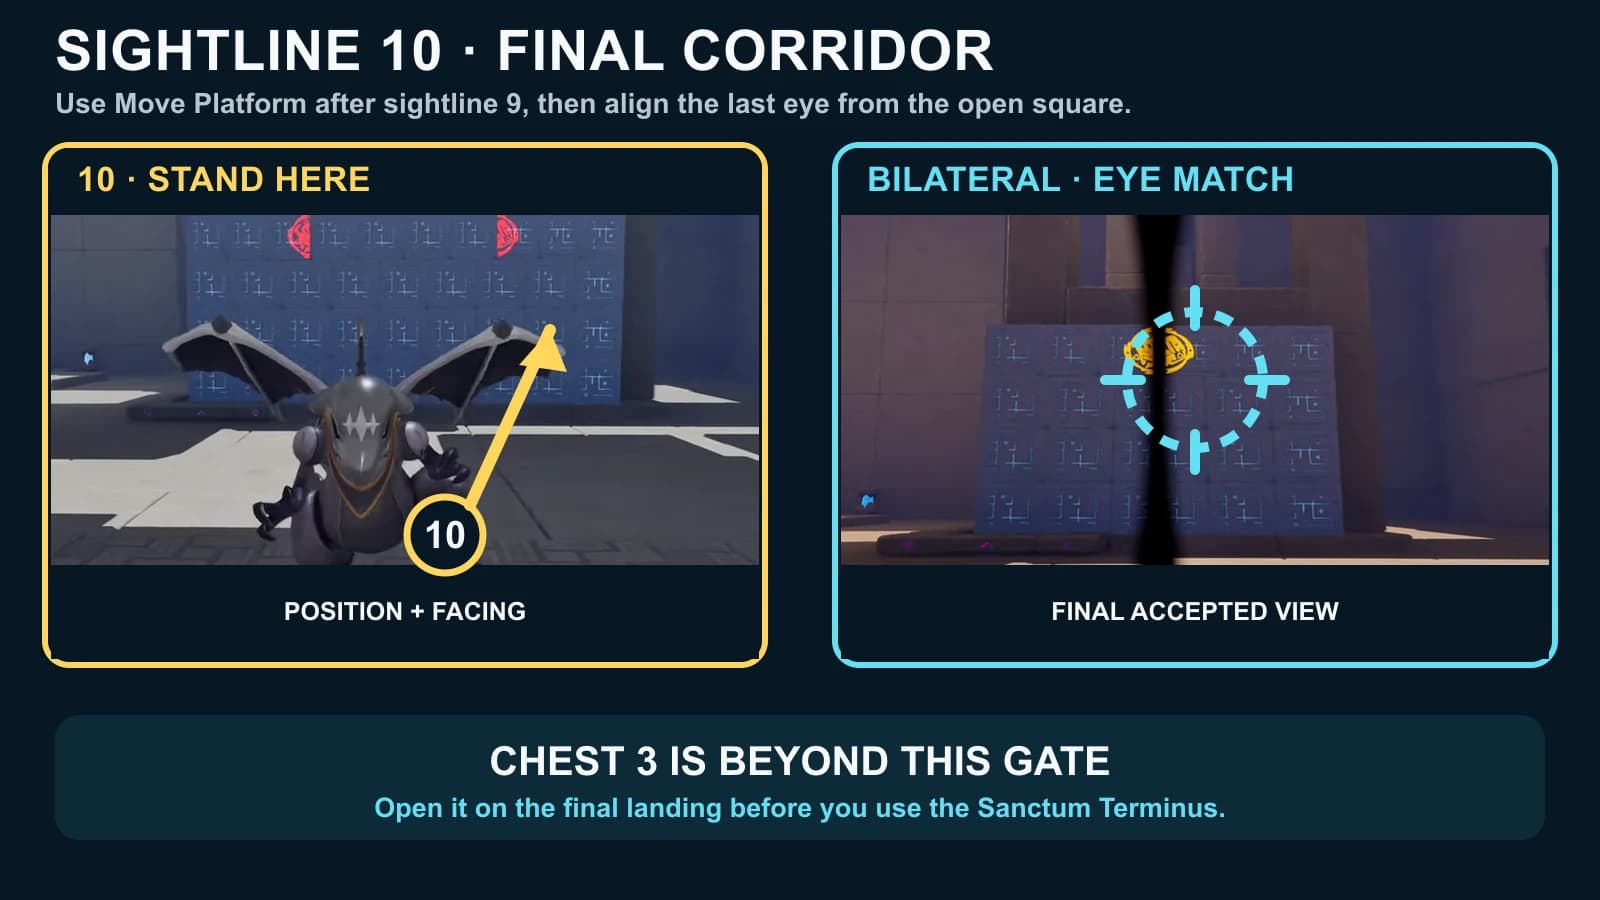
10. Final corridor, then chest 3
Stand here: after Move Platform, stop on the open square at the final corridor. Face this: aim toward the separated eye fragments across the central block. Enter Bilateral and make small corrections until the last eye turns gold. Follow the opened route to chest 3 on the final central landing and confirm 3/3 before continuing to the Sanctum Terminus.
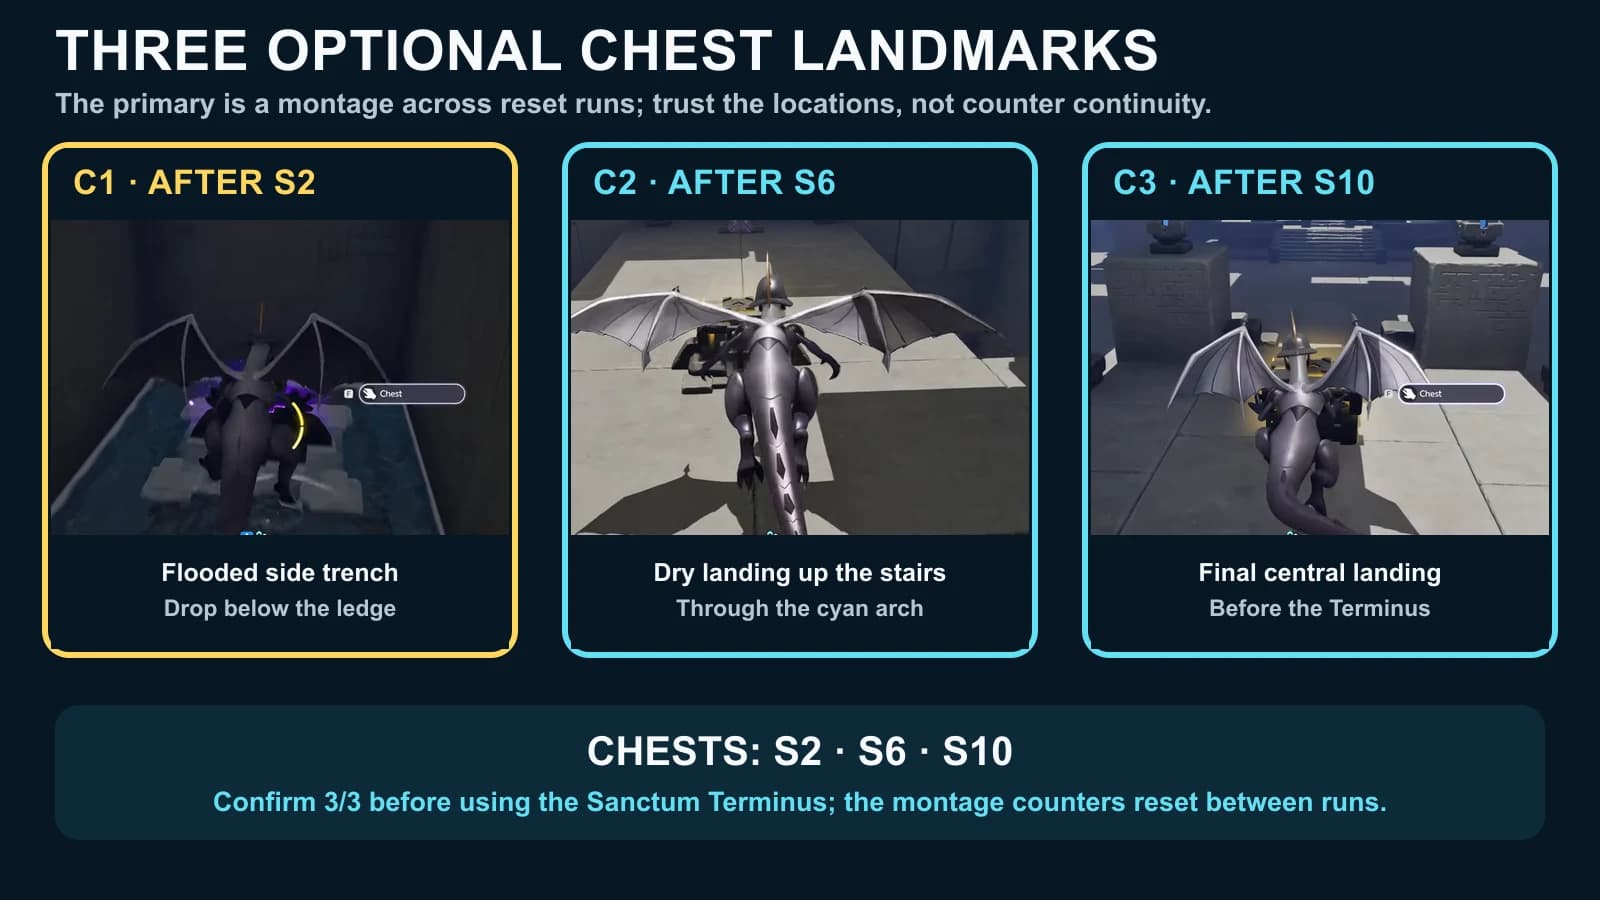
Three-chest checklist
| Chest | After | Exact landmark | Collect before |
|---|---|---|---|
| 1 | Sightline 2 | Flooded side trench below the lower ledge | Sightline 3 and the raft section |
| 2 | Sightline 6 | Dry landing through the cyan arch and up the short stairs | The vertical climb to sightline 7 |
| 3 | Sightline 10 | Final central landing beyond the last gate | The Sanctum Terminus |
Troubleshooting the route
| Problem | Check | Correction |
|---|---|---|
| The eye halves nearly meet | Normal-view landing and facing direction | Return to the named normal-view landmark, face the stated wall, then use smaller camera corrections in Bilateral. |
| The raft will not stay in the lane | Whether the context control says Drop or Throw | Drag it into position and choose Drop; Throw can send it past the intended crossing. |
| The water-column route seems inactive | Whether sightline 5 registered and its doorway opened | Enter the lane after S5. The columns run on their own, so there is no pad to activate. |
| The route stops after sightline 9 | Nearby Move Platform prompt | Use the separate geometry interaction, then solve the tenth eye gate. |
| The Sanctum Terminus is available at 2/3 | Chest landmarks after S2, S6 and S10 | Backtrack to the missed landmark before you finish the room. |
Finish the route and continue
After chest 3, verify 3/3, follow the opened route and interact with the Sanctum Terminus to restore the Vein and resolve the challenge. The entrance panel shows a first-clear item icon ×1 and EXP 200, and the Sanctum first-clear currency is Lumin Amber.
Frequently asked
Where is the Double Vision Sanctum?
Double Vision is a solo Sanctum in Russet Highlands. Open the exact Double Vision atlas pin; the marker sits at 2775, 423 on the AniimoVerse atlas.
Is Helgon’s perspective skill called Bilateral or Split-Sight?
Helgon’s skill data calls the action Bilateral. The in-room tutorial also says Split-Sight, which is alternate wording for the same perspective mechanic.
How do I move the raft in Double Vision?
Untwine, aim at the water-drop-marked raft and press Q when the HUD says Manipulate. Follow the context prompts to Drag it into the crossing lane and Drop it. Do not Throw it, and do not try to freeze it.
Where are all three Double Vision chests?
Chest 1 is in the flooded side trench after sightline 2, chest 2 is on the dry landing after sightline 6, and chest 3 is on the final landing after sightline 10. Confirm 3/3 before using the Sanctum Terminus.