

Exact atlas location
Use the Chest (Lv 16-30) pin at atlas coordinate 1019, 2085. That marker resolves in The Argent Strait / Bay, and centering it is the fastest way to land on the right ruin.
| Check | Value |
|---|---|
| Atlas marker | Chest (Lv 16-30) |
| Atlas coordinate | 1019, 2085 |
| Area | The Argent Strait / Bay |
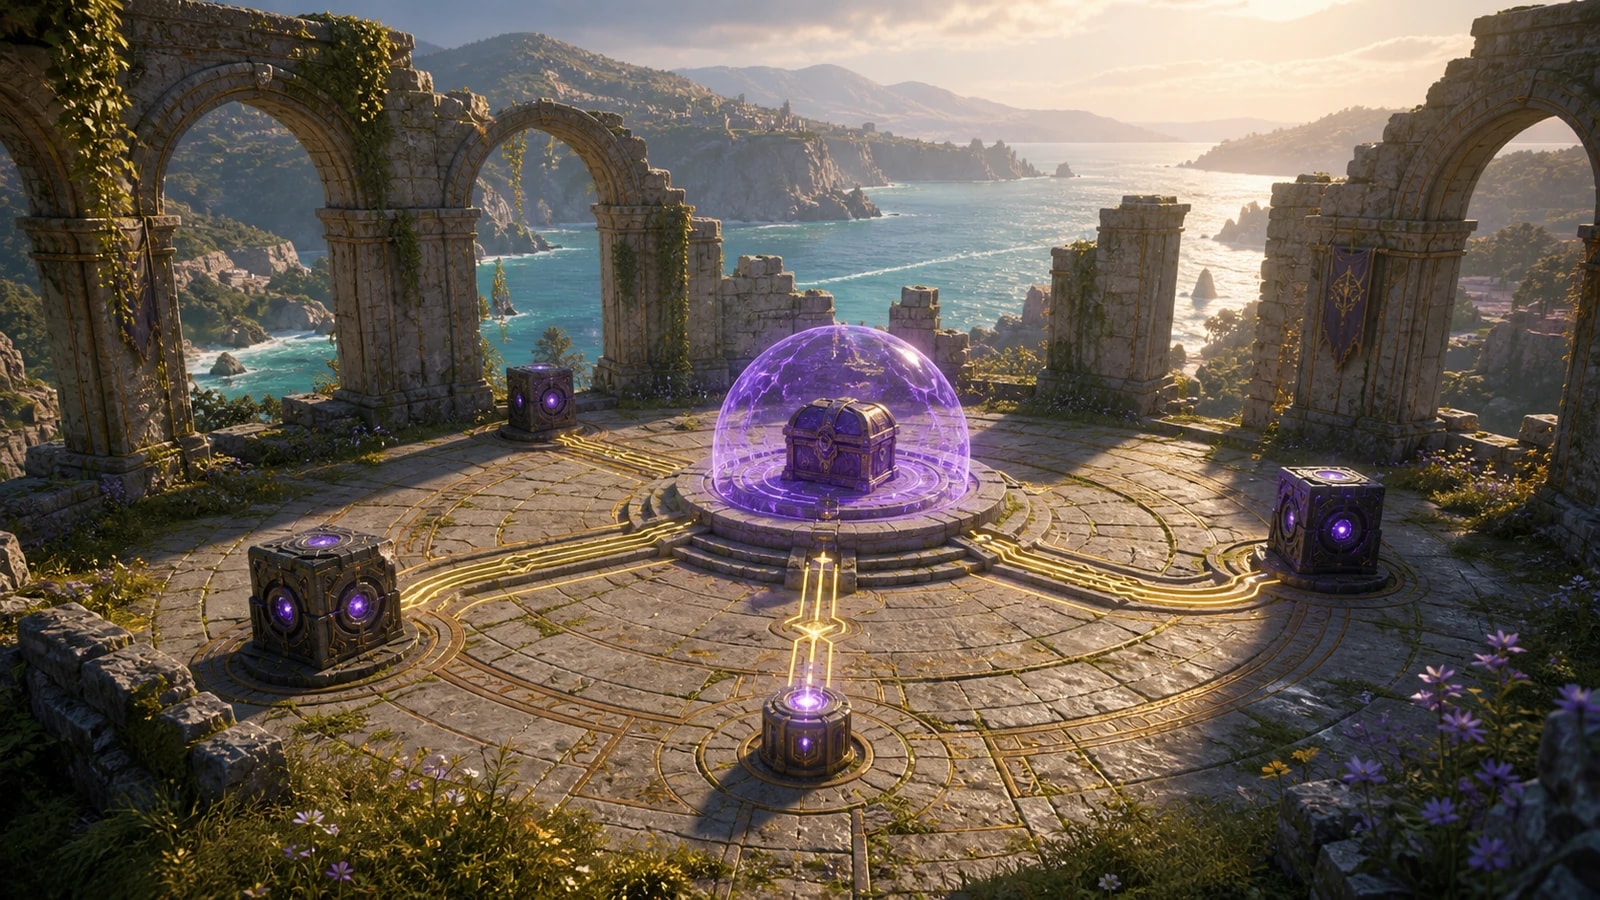
| Approach landmark | A roofless ring of pale arches above the coast, with an Elemental switch tangled in dark brambles outside the platform. |
| Chest landmark | A raised central dais covered by a violet dome while the lower floor circuit is incomplete. |
- Open the exact pin. Center the level 16-30 chest marker before leaving the atlas; the explicit coordinate prevents another marker with the same label from being selected.
- Approach from the coastal side. Look for broken pale arches, an open circular floor and the bramble-covered switch just outside the ruin.
- Confirm the correct chest. It should stand on the raised center platform inside a visible violet dome, with purple fixed circuit lines and movable ancient components around the lower ring.
The components you will move
Elemental switch
One exterior switch under dark brambles; its core and outgoing fixed line glow gold once exposed through a Fire interaction.
Burn the brambles first. Nothing on the lower floor powers up while that core is dark.
Power node
A labeled cylinder that seats in an inner socket. A second labeled Power node sits loose outside the low wall.
Center a node over its socket and use Drop. Judge it by the socket ring and its floor line turning gold, never by how many nodes you can count.
Ancient Iron Crate
Maze-faced crates around the lower ring. The clear uses two accepted crate placements: one beside the seated node and one on the line break beside the large terminal. Spare ordinary crates remain visible.
Bridge a broken fixed segment with a crate. An accepted crate turns dark and its line turns gold; the spares are not part of the solution.
Shielded chest
A raised central chest inside a violet dome.
Leave it alone until the fixed circuit is gold and the dome is gone. There is nothing to interact with before that.
The Pathfinder skill is Gravity Pull. Its prompts read Manipulate before selection, Drag and Stop dragging while pulling a crate, and Drop or Throw while holding a component. Use Drop at sockets and at fixed line breaks. Keep Throw out of this puzzle: it is the one action that can send a component somewhere you cannot follow it.
Route from switch to chest
- 1Open the exact atlas pin
Travel to the Chest (Lv 16-30) marker at 1019, 2085 and confirm the raised chest, violet dome, broken arches and bramble-covered exterior switch.
- 2Burn the exterior brambles
Use a Fire field interaction on the dark brambles around the short pillar. Continue only when the Elemental switch core and its outgoing fixed line hold a gold glow.
- 3Seat the inner Power node
Center the labeled cylinder over the small socket and choose Drop. The reliable checkpoint is the fixed socket ring and connected floor line turning gold while the node remains upright.
- 4Bridge the adjacent break with the nearby crate
Use Manipulate and Drag on one nearby maze-faced Ancient Iron Crate, then use Drop on the broken circuit segment beside the seated node. The accepted crate becomes dark and its fixed line turns gold.
- 5Bring one outer crate to the terminal-side break
The outer broken-wall spur holds a spare labeled Power node and several ordinary crates. Bring one ordinary crate back to the remaining line break beside the large circular terminal. Stop when that crate is dark and the connected fixed rails hold gold.
- 6Confirm the shield-drop state
Trace the fixed rails toward the large circular terminal. Continue only when the required rails and socket rings hold a steady gold/yellow glow and the violet dome over the chest has visibly disappeared.
- 7Fly to the center and open the chest
Twine with Celestis: use Rise to clear the dais lip, then Exit flight over the center platform and open the now-unshielded chest.


Off/on states and recovery
- Read on fixed scenery
- A fixed floor rail or socket ring remains violet/purple. At least one required connection is still missing.
Off or incomplete
- Read on the object in hand
- The object is pale gold or surrounded by a blue Gravity Pull aura. The object is moving; its placement has not necessarily been accepted.
Selected or held
- Read on fixed scenery
- The fixed rail, socket ring or large terminal rim holds a gold/yellow glow. That visible circuit segment is carrying power.
On or accepted
- Read on fixed scenery
- The required fixed route is gold and the chest’s violet dome is absent. The shield has dropped and the center platform can be entered.
Puzzle complete
The finished reading
Chest ascent, reward and nearby routes
The ascent uses Celestis and its Fly Lv.1 mobility. Nimbi carries the same Fly Lv.1 tier if Celestis is not in your party. For Twine entry, Rise and Exit basics, use Twining and field movement.

The chest pays Glimmer ×20. It sits in the level 16–30 band on the atlas, so run the ruin for the puzzle and the coastal route rather than for the payout.

Frequently asked
Where is the Argent Strait Ancient Ruin Shielded Chest?
It is at the southwest coastal ruin in The Argent Strait / Bay. Open the exact Chest (Lv 16-30) atlas pin at 1019, 2085 so you land on the right ruin, since other markers carry the same label.
How many crates and Power nodes does this puzzle use?
Two Ancient Iron Crate placements and one seated Power node. Spare crates and a second loose labeled Power node sit around the ring, so counting objects will mislead you. Follow the fixed gold-line and absent-dome cues instead.
Do I need Celestis to reach the chest?
This route uses Celestis and Fly Lv.1. Nimbi carries the same mobility tier. Wait until the violet shield is gone before using Rise and Exit over the center dais.
What reward does the Shielded chest give?
Glimmer ×20. That is a modest payout for a level 16–30 chest, so treat the ruin as a puzzle worth clearing on the coastal route rather than a farming stop.