



Location and party requirements
Open the exact Courageous Wit atlas pin in Zephyrus Landbridge. The marker sits at 3208, 441 on the AniimoVerse atlas.
Preparation, recommended roles and shorthand
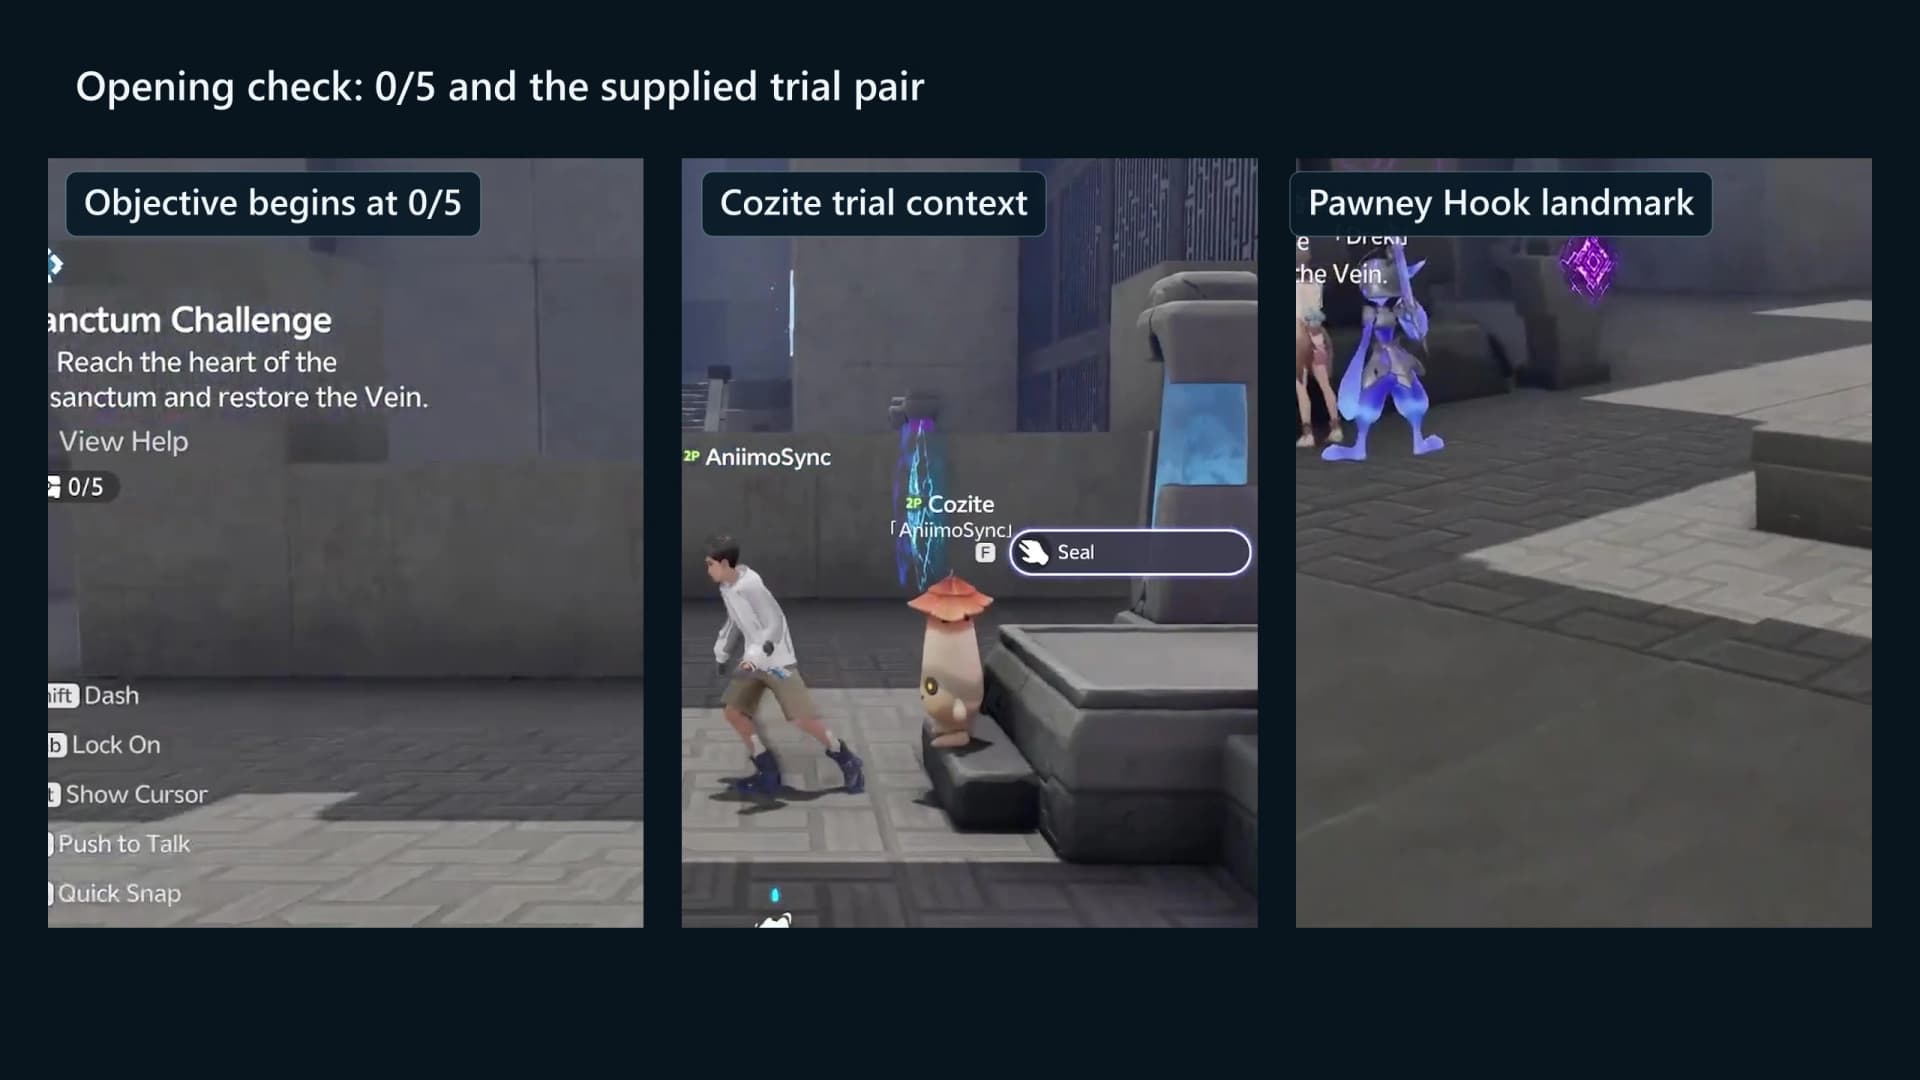
No owned puzzle Aniimo is required. Cozite holds its skill button to aim and throw a mudball along a parabolic arc, and those mudballs strike Targeting Slabs, which roll turning walls, a hanging flame cube and whole rotating floor sections a quarter turn each. Pawney aims its Grappling Hook at a Grappling Hook Anchor Point and vaults on reaching the landing. Review party setup and Twine and Untwine controls before entering.
| Callout role | Trial form | Job | Notes |
|---|---|---|---|
| Player A · runner | Usually Pawney where an Anchor Point is visible | Cross only after the current hazard state changes and report the next plain-stone landing. | Either player can take the Pawney statue, but whoever does is A for the whole run: the west wing has no target to strike. |
| Player B · target operator | Cozite for the target strike | Aim a mudball at the current purple target, check the linked state change and avoid striking a different target during the crossing. | B owns every Targeting Slab in the room. The east wing has no anchor point, so B clears it alone while A works the west. |
| Call | Meaning | Next action |
|---|---|---|
| Set | B struck the current target and the linked hazard or component visibly changed. | The assigned crossing player checks the lane, then moves; that player may be B. |
| Moving | The assigned player is inside the active crossing. | Nobody strikes a different target until the crossing player reports safe. |
| Safe | The crossing player reached the next plain-stone landing outside the visible hazard sweep. | Both players reassess the next target, route and chest branch. |
Route, step by step
The opening is a locked split: the west wing carries five Grapple Anchor Points and no target at all, the east wing carries two Targeting Slabs and no anchor, so Player A (Pawney) has to take the west chest and Player B (Cozite) the east one. The two branches run in parallel, and from the first paired gate onward you travel together. Three large doors in the room answer only a paired Stela pedestal, one in the opening hall and one before each of the last two halls.
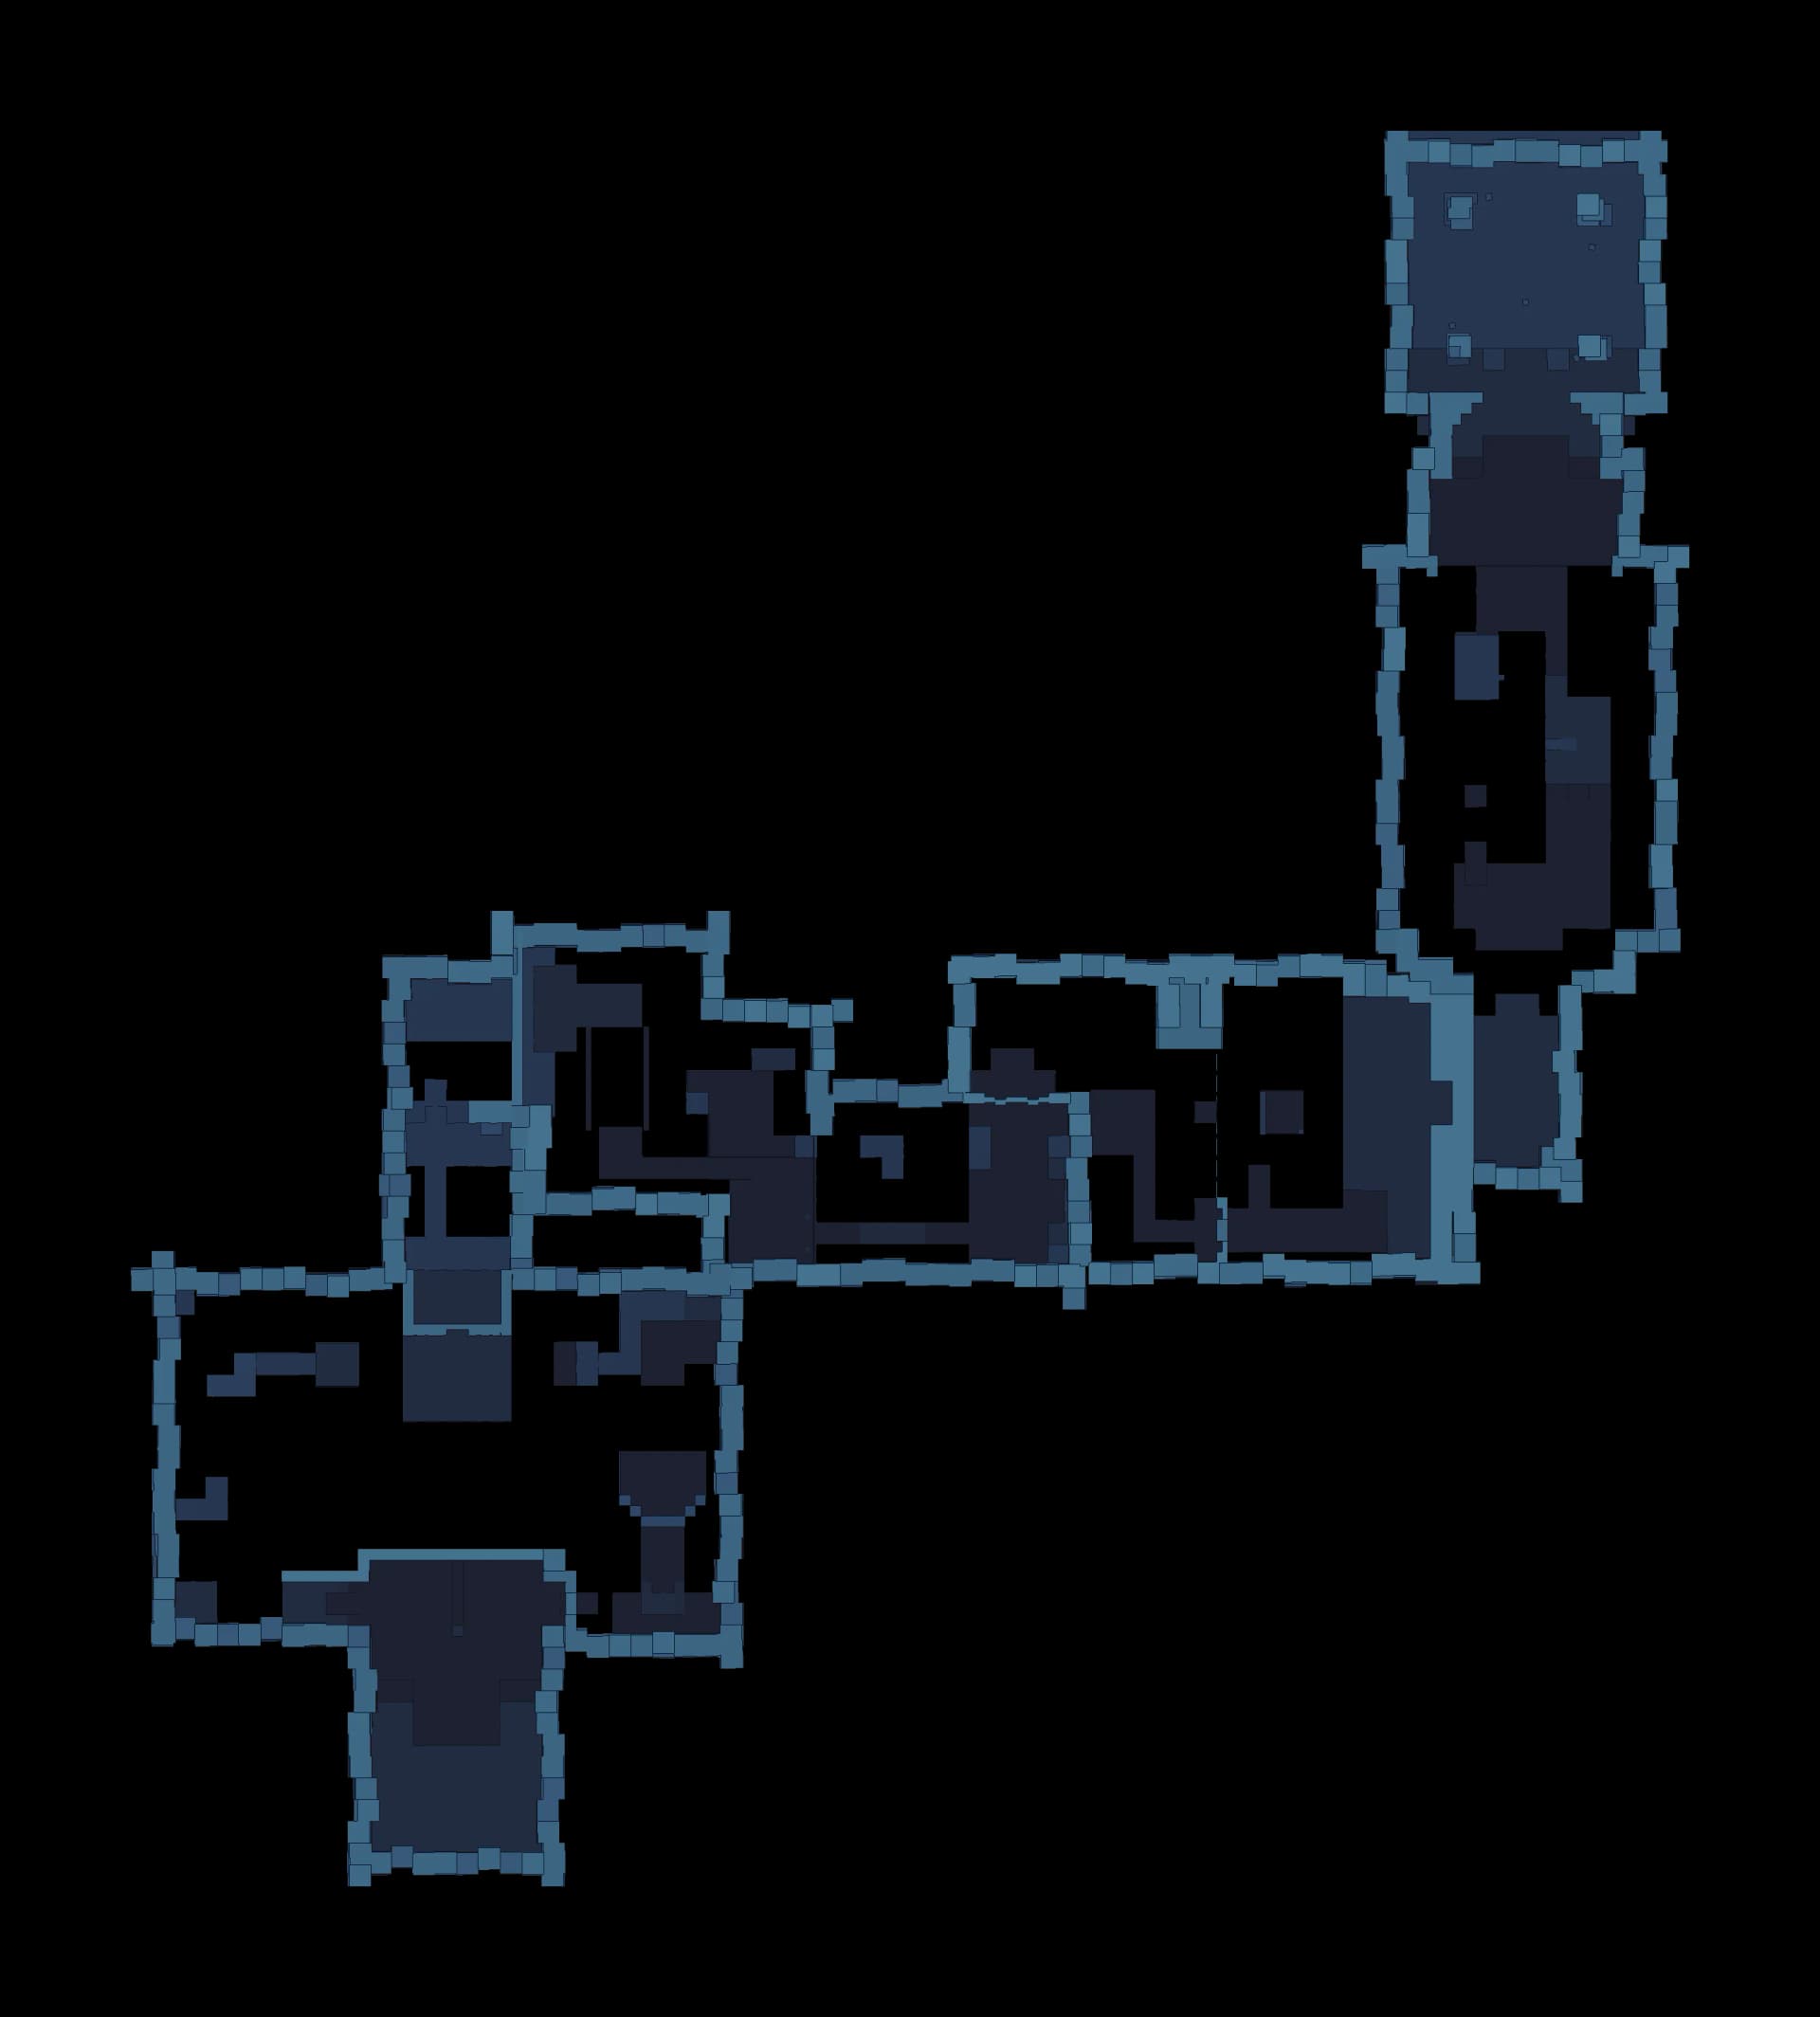 TTXCCCC13245CCCCACCCCCCCCCCC
- Entrance
- Checkpoint
- Trial statue
- Terminus
- Chest
- Control
- Mechanism
- Element device
- Hazard
- 1Land on the Sanctum entrance padRoom 0
Both Pathfinders arrive on the entrance pad at the south end of the hall. The counter reads 0/5 and this pad is the only respawn the room starts with, so nothing ahead is reachable alone.
- 2Twine with both trial statuesRoom 1
Two stone statues stand side by side across the hall. Player A takes Pawney from the west statue for the Grappling Hook, and Player B takes Cozite from the east statue for the arcing mudball.
- 3Player A opens the west grapple wingRoom 1
Player A (Pawney) turns west into the teaching alcove and picks up the Hookshot card. Crossing the mouth of the wing lights the west checkpoint, and the first Grappling Hook Anchor Points carry Player A out over the void toward the raised ledge.
- 4Player A clears the fire bank and takes the west chestOptionalChest 1Room 1
A one-shot switch waits on the ledge and a six-jet fire bank walls off the shelf beyond it. Player A (Pawney) throws the switch, then grapples along the last anchors to the Basic chest on the far shelf, which moves the counter to 1/5.
- 5Player B opens the east wing and the turning wallOptionalChest 2Room 1
Player B (Cozite) turns east, picks up the mudball card and lights the east checkpoint. One mudball at the Targeting Slab above the small mechanism door swings it open, and a second strike on the long-range slab beyond rolls the turning wall a quarter turn. The Basic chest riding on that wall comes round within reach and takes the counter to 2/5.
- 6Ride the fans back to the central columnRoom 1
Three fans line the gap west of the east wing and push Player B back toward the middle. Player A (Pawney) returns on the anchor above the same column, and the shared checkpoint lights as the two of you meet.
- 7Open the first paired gateRoom 1
The large mechanism door on the central axis answers only a paired interaction. Both players stand at the two-player pedestal in front of it and use it together; the door rolls back and no same-frame timing is needed.
- 8Start the shaft and turn the tall wallRoom 2
A save point stands just inside the shaft, and a three-jet bank fires east across the first anchor, so take the hook between bursts. The tall wall above carries an anchor point and a one-shot switch on faces you cannot see yet, so Player B (Cozite) hits the long-range Targeting Slab below it and a quarter turn brings both faces into reach.
- 9Climb the six-jet column to the top doorRoom 2
A column of six jets stacks the full height of the east wall above the wall you just turned. Work up the last anchors between bursts, then Player B (Cozite) puts a mudball on the Targeting Slab that opens the small door at the top, with a save point waiting behind it.
- 10Cross the trap bridges between the spike wallsRoom 2
Two facing walls of spikes line a chasm, and a rank of trap bridges folds out from each side, staggered so no two are ever opposite. Cross one plank at a time and land on the anchor shelf beyond, because each bridge drops away once it is used.
- 11Weight the first pad and clear spike bay oneRoom 3
The first bay holds a block of retracting spikes with a weighted floor pad set just past it. One player stands on the pad and stays there while the other crosses, then you swap so both are through, and the checkpoint on the lip is the fallback if the bank catches you.
- 12Swing the flame cube out of the laneRoom 3
A cube hanging over the lane carries a three-jet fire bar on its underside. Player B (Cozite) strikes the long-range Targeting Slab beside it to roll the cube a quarter turn and lift the bar clear, then both players cross on the anchors and pick up the next checkpoint.
- 13Run the second and third spike banksRoom 3
The long bank ahead alternates between two halves, and a shorter bank sits behind it. Use the second weighted pad the same way, and take the anchor line along the north wall rather than the floor wherever the spikes are up.
- 14Take the gold chest in the wall recessOptionalChest 3Room 3
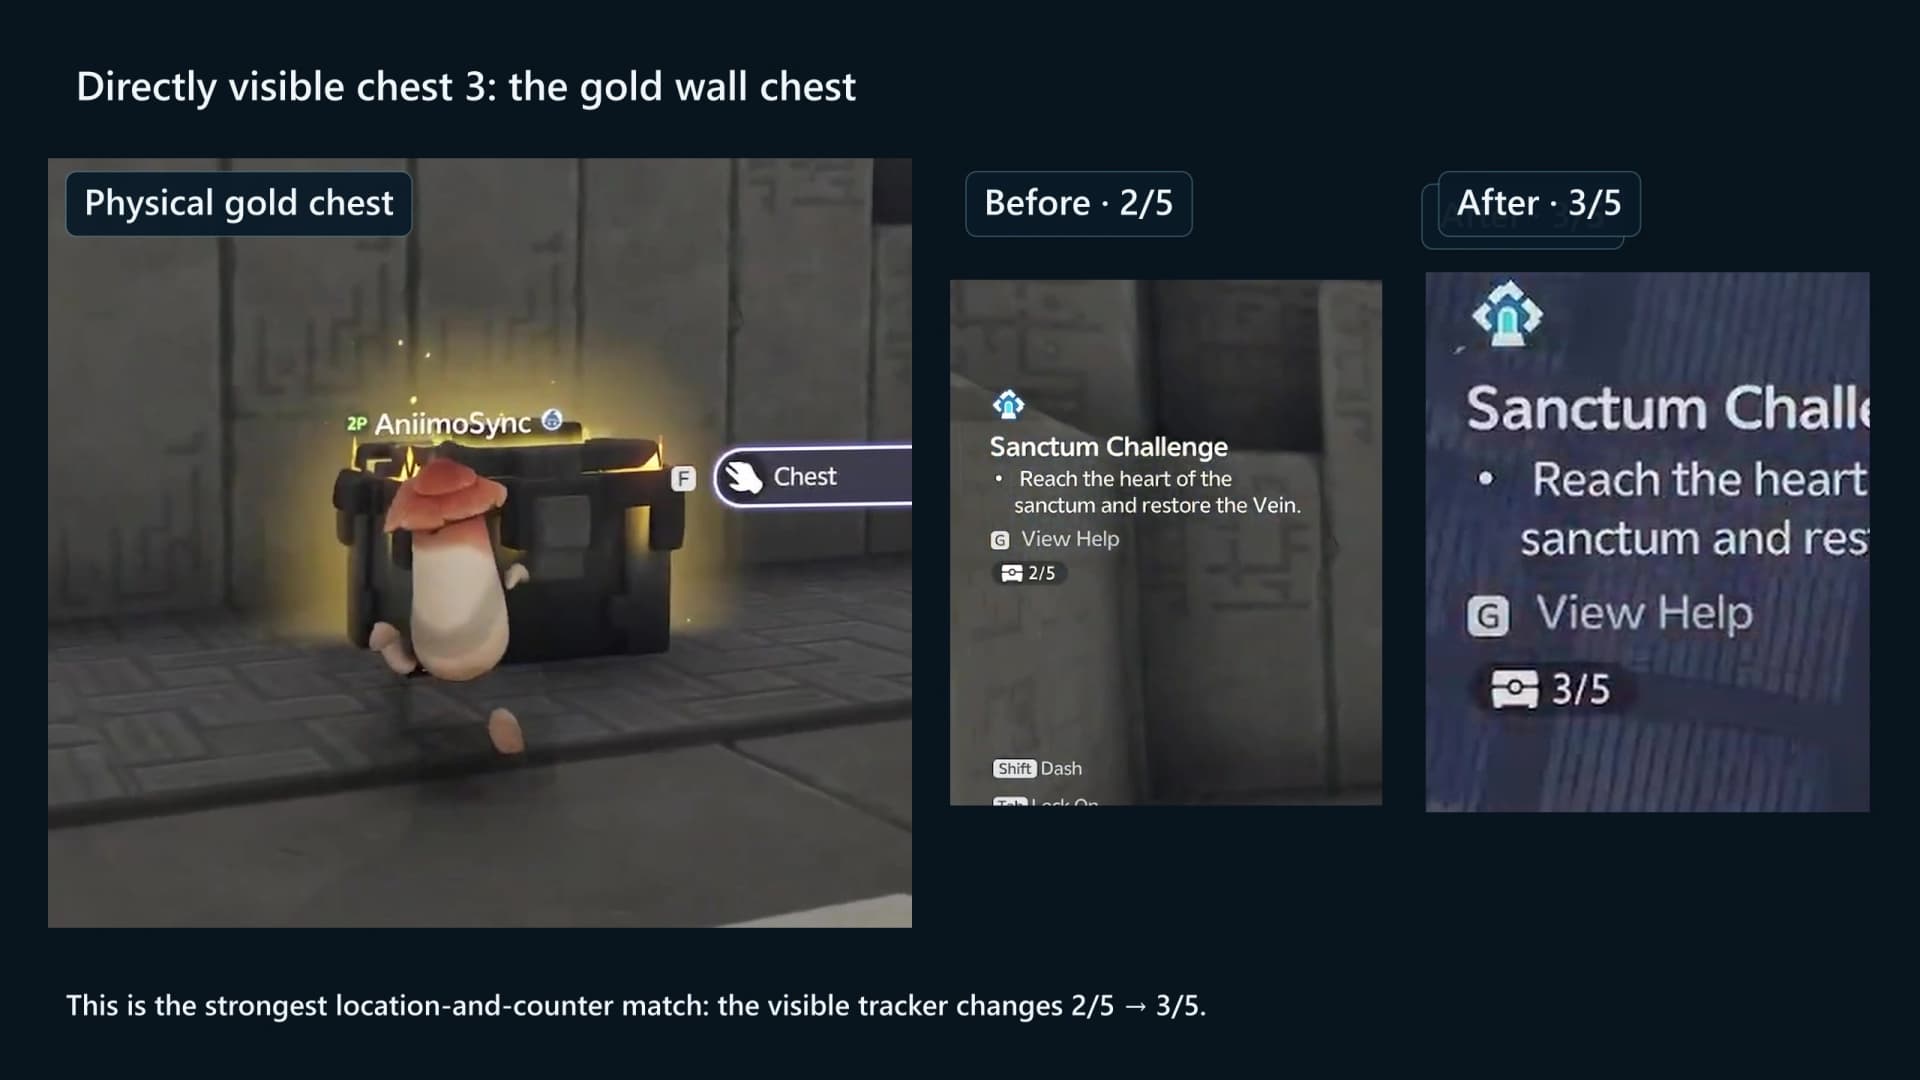
The checkpoint at the end of the spike halls sits beside a recess cut into the south wall. The Premium chest stands inside it and takes the counter to 3/5, so clear it before you head north.
- 15Open the north door with a mudballRoom 3
One more Targeting Slab hangs above the small mechanism door in the north wall. Player B (Cozite) opens it from the floor, and stepping through lights the checkpoint on the far side.
- 16Cross the moving tilesRoom 4
Two ranks of moving tiles span the hall, one drifting south and one drifting north, with a single tile in each rank per column. One player weights the pad in the south bay past the spike block while the other hops east along the ranks, then both regroup at the save point on the far ledge.
- 17Turn the rotating space at the gapRoom 4
The corridor breaks at a rotating section that starts turned the wrong way up. A long-range Targeting Slab below it rolls the section a quarter turn into a walkable floor, and the anchors on either side carry Player A (Pawney) across first.
- 18Kill the narrow fire bar and open the second paired gateRoom 4
A tall three-jet bar guards the narrows at the end of the corridor. Throw the one-shot switch on the shelf past it to shut the bar down and take the checkpoint, then both players use the two-player pedestal in front of the large door.
- 19Descend into the rotating-space hallRoom 5
Past the large door the floor falls away into a deep hall. Take the checkpoint at the lip, then follow the three anchors down the east wall to the save point on the ledge below.
- 20Turn the first rotating spaceRoom 5
The first of the two large rotating sections blocks the way north. Player B (Cozite) hits its long-range Targeting Slab from the east ledge and the whole section rolls a quarter turn into a floor you can walk.
- 21Turn the second rotating space for the Basic chestOptionalChest 4Room 5
The second section carries both remaining chests and an anchor point on its faces. One mudball on its Targeting Slab brings the lower Basic chest and the anchor round to the walkway, moving the counter to 4/5.
- 22Turn it again for the Standard chestOptionalChest 5Room 5
The Standard chest sits on a different face at a different height, so the section has to be turned once more before you can stand beside it. Take it now and confirm the counter reads 5/5, because the chest line closes the moment the Sanctum clears.
- 23Shut the last fire banks and open the final gateRoom 5
Two fire banks cover the last stretch, one across the walkway and one against the east wall. Throw the one-shot switch beside them, take the checkpoint, then both players use the final two-player pedestal to open the large door.
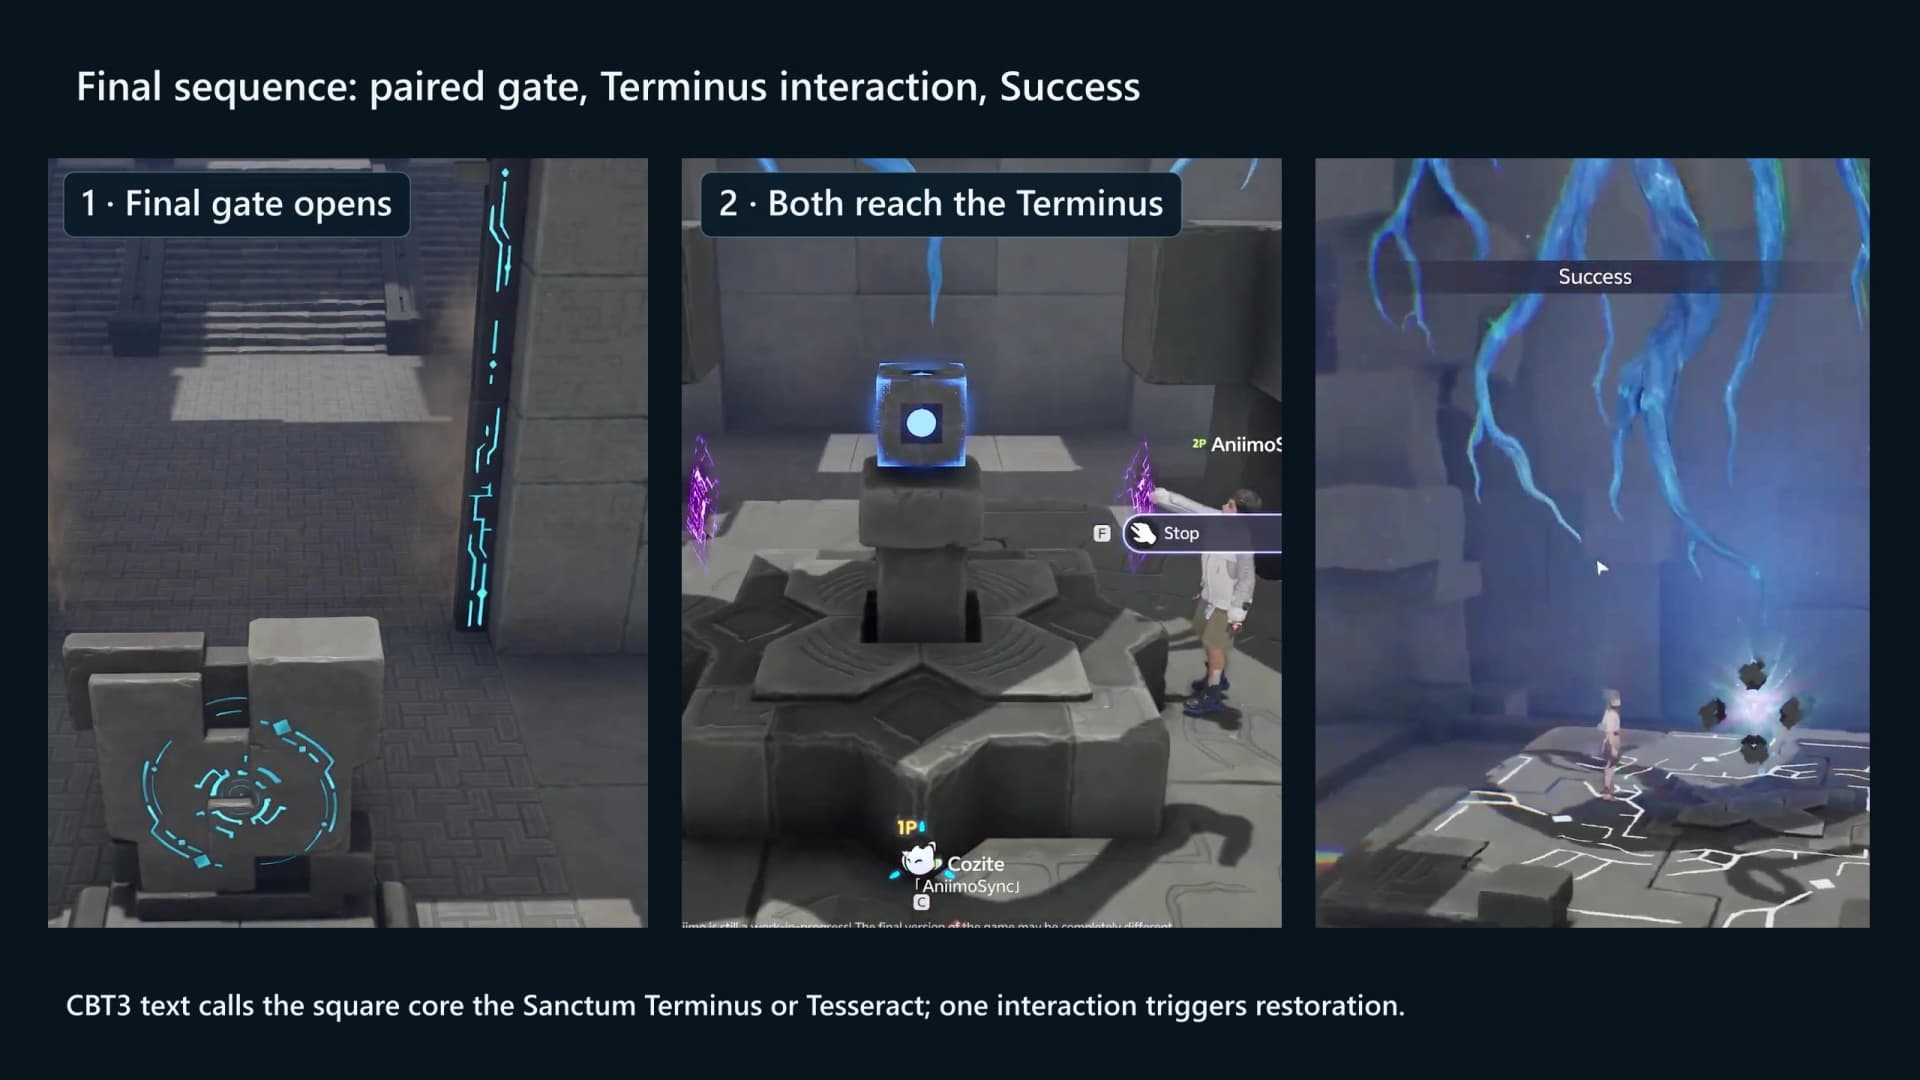
- 24Touch the Sanctum TerminusRoom 6
The last checkpoint lights just inside the final hall, and the square Terminus stands alone at the north end. Both players reach it together and one Touch sets it to its completion state, which clears the Sanctum and starts the Vein restoration.
Trap rooms and handoffs
Each room below is one target-and-crossing loop. Read the visible target, hazard state, landing and counter on your own screen before every call.
Room 1: opening split and two early blue chests
- 1Split by form, not by preference
The two wings are mirror images and each is locked to one trial. West is five Grapple Anchor Points with no target, so Player A (Pawney) takes it; east is two Targeting Slabs with no anchor, so Player B (Cozite) takes it. Run them at the same time.
- 2Watch the counter reach 2/5
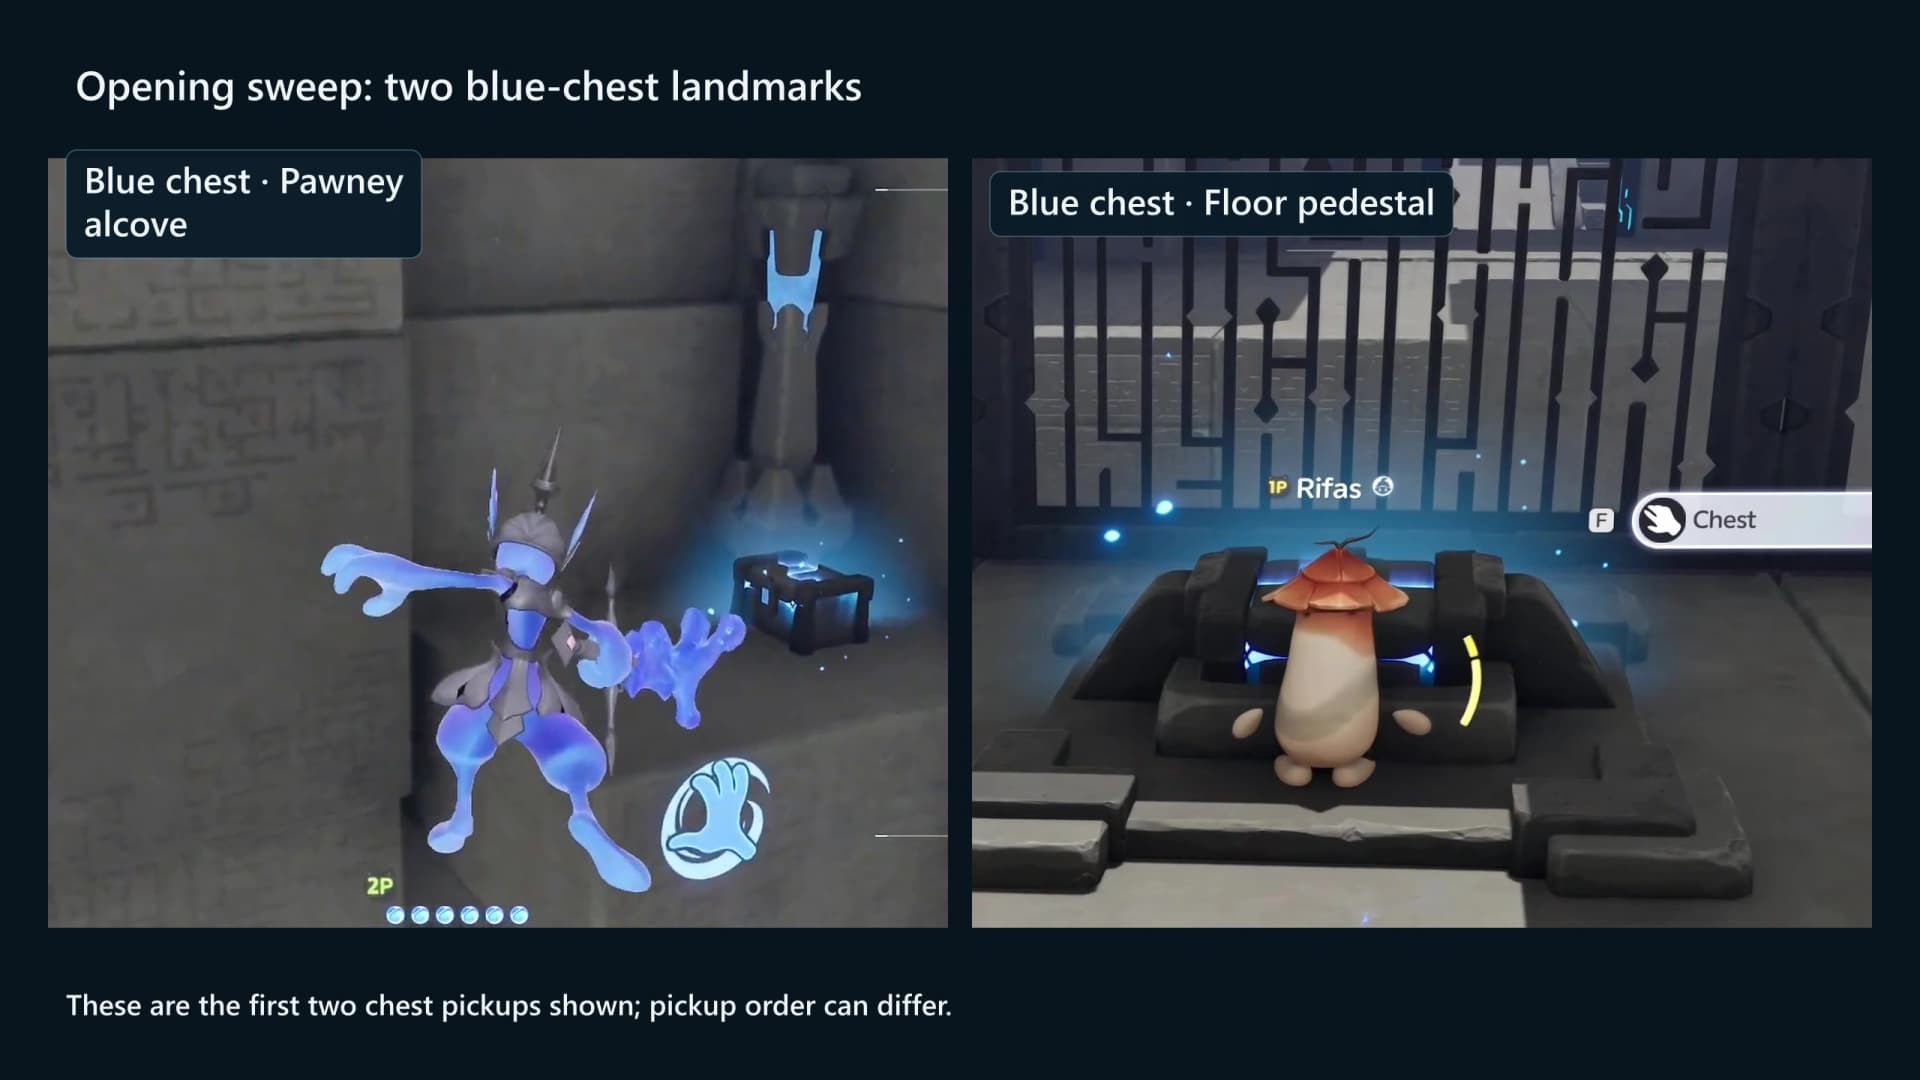
Each wing holds one Basic chest: Player A throws a one-shot switch to drop a six-jet fire bank and grapples to the far shelf, and Player B rolls a turning wall a quarter turn to bring its chest round. The two pickups carry the tracker from 0/5 to 2/5.
- 3Regroup at the first paired gate
Three fans push Player B back to the central column while Player A returns on the anchor above it. Confirm 2/5, then use the two-player Stela pedestal together; this first large door is a paired gate the older route notes never mentioned.
Room 2: target toggles and horizontal fire banks
- 1B strikes the current target
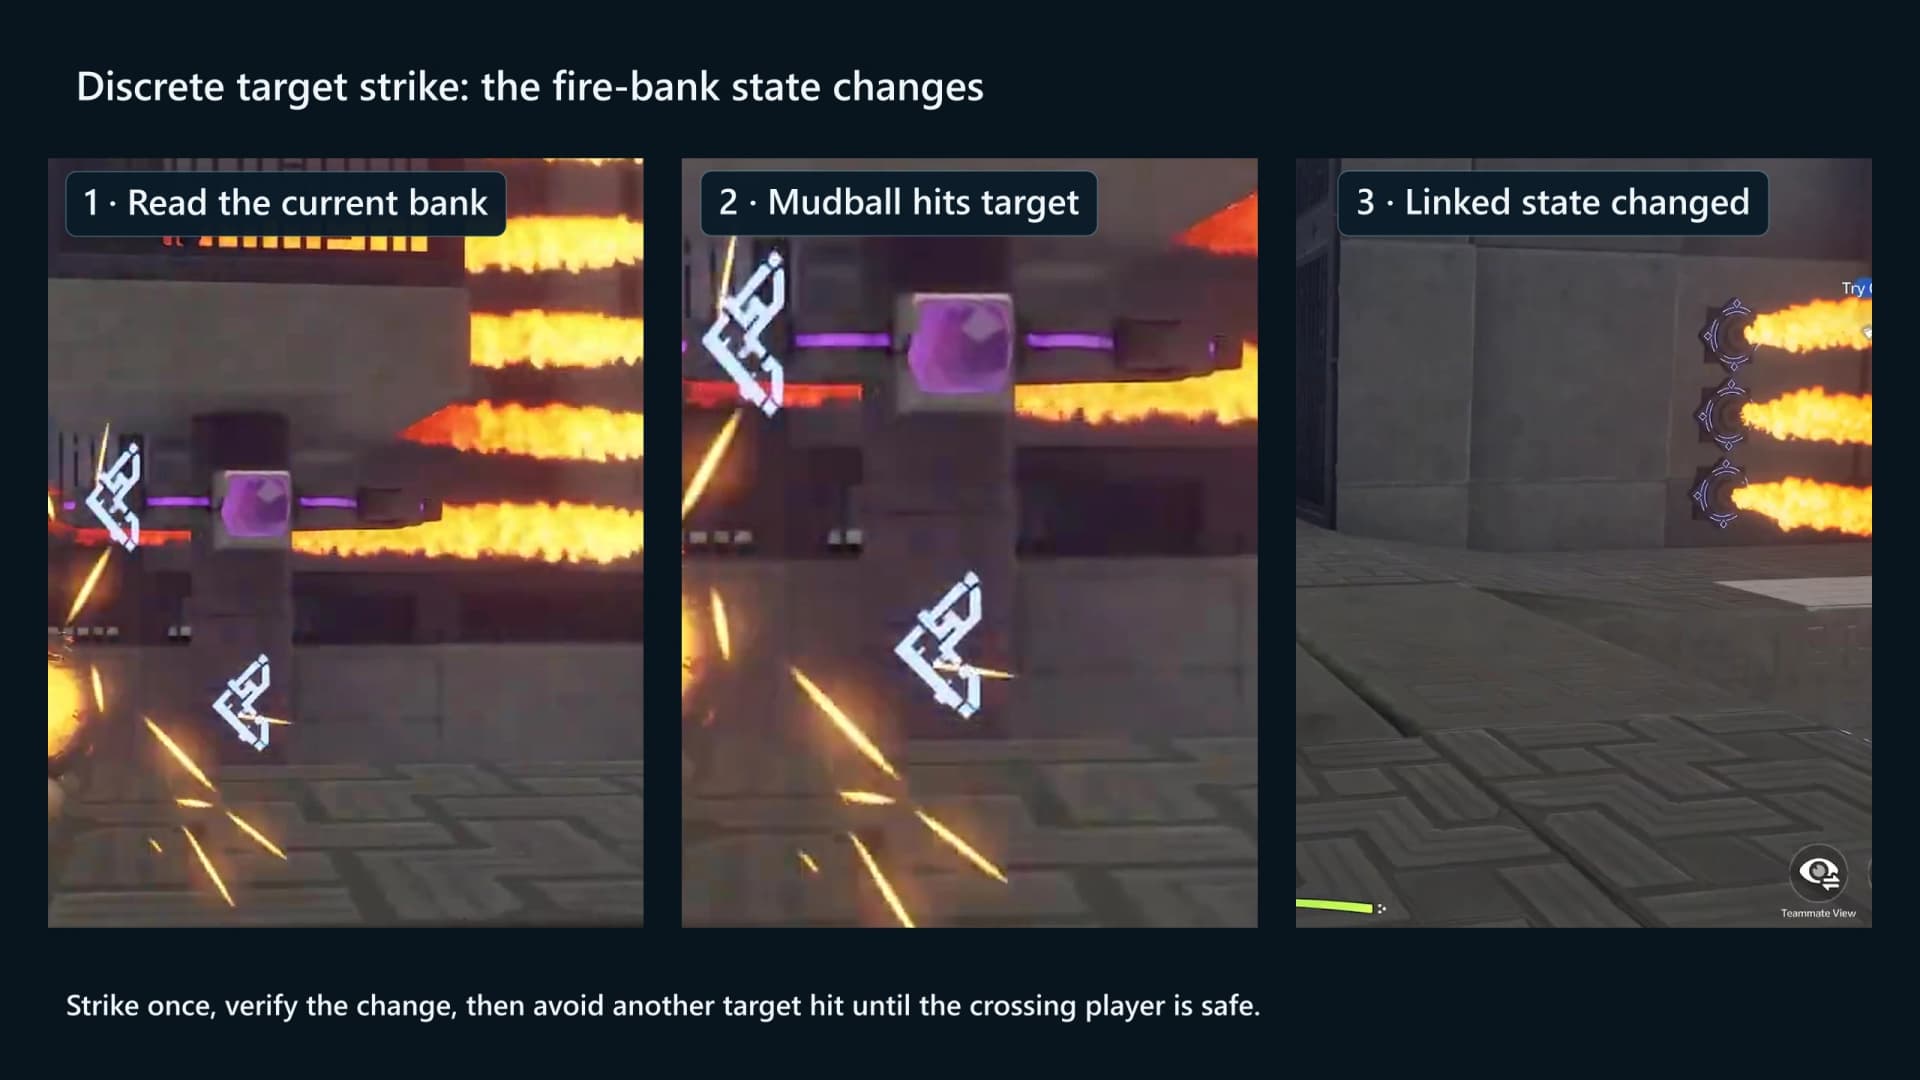
Aim Cozite’s mudball at the purple target associated with the current bank and wait for the flame pattern or route state to visibly change before saying set.
- 2The assigned player crosses the visible open line
The target operator may take this crossing after the hit. Use Pawney only where the room exposes an Anchor Point, then stop on the next plain-stone landing outside the flame row.
- 3B waits for safe before retargeting
Do not strike another target during the crossing. The first target holds its own state; the rule protects the player in the lane, not the toggle.
Room 3: autonomous spike sweepers
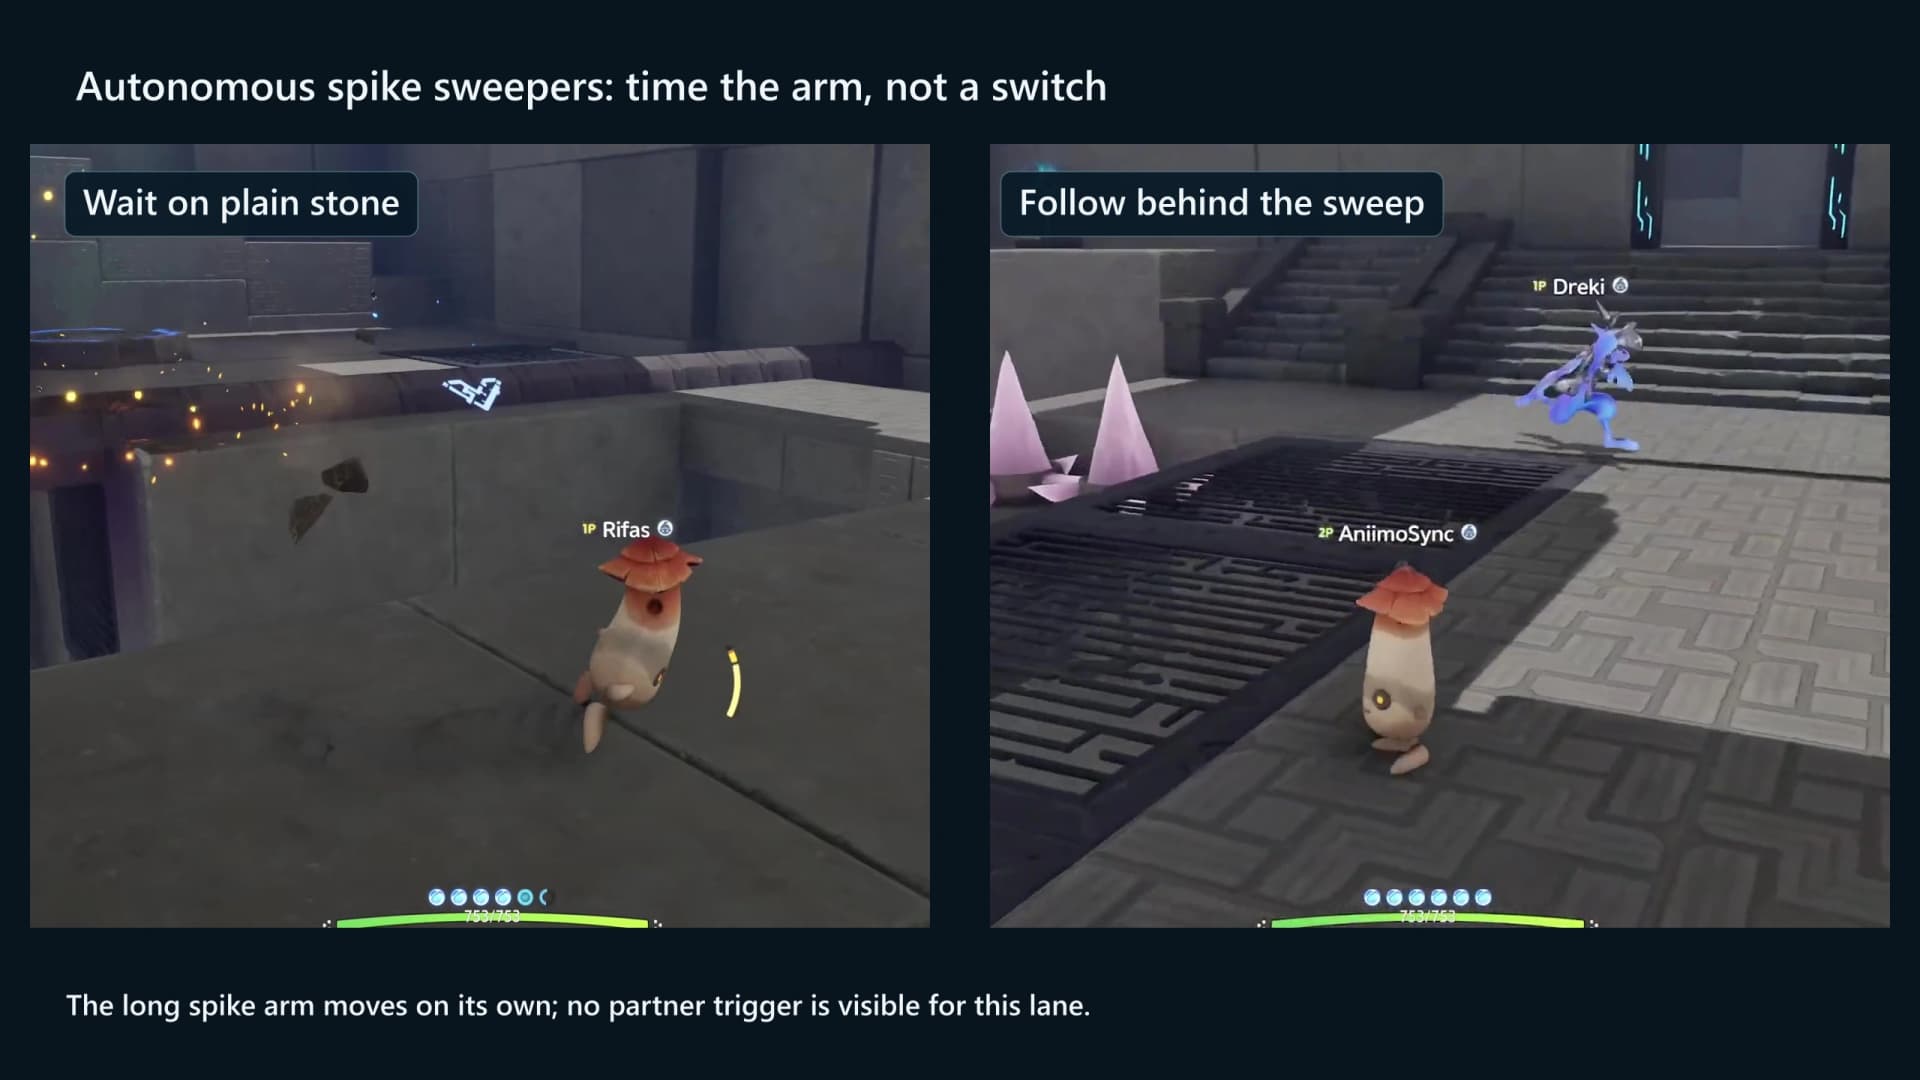
The long spike arms sweep on their own. Watch one complete pass, move behind it and stop on the next plain-stone island. Dark sockets and the arm’s arc are hazards; a surface is not safe merely because it is pale or patterned.
Room 4: overhead targets, mixed hazards and the gold chest
- 1Read one target and one lane at a time
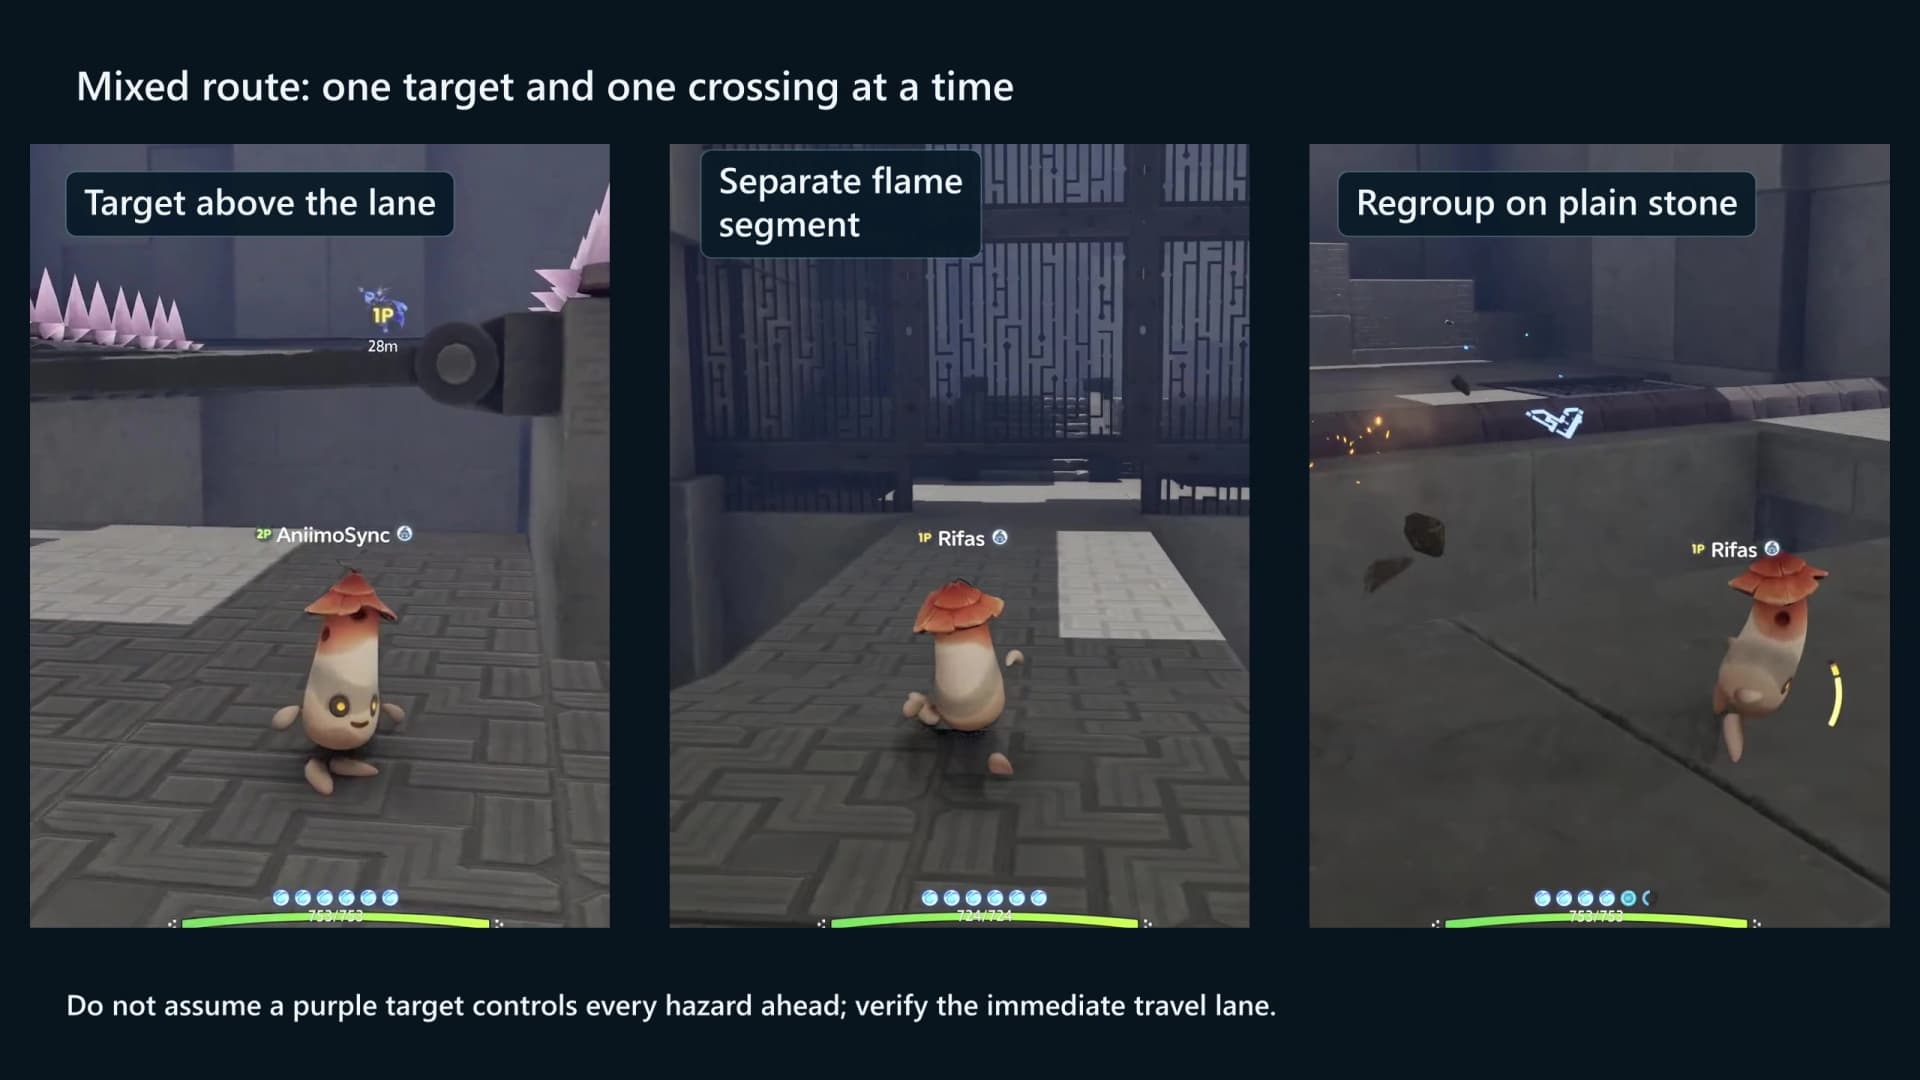
B hits the target linked to the immediate fire or moving-component state. A checks the resulting open path; one purple target does not control the whole room.
- 2Use the visible landings
Cross the flame and spike segments separately. Regroup on plain stone beyond the active sweep before either player changes another target state.
- 3Take the gold chest against the wall
Before the paired phase gate, open the directly visible gold chest. The tracker changes from 2/5 to 3/5 here.
Room 5: post-chest relay, paired phase gate and purple components
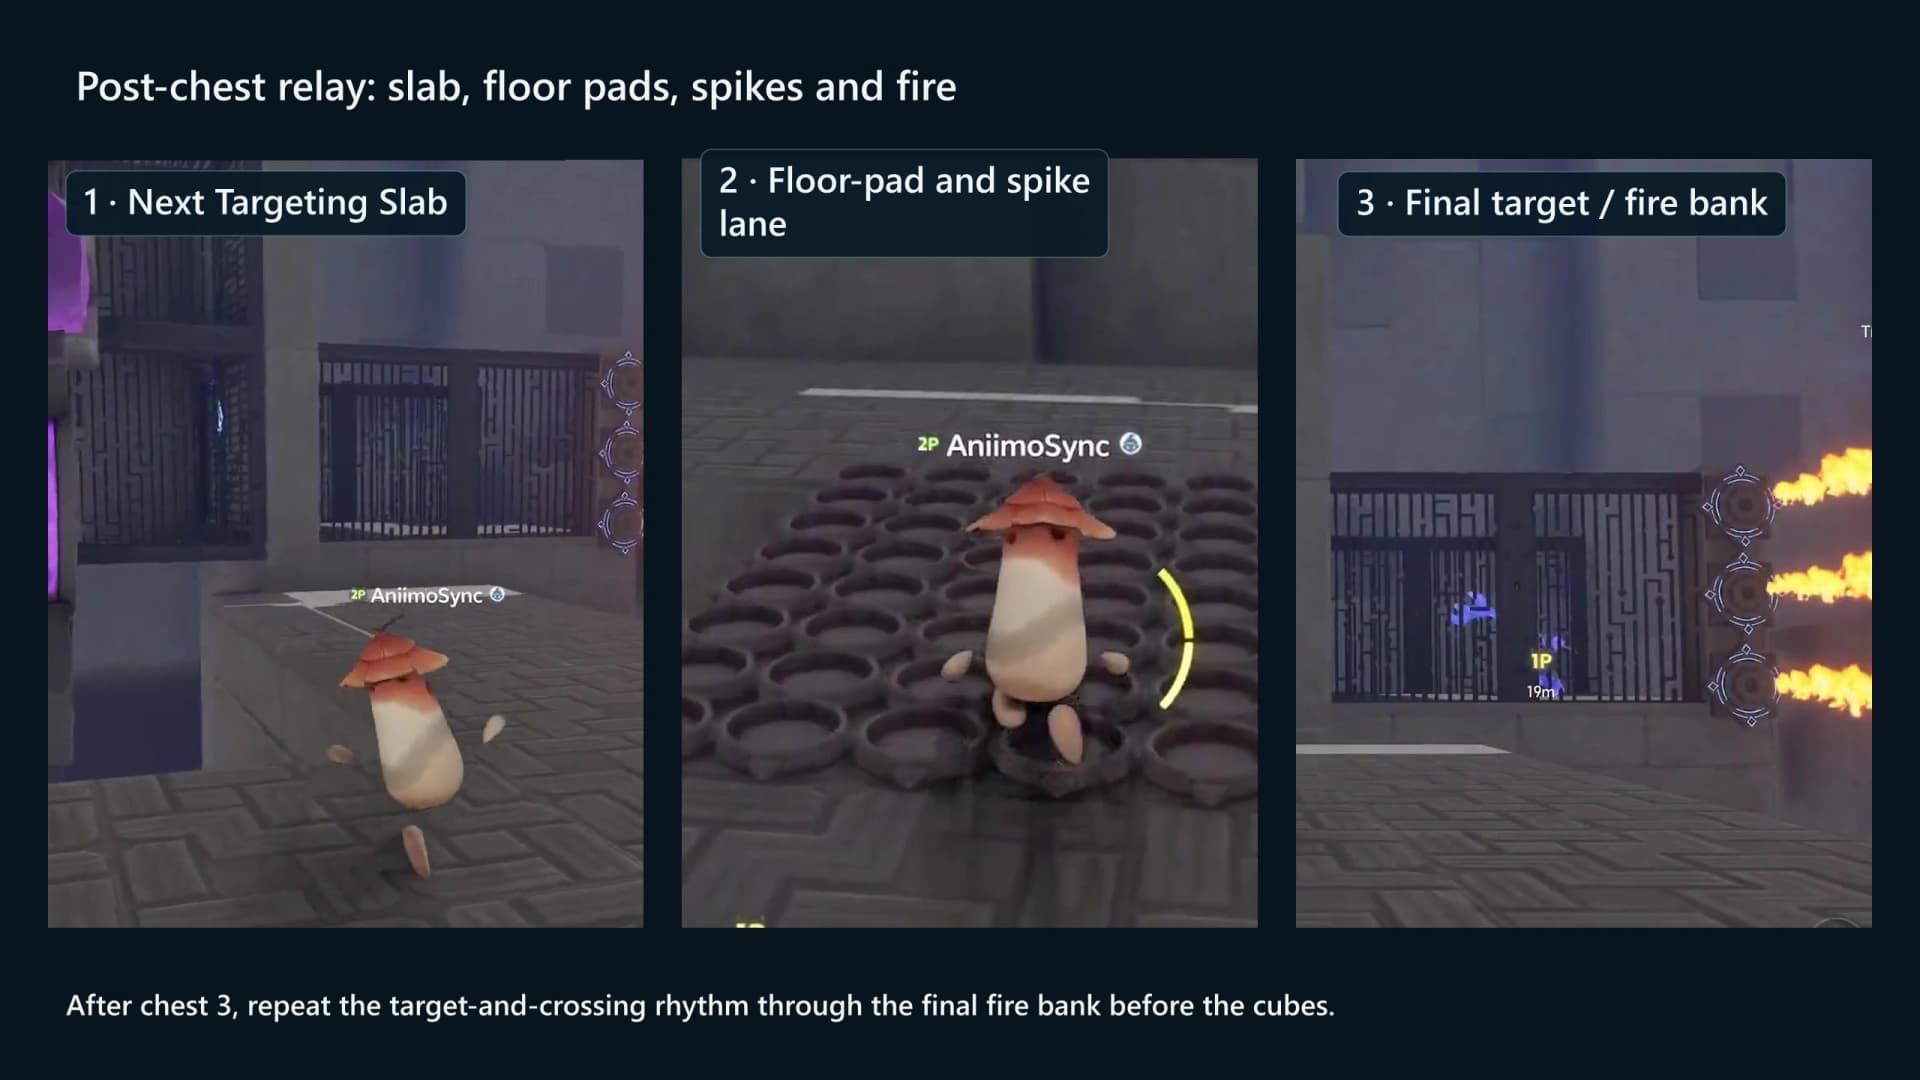
- 1Clear the post-chest Targeting Slab and the tile crossing
Most of the weighted-pad work comes before the gold chest, in the spike halls. After it, Player B opens the small north door with one more Targeting Slab, and the pad in the moving-tile hall is the last of the three: one player weights it while the other hops the two drifting ranks.
- 2Turn the corridor floor and kill the narrow fire bar
A rotating section starts turned the wrong way up and becomes a walkable floor after one mudball. Past it a tall three-jet bar guards the narrows; a one-shot switch on the shelf beyond shuts it down.
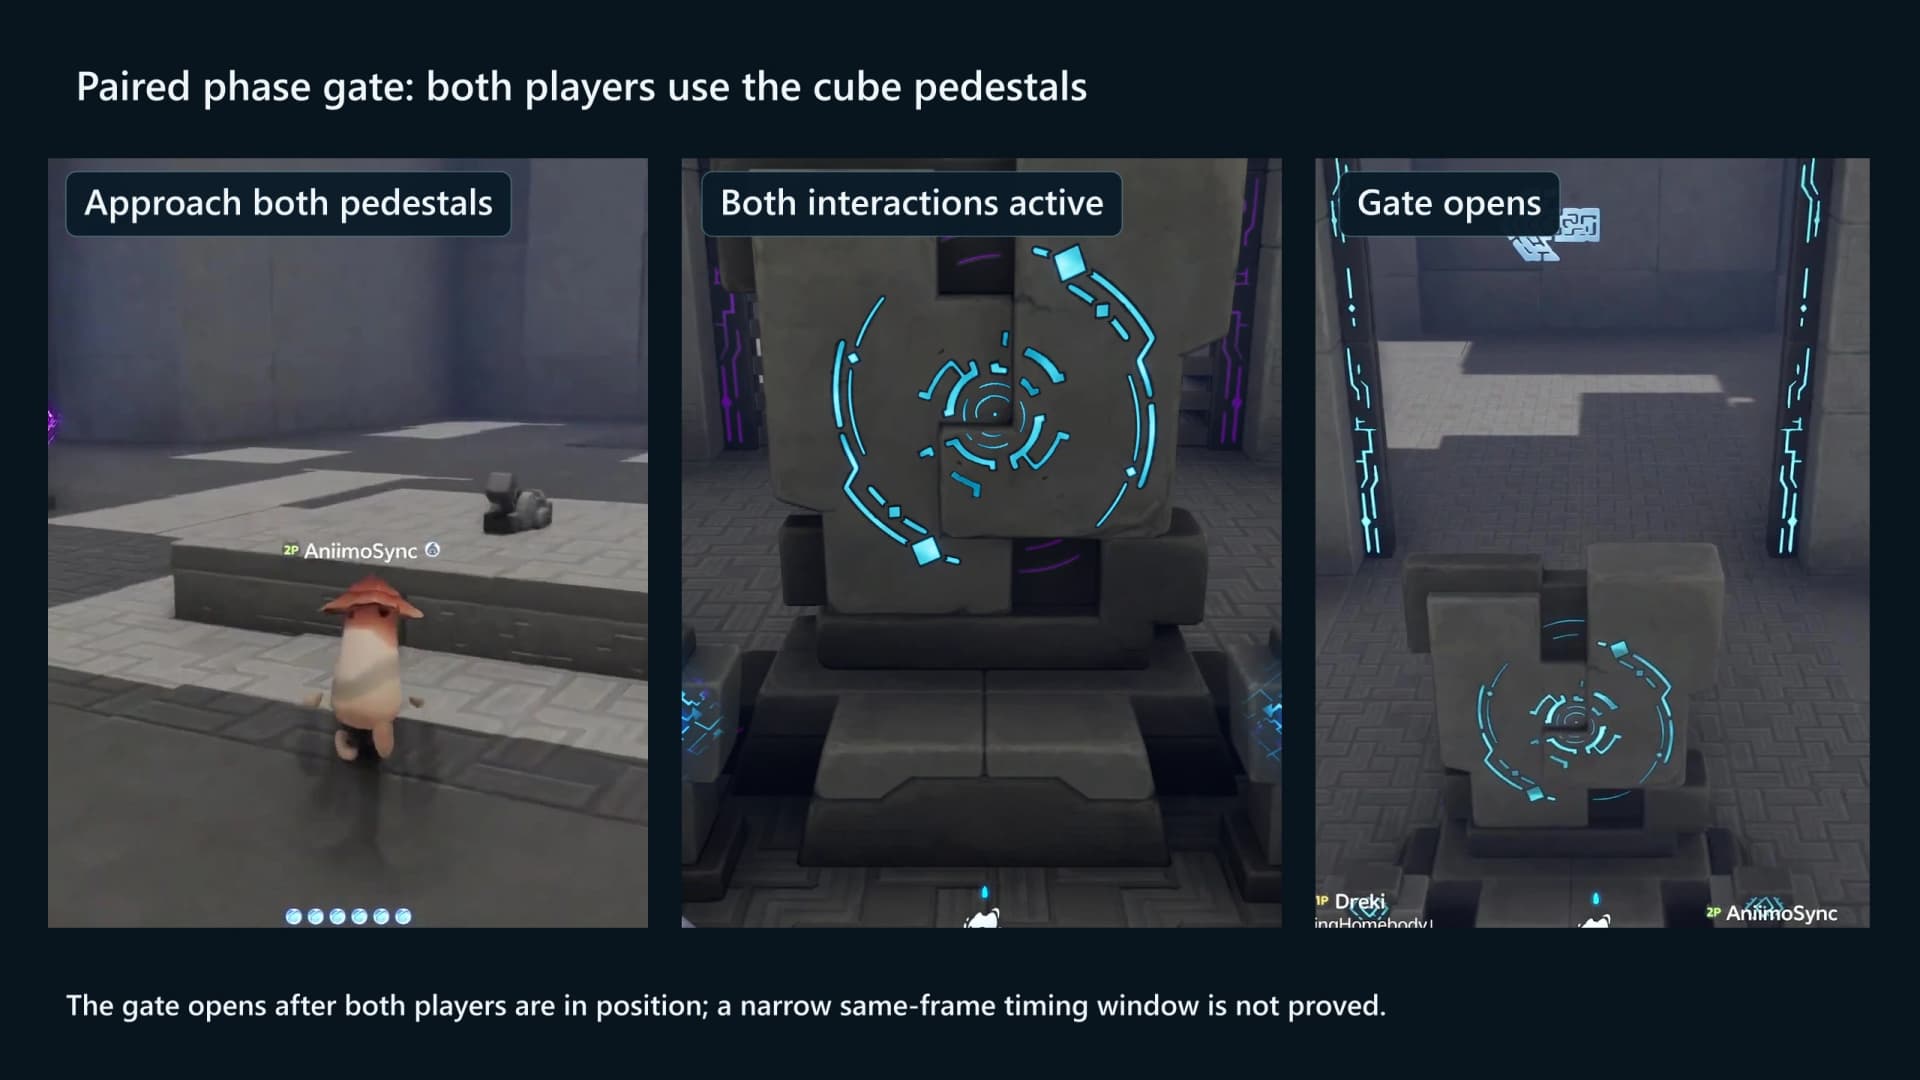
- 3Regroup at the second paired Stela
Both players use the two visible pedestals. The door opens on the paired state; calling “ready, three, two, one” helps, but an exact same-frame input is not required. This is the second of the room’s three paired gates.
- 4Untwine and retwine as the room prompts
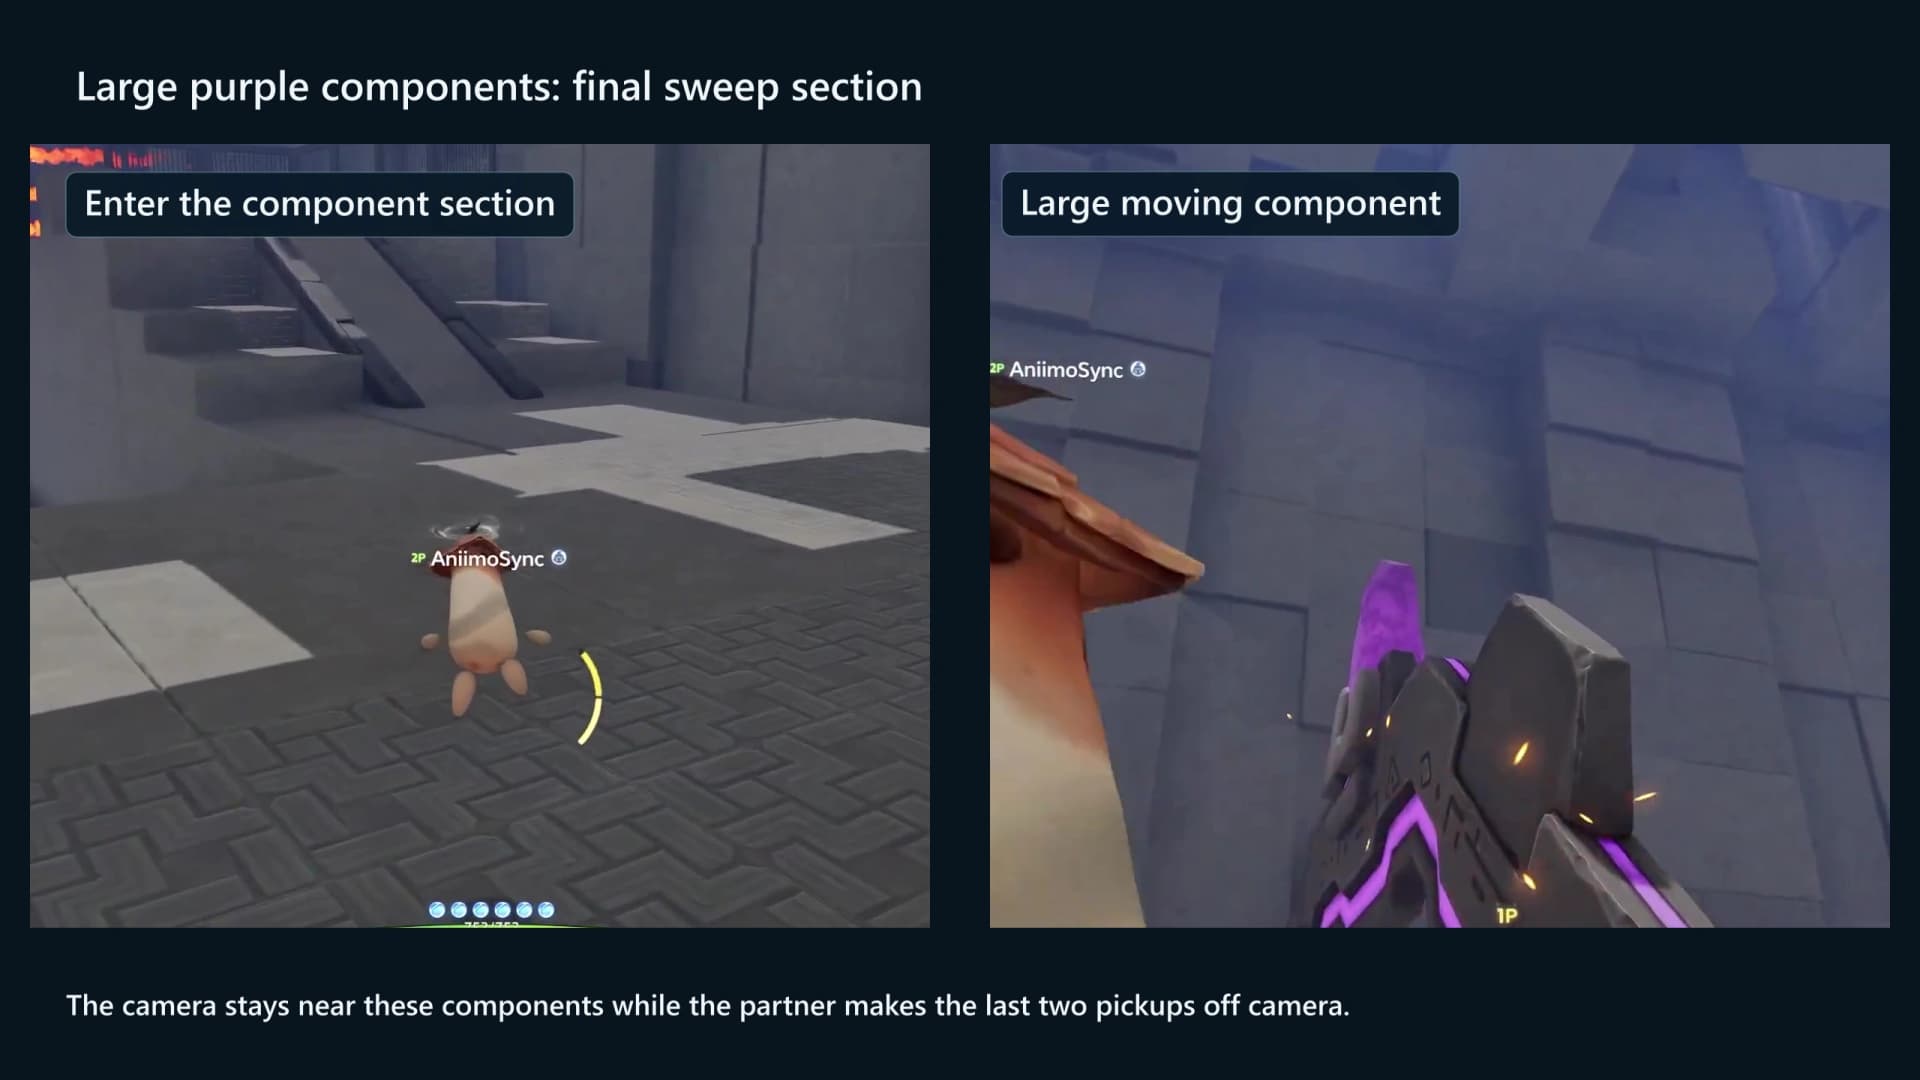
The room hands control back to the human Pathfinders, then returns you to the trial forms for the large purple-component section. Follow the live prompt rather than forcing the opening role split through every interaction.
- 5Turn the second rotating space twice
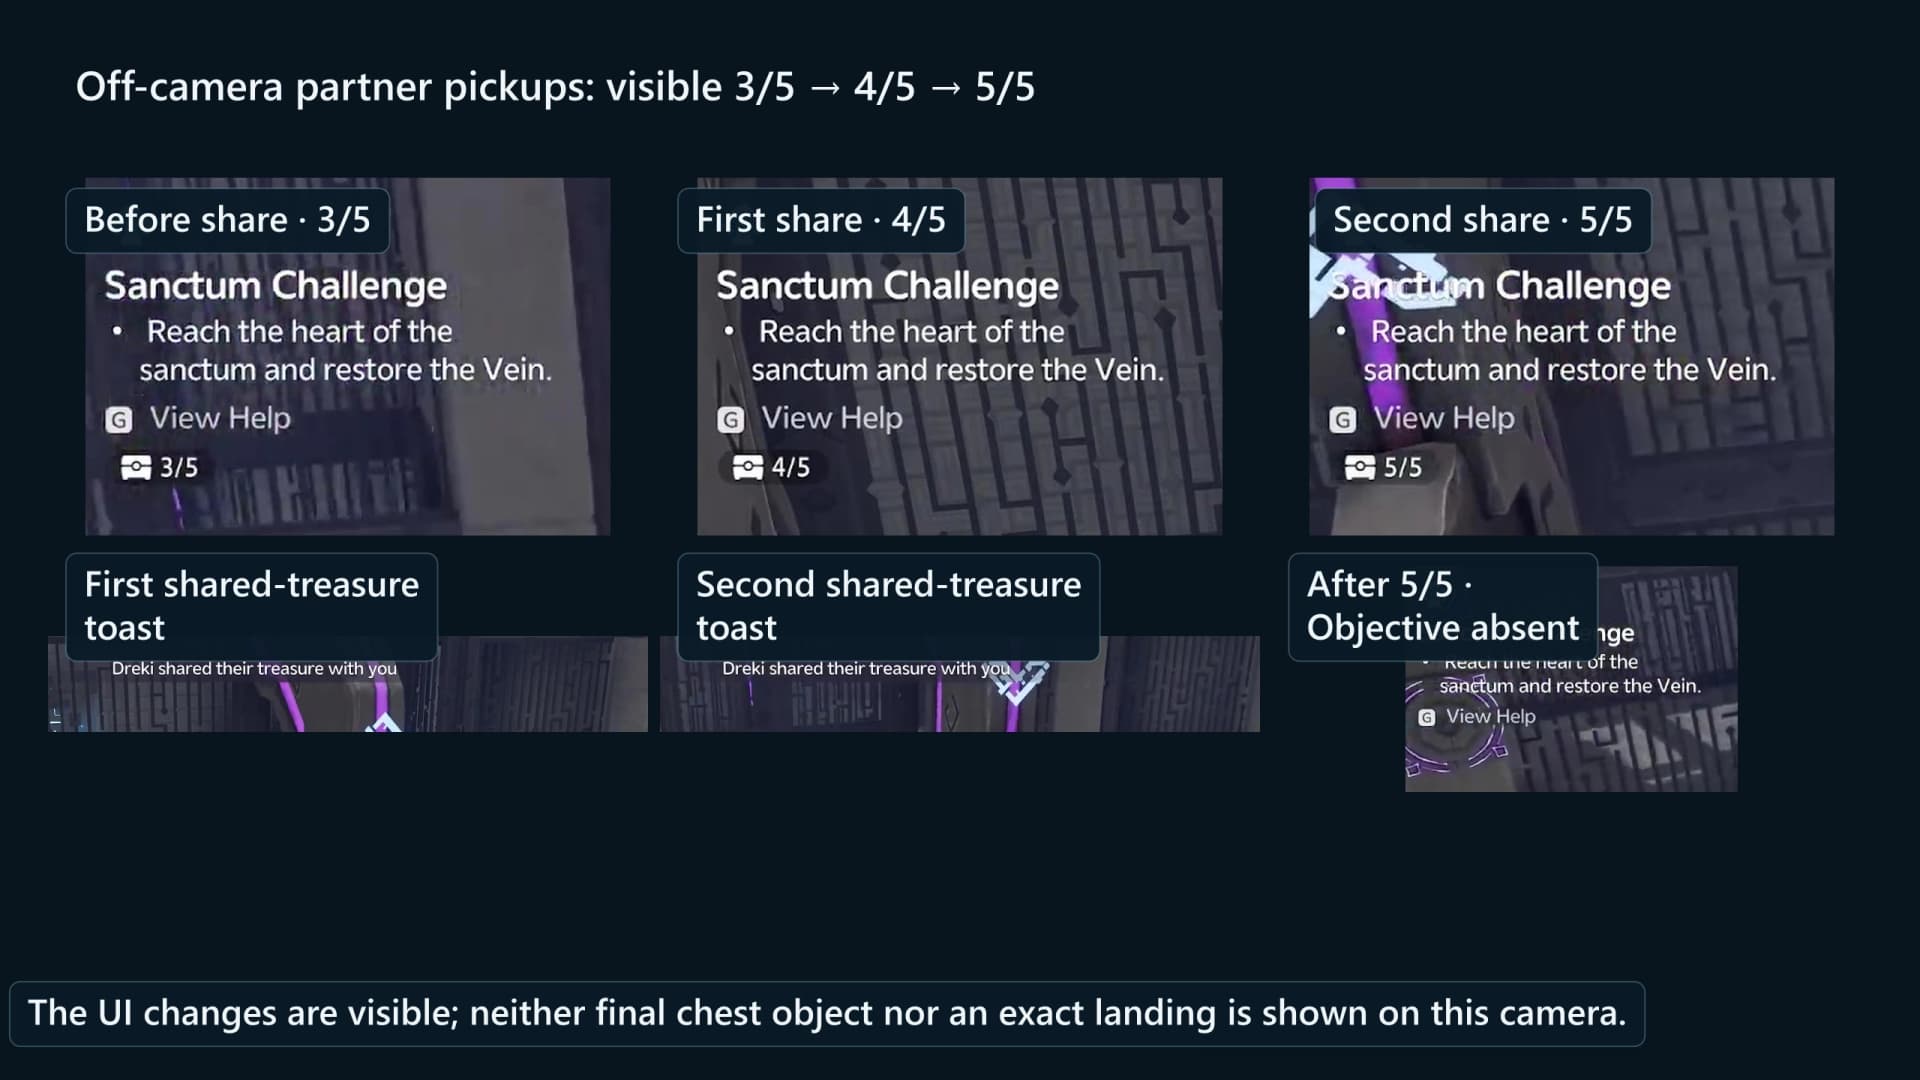
Both remaining chests ride the faces of one large rotating section. One mudball brings the Basic chest and an anchor round for 4/5; a second quarter turn brings the Standard chest, which sits on a different face at a different height, round for 5/5.
Room 6: final paired gate, Tesseract and restoration
- 1Confirm the chest objective is complete
The chest line disappears once the counter reaches 5/5. Do this check before the final paired gate, because you cannot come back for a chest after the clear.
- 2Use the third and last paired Stela
Each player takes one side. The gate opens on the paired state; the two inputs do not have to land on the same frame.
- 3Reach the central completion object together
Both players untwine and enter the completion space. A Touch interaction on the Sanctum Terminus, the square core called the Tesseract, leads into Success and the Vein-restoration cutscene.
Five chest landmarks
Five chests, three Basic, one Standard and one Premium. Two sit in the locked opening wings, one Basic per wing. The Premium chest waits in a recess cut into the south wall at the end of the spike halls. The last two ride the faces of the same large rotating section in the final hall, so that one piece has to be turned twice.
| Chest | Tier | Contents |
|---|---|---|
| Chest 1 | Basic | Glimmer x5, Credits x5000, Sparkling Crystal x5 |
| Chest 2 | Basic | Glimmer x5, Credits x5000, Sparkling Crystal x5 |
| Chest 3 | Premium | Glimmer x20, Credits x20000, Sparkling Crystal x15, one Epic held item |
| Chest 4 | Basic | Glimmer x5, Credits x5000, Sparkling Crystal x5 |
| Chest 5 | Standard | Glimmer x10, Credits x10000, Sparkling Crystal x10, one Rare held item |
| First clear | Reward | Lumin Amber: Breezy Plains, EXP x500 |
Every held item: Spirited Feather, Fission Needles, Echoing Grimoire, Ferocious Fang, Miraculous Fleece, Lightning Needle, Gargantuan Horn, Marching Flask, Capacitous Battery, Heartseeker Pendant, Avenging Gear, Heritage Amulet, Explosive Gloves, Giant Tortoise Shell, Auspicious Bell.
Checkpoints and hazards
Courageous Wit is generous with respawns and stingy with floor. Fifteen interior checkpoints sit along the route on top of the entrance pad, and four instant-death drops wait under the gaps you cross.
- Fifteen interior checkpoints, one entrance pad. Eleven arm by walking over them, including one at the mouth of each opening wing, and four are save points you touch by hand, one inside the shaft, one past the top door, one on the far side of the moving tiles and one on the ledge in the final hall.
- Four instant-death drops. They sit under the first shaft, under the trap-bridge chasm, under the moving-tile hall and under the descent into the final rotating-space hall.
- Three paired Stela gates. Each large door needs both players at its pedestal, so a partner who is dead or lost stops the run until they respawn and walk back.
- Nothing is on a timer. The fire banks, spike banks and moving tiles all cycle on their own, so wait for the pattern instead of racing it.
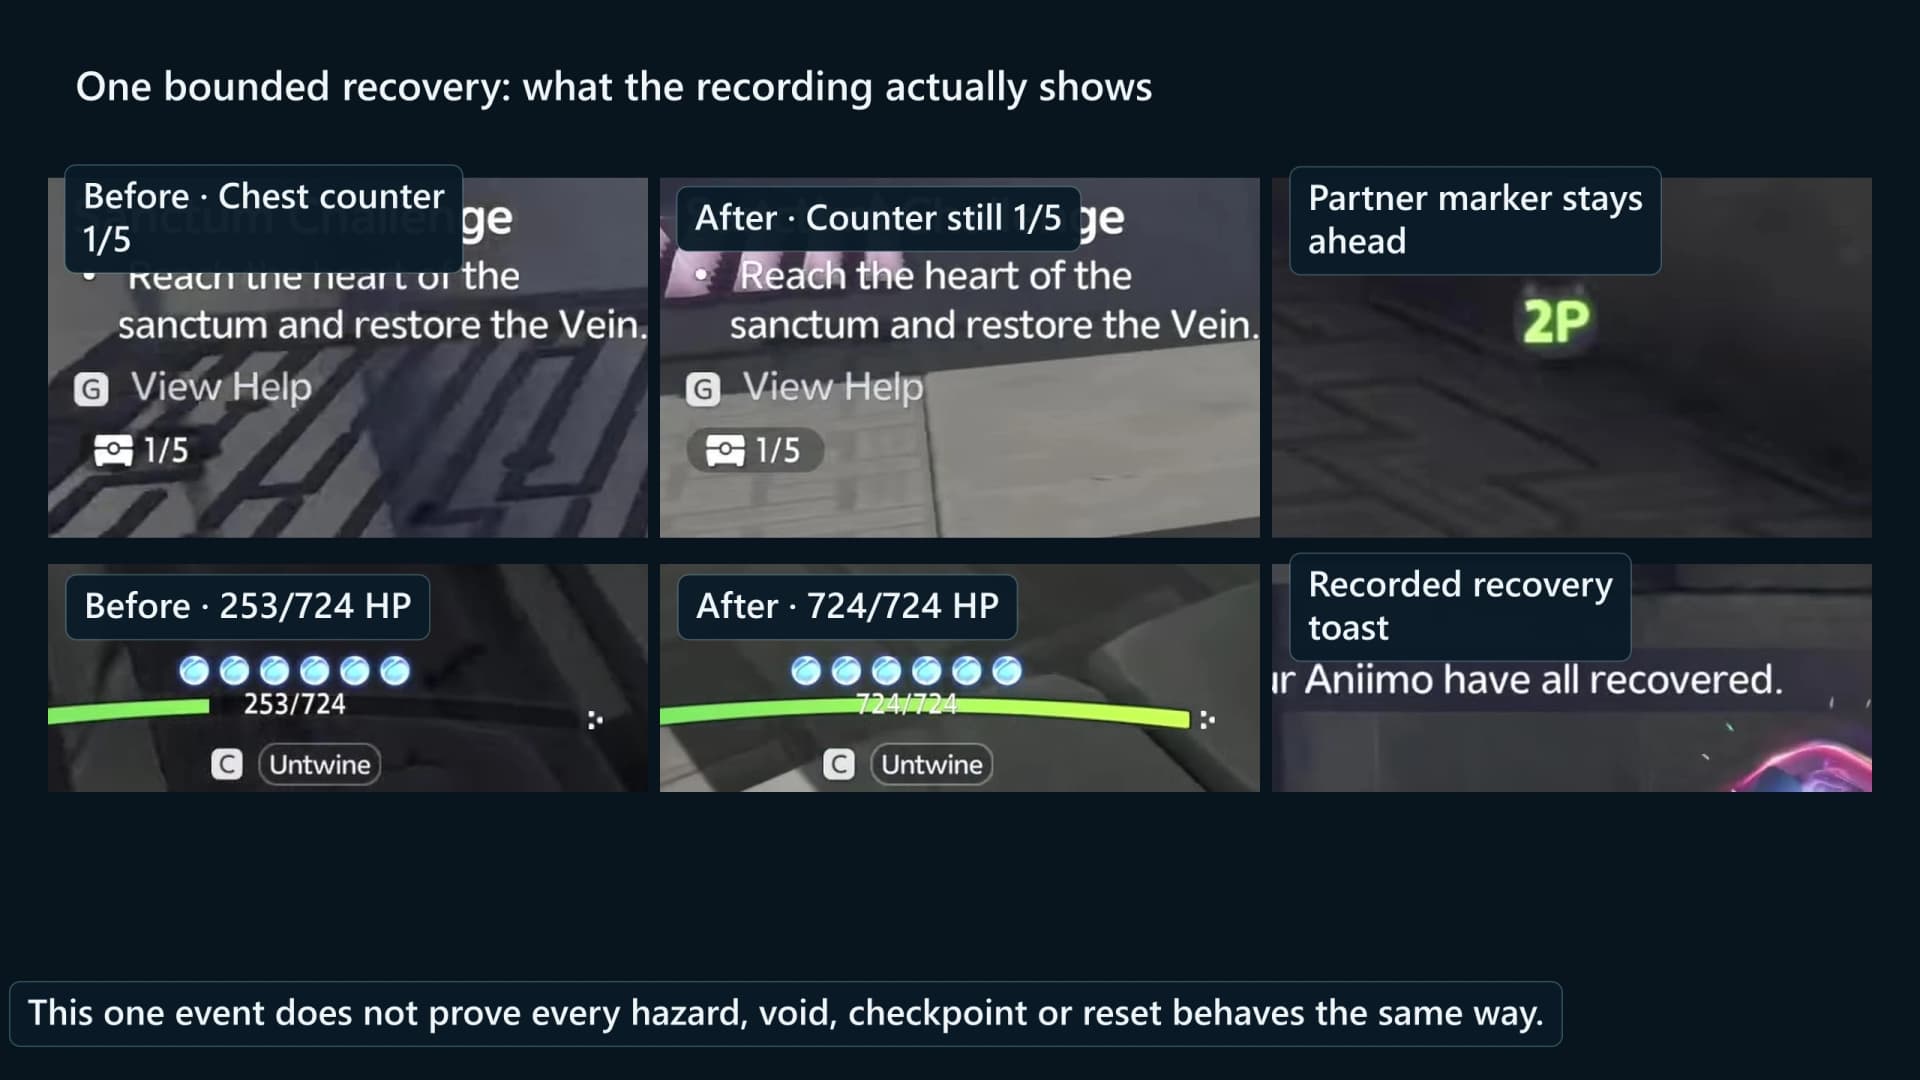
- A recovery keeps your chest count. Health is restored and the counter carries over, but you land on the last checkpoint rather than past the gate you were working on.
Recovery, completion and rewards
The first clear pays Lumin Amber: Breezy Plains ×1 plus 500 EXP, once, to each player. It also lights this room’s Vein node and counts toward the Sanctum Delver badges at 3, 5, 10 and 15 clears. Repeat runs pay nothing, so the five chests are the only reason to come back.
| Question | Answer |
|---|---|
| Does a failure erase the chest count? | No. Health is restored and your visible chest count carries over. |
| Can a missed chest be collected after success? | No. Reach 5/5 before the final Sanctum Terminus. |
| Must both players touch the Vein? | No. Both players reach the completion space and one Touch interaction on the Tesseract starts the cutscene. |
| What is the first-clear reward? | Lumin Amber: Breezy Plains ×1 plus 500 EXP, once, plus a Vein node and progress toward the Sanctum Delver badges. |
Frequently asked
Where is the Courageous Wit Sanctum?
It is in Zephyrus Landbridge. The AniimoVerse atlas marker is at 3208, 441. Open the exact Courageous Wit atlas pin.
How many players and chest slots does Courageous Wit have?
The entrance requires two challengers and lists five optional chests. One sits in each of the two locked opening wings, one waits in a wall recess at the end of the spike halls, and the last two ride the faces of the same rotating section in the final hall.
Does the Cozite player have to hold a Courageous Wit switch?
No. The player holds Cozite’s skill input only to aim a mudball. Purple targets take a discrete hit or toggle, and the linked state does not cancel when the operator moves away.
Can I collect a missed Courageous Wit chest after clearing the Sanctum?
No. Reach 5/5 before you use the final Sanctum Terminus or Tesseract. If the route becomes irrecoverable before then, leaving and re-entering is the last resort, and you check every mechanism and the chest counter again on the way back.