

Location and entrance
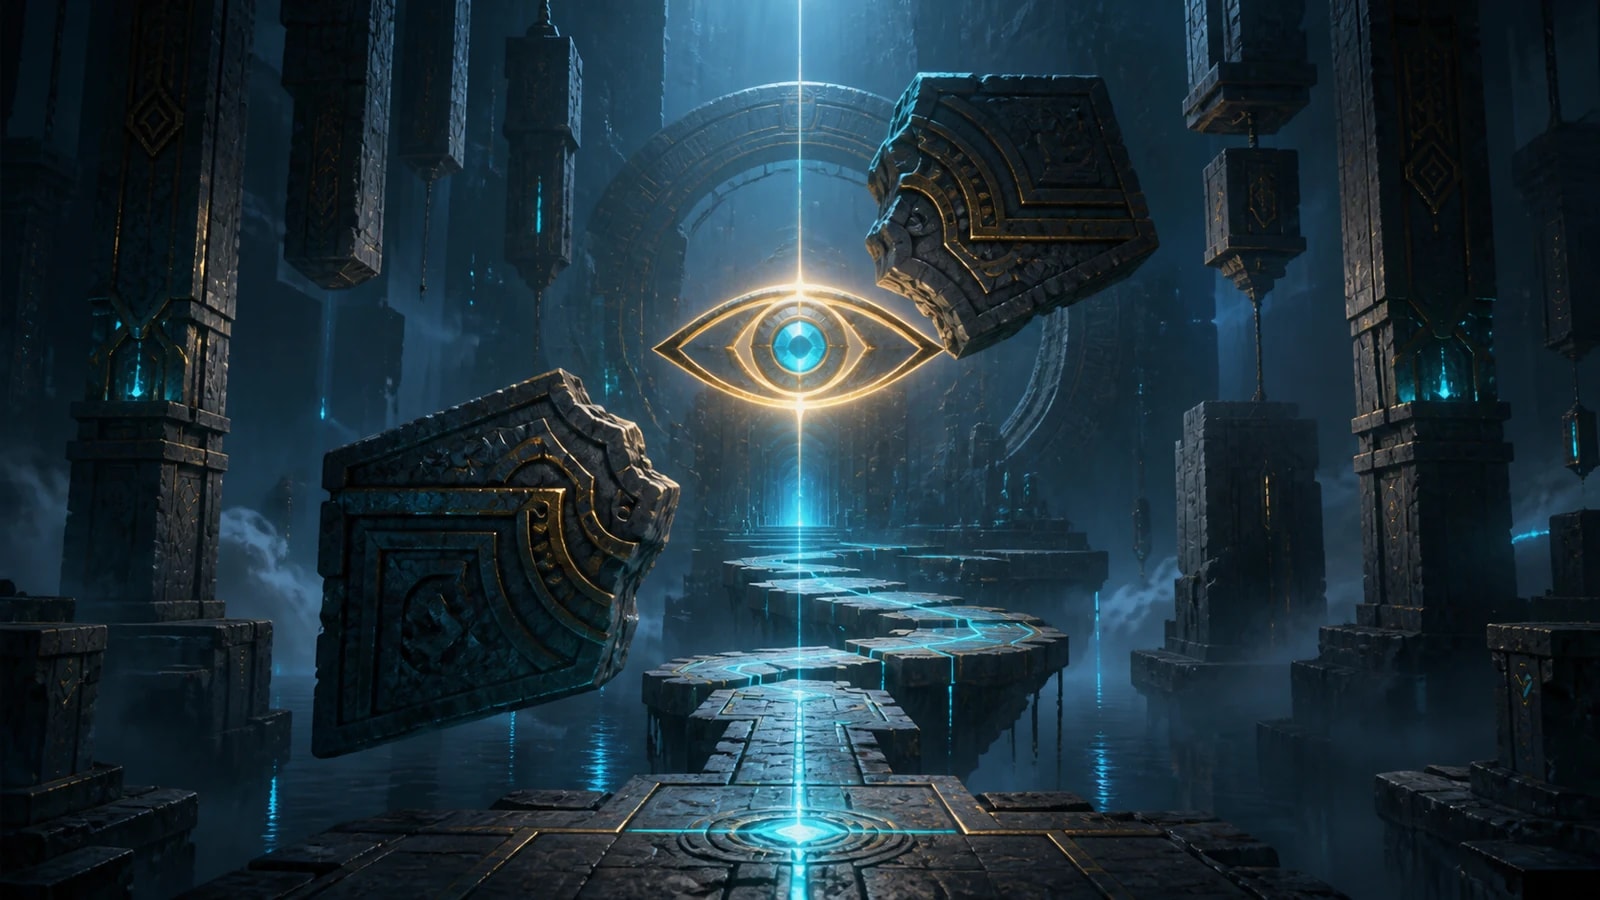
Open the exact Vigilant Eyes atlas pin in Russet Highlands. The marker sits at 2775, 423 on the AniimoVerse atlas. Older editorial notes call this room Keen Gaze; the map and the entrance card both use Vigilant Eyes.
| Check | Value |
|---|---|
| Area | Russet Highlands |
| Atlas coordinate | 2775, 423 |
| Entrance | 1 challenger · 0/3 optional chests |
| Trial form used | Helgon · supplied inside the room |
| Perspective action | Mobility · compresses visual space |
| Wall-breaking action | Skill 1 · breaks cracked stone walls |
| First clear | Lumin Amber: Breezy Plains ×1 · 500 EXP |
Route, step by step
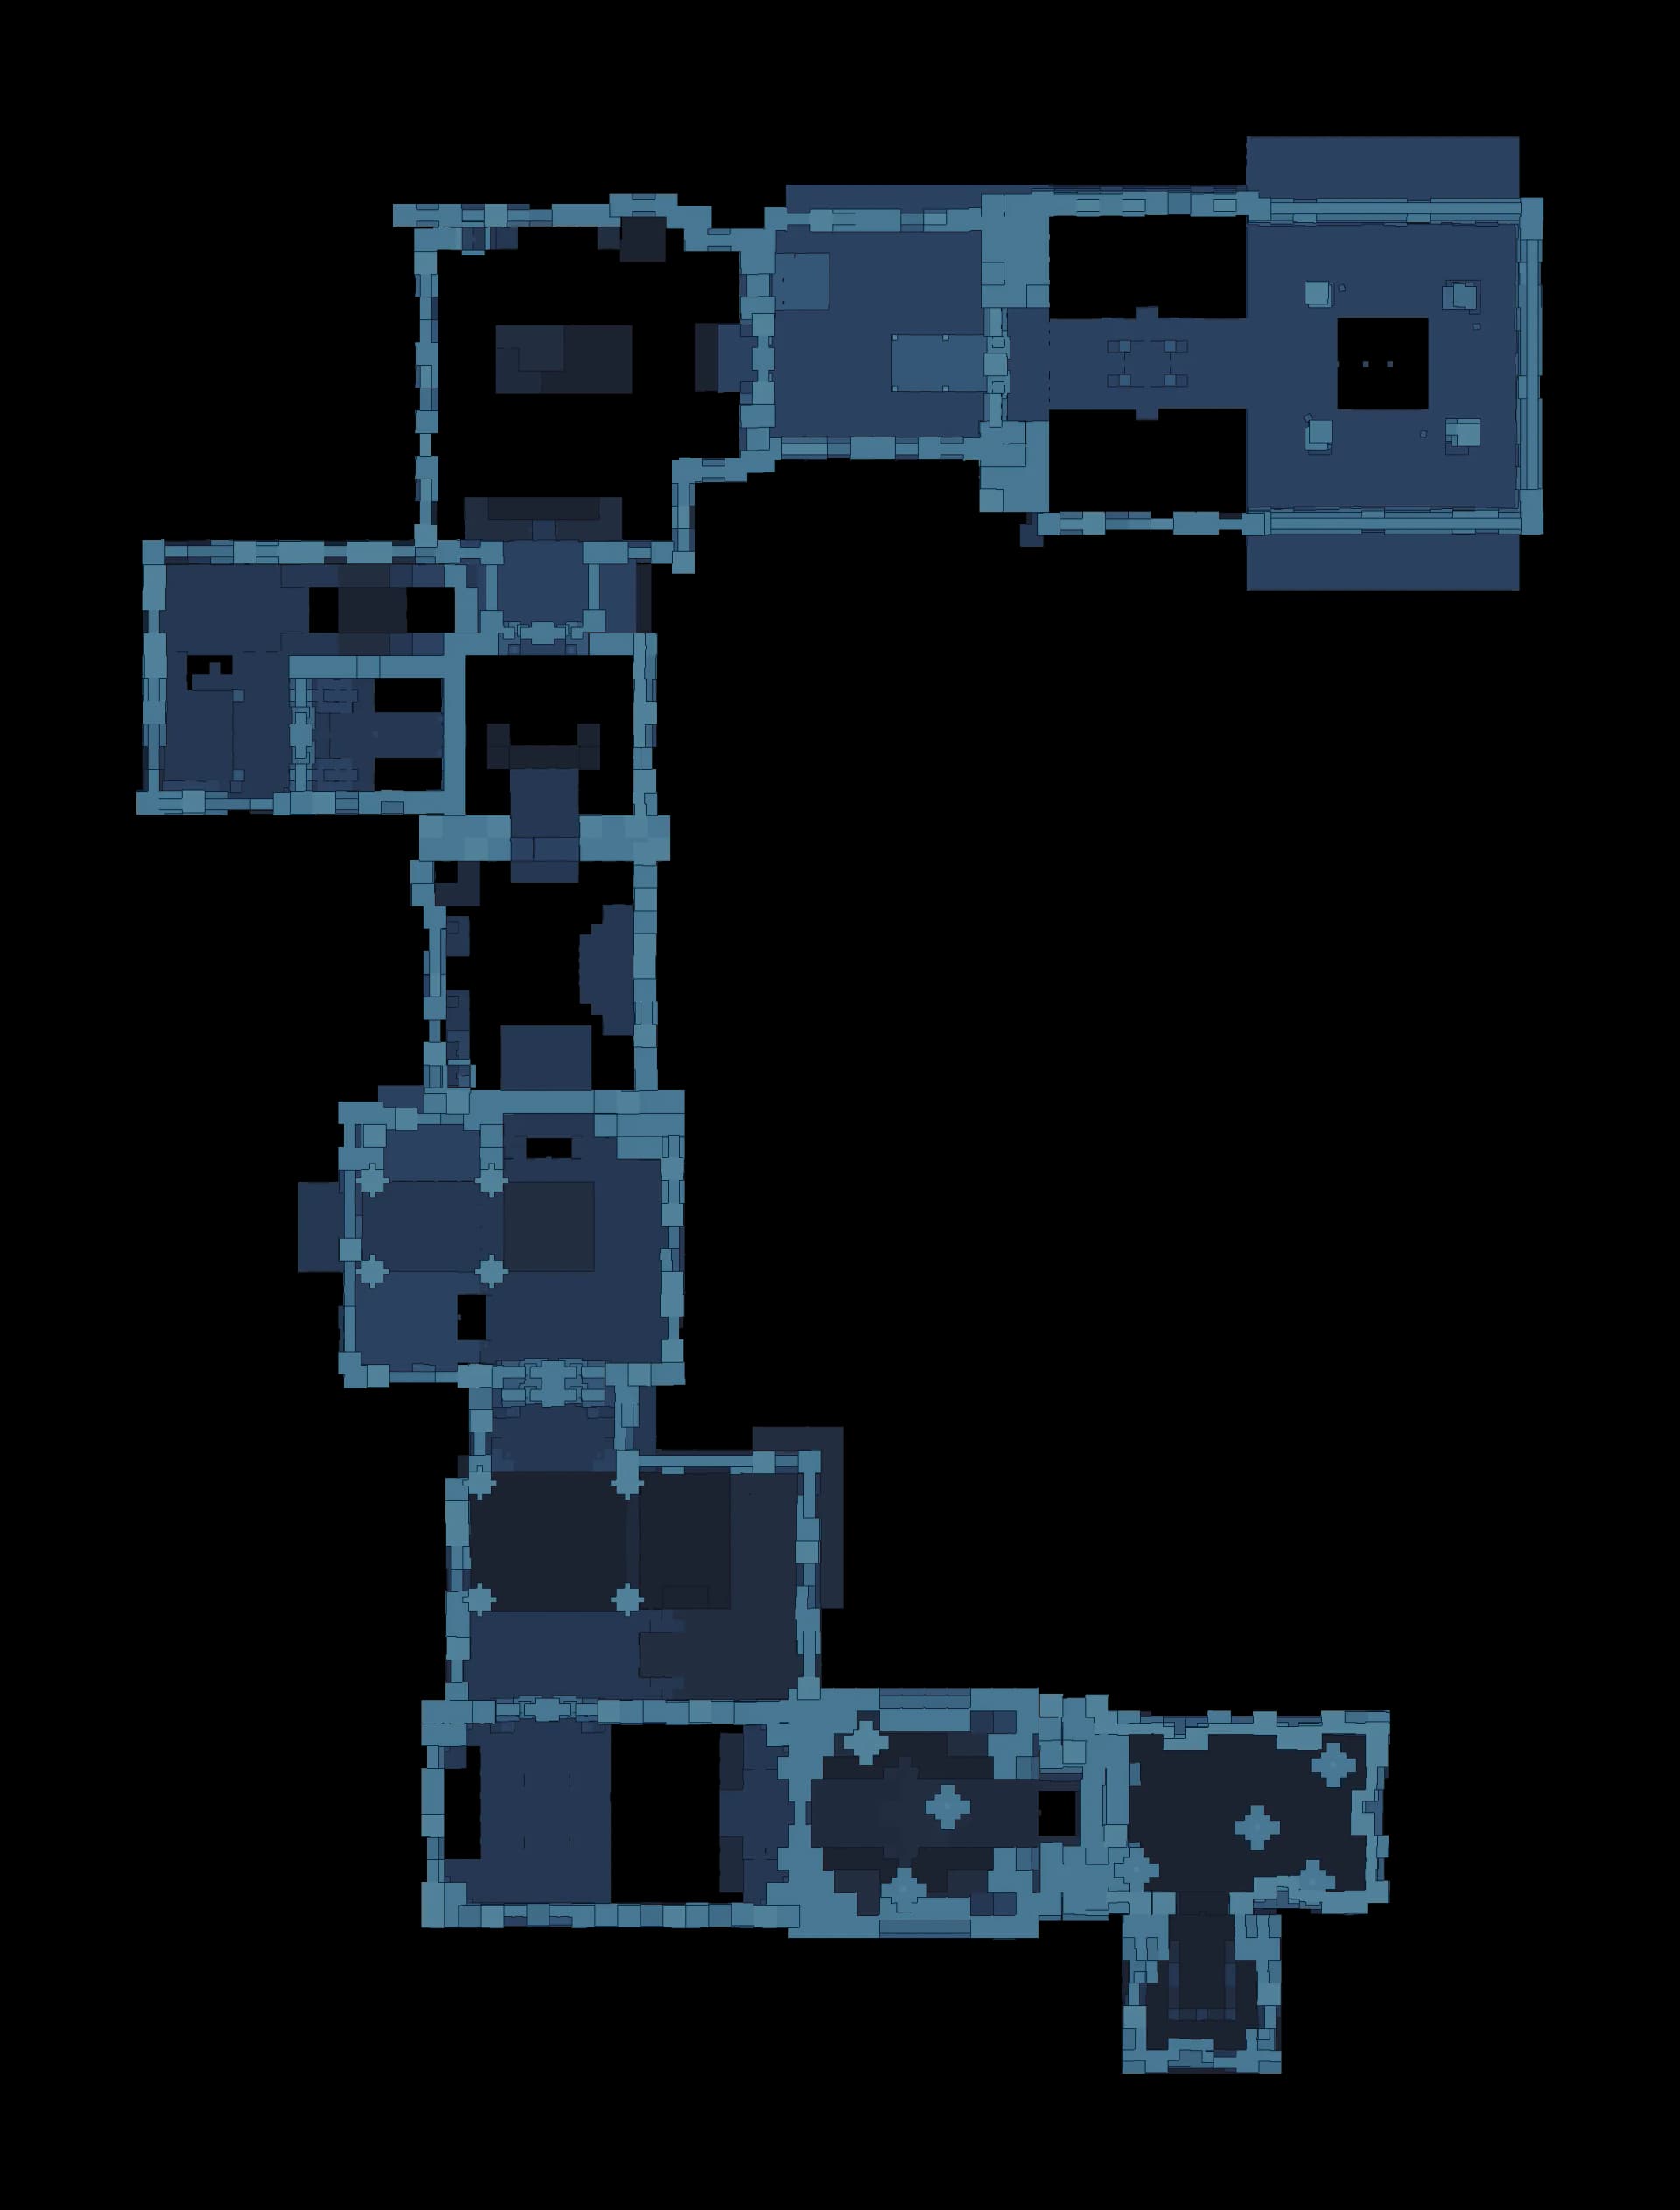
The room runs almost due north from the entrance and finishes on the only stretch that sits east of it. Eleven sightlines open the gates, and between them sit two Mechanical Ball runs that older route summaries leave out entirely: one across the conjured chasm bridge and one along the lane past the square console. Both have their own reset lever, so a ball lost down a pit is never a dead run.
 TXCCC213ACCCCCCCC
- Entrance
- Checkpoint
- Trial statue
- Terminus
- Chest
- Control
- Mechanism
- Element device
- Hazard
- 1Drop into the Sanctum entranceRoom 0
You arrive on the entrance pad at the south tip of the room, facing a low stone door that blocks the axis west. This pad is the only revive point the Sanctum starts with, so every checkpoint ahead of you has to be lit by walking into it.
- 2Solve the first sightline at the entrance approachRoom 0
Stay in Pathfinder form and turn back east. The first split pattern hangs at the very top of the chamber above the entrance, and this is the one sightline the room lets you register before it gives you a trial Aniimo. Close the halves and the offset stone door on the axis drops away.
- 3Twine with trial Helgon and light the first checkpointRoom 0
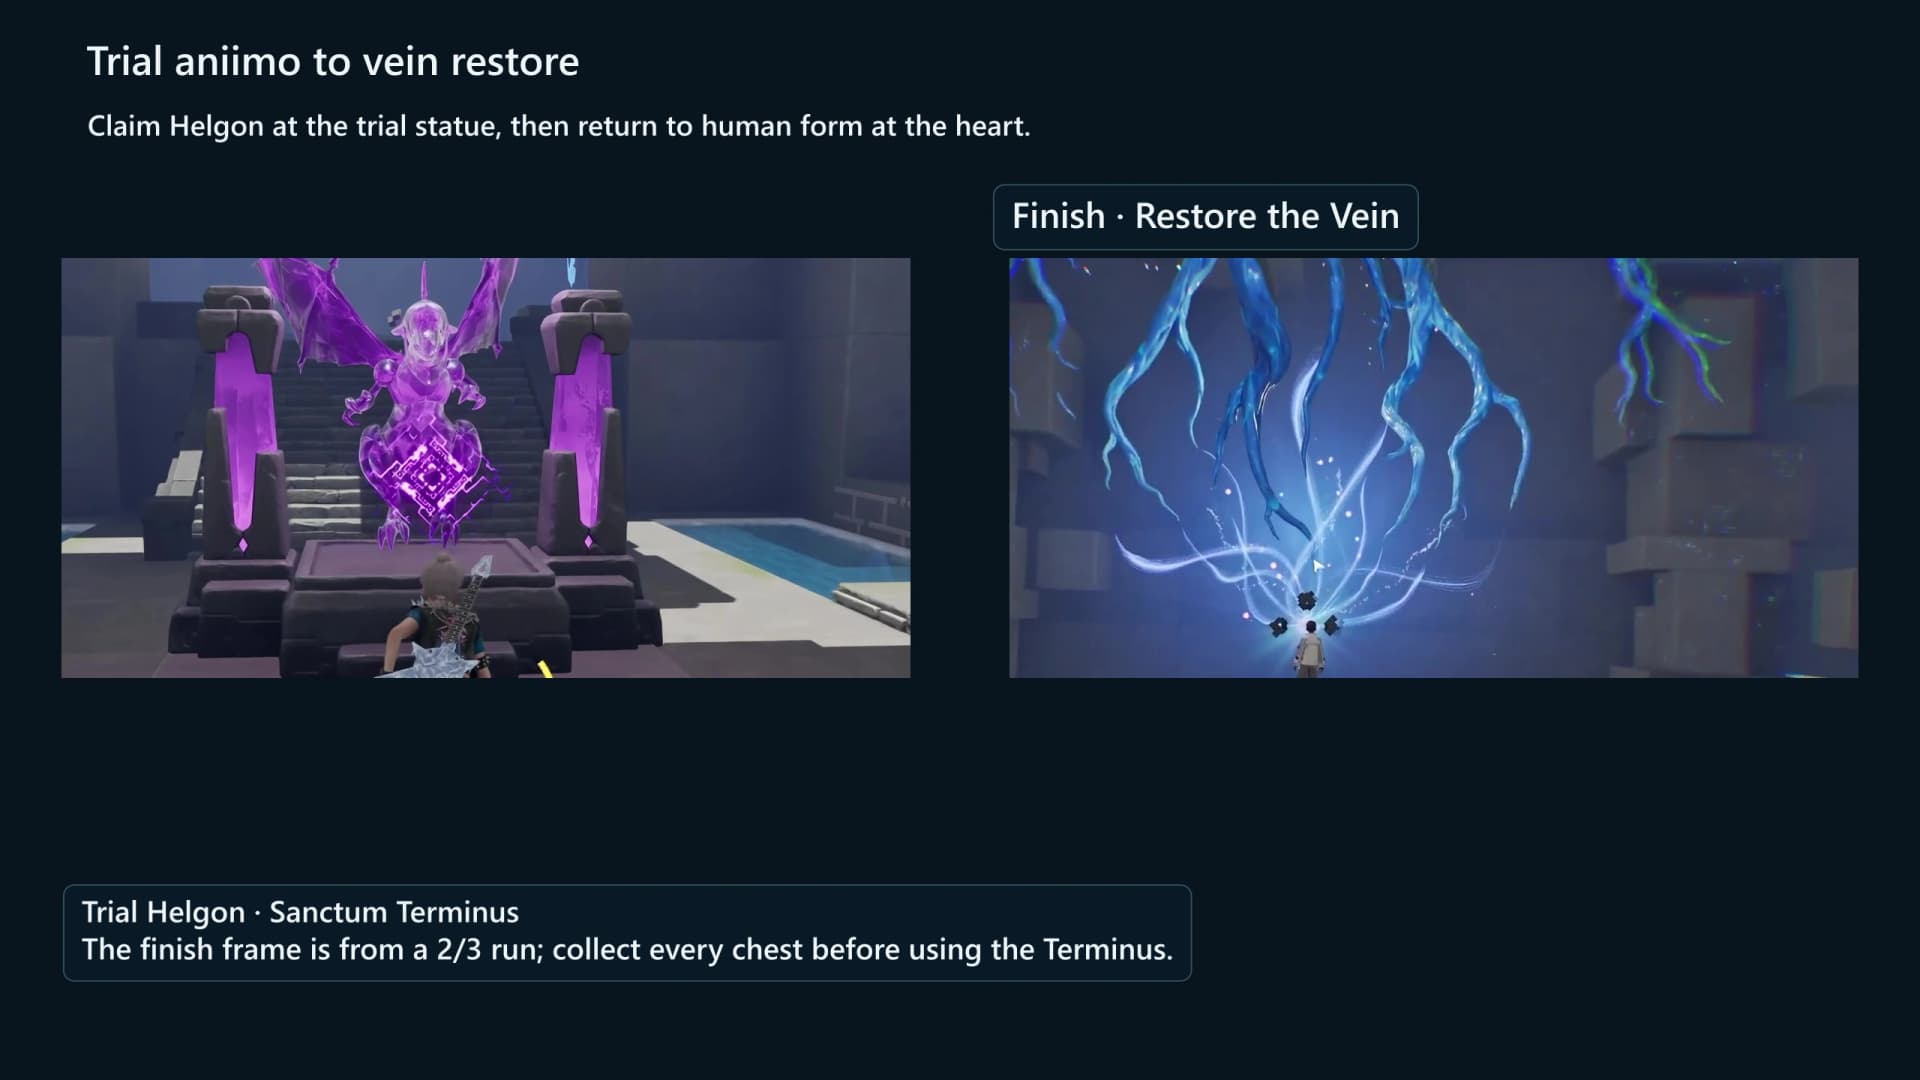
Carry on west to the statue and Twine with the trial Helgon it hands you. Two cards follow: compress visual space with Mobility and break cracked stone walls with Skill 1, then hold Jump to fly across water. A few steps further west the first checkpoint and its save point come on together.
- 4Solve the west gate sightlineRoom 1
Follow the axis to its west end. The pattern for this gate floats high and well to the south of the doorway it controls, so stand back and let the compression pull the halves together rather than walking up to the door. The stone door opens north and the second checkpoint sits just beyond it.
- 5Chest 1 in the flooded side trenchOptionalChest 1Room 2
Past the gate the floor gives way into a flooded trench well below the walkway. Drop in, open the standard chest at the bottom and climb back out before you go on. Falling further than the trench is fatal, so take the descent on the near wall.
- 6Solve the water room sightline and change the poolsRoom 2
Two water jets run down the west wall of the next chamber and two separate pools sit at different heights. Register the pattern from the east side and the pools swap: the near one rises about three and a half units and the far one drops by six. That pairing is what makes the crossing walkable.
- 7Take the third checkpoint and place a plank raftRoom 3
Walk into the raft basin to light the third checkpoint. Untwine, aim at one of the three floatable Ancient Large Planks on the west shore and use Manipulate, then Drag it into the crossing lane and Drop it. Do not Throw it, because a thrown plank overshoots the lane.
- 8Solve the west basin sightlineRoom 3
Line up the far western pattern from the low water edge. Registering it drops the western pool by nearly three units and opens the first of the two basin doors, which is the one on the west side of the channel.
- 9Solve the east basin sightline and ride the jetsRoom 3
Climb to the upper ledge and register the second pattern across the basin. The eastern pool rises by a little over three units and the north door opens. The water jets here are already running, so there is no pad to press: ride the columns up and use flight to correct the last part of the climb.
- 10Take the fourth checkpoint and bridge the chasmRoom 4
Step through onto the balcony to light the fourth checkpoint and its save point. Look west across the chasm and register the bridge pattern from where you stand. A span forms over the drop, and three assist winds along the far lane start pushing anything loose north across it.
- 11Send the first Mechanical Ball into its socketRoom 4
A Mechanical Ball waits high at the south end of the lane. Keep the span standing while the winds carry the ball north into the socket at the far end. If the ball ends up in the pit, or the span unmakes under it, the lever on your balcony puts a fresh ball back at the top.
- 12Ride the fan shaft northRoom 5
With the socket seated, nine dungeon fans come alive in the corridor north of the lane, stacked in three ranks. The last rank sits at the bottom of a pit eight units below the one before it, so expect to fall before the updraft catches you and lifts you onto the next deck.
- 13Open the ancient gate and take the fifth checkpointRoom 6
The long west deck starts behind the room's only ancient mechanism gate, with its one-shot lever right at the gate post. Throw it once and the gate stays open. The fifth checkpoint is a short walk west along the deck.
- 14Break the cracked stone wallsRoom 6
Keep west past the stone door to the end of the deck, where three cracked stone walls close off the last stretch. Twine and use Skill 1 on each of them. The chasm below the deck is lethal, so break them from solid ground rather than mid air.
- 15Solve the alcove sightline at the west edgeRoom 6
Beyond the broken walls the room ends in an alcove holding the last pattern of this chamber, the furthest west point in the whole Sanctum. Register it and the route through the stone door settles into place for the walk back east.
- 16Chest 2 on the landing above the chasmOptionalChest 2Room 6
Come back east along the deck and stop at the short stairs over the chasm. The premium chest sits on the dry landing there, with nothing but a long drop underneath it. Open it before you leave the chamber.
- 17Ride the updraft to the sixth checkpointRoom 7
North of the gate the floor drops to the lowest point in the Sanctum. Two fans down there run from the moment the room loads, so the fall is survivable and the updraft carries you back up to the sixth checkpoint and its save point.
- 18Solve the paired bridge sightlinesRoom 7
This gap takes two registrations rather than one. Two patterns sit side by side about nine units apart at the same height, a left half and a right half, and the broken bridge in the lane below only holds once both have registered. Solve them in either order, taking the shelf on your left first as the site route does.
- 19Work the console and seat the second ballRoom 8
Drop to the deck with the square console and use it. It drives the lift in the lane twenty units north of you, where the second Mechanical Ball waits on the west shelf and four assist winds push it east across the bridge into the socket. The lever beside the console is the reset if the ball ends up somewhere the winds cannot reach.
- 20Ride up to the seventh checkpoint and open the combination doorRoom 8
Three fans on the east side lift you from the lane onto the high deck, where the seventh checkpoint sits. The pattern for the next gate hangs almost directly overhead, so register it from the deck rather than walking toward the door. The gate it opens is the one that answers to both human and dragon sight.
- 21Use Move PlatformRoom 8
Through the gate, a separate switch sits beside the last travelling platform. This is a geometry prompt, not an alignment. Use it and ride the platform thirteen units south to the final corridor.
- 22Solve the last sightline in the final corridorRoom 9
Untwine for the last pattern, because this one is a human sight piece like the very first. Register it from the open square and the eighth and final checkpoint comes on just past it.
- 23Chest 3 on the final central landingOptionalChest 3Room 9
The last premium chest sits on the central landing ahead, with a drop beside it that will kill you. Open it and confirm three of three before you take another step east.
- 24Touch the Sanctum TerminusRoom 9
The Terminus stands at the far east end of the corridor, the only part of the Sanctum that sits east of the entrance. Use Touch to restore the Vein and clear the room. It resolves the challenge whether or not the chests are open, so nothing is left to come back for.
Checkpoints and hazards
Past the entrance pad the room lights eight checkpoint portals, each one armed by walking into it rather than by solving anything. Three of them carry a save point as well. Four instant-death boxes sit under the route, and every one of them is a drop you are meant to cross rather than a floor to stand on.
- Checkpoint 1, past the trial statue. Comes on with the flight card, which is the room telling you that you can hold Jump to fly over water from here on.
- Checkpoint 2, beyond the west gate. Banks the first sightline pair and covers the drop into the flooded trench for chest 1.
- Checkpoints 3 and 4, the raft basin and the chasm balcony. The balcony bank covers the whole first Mechanical Ball run.
- Checkpoint 5, the long west deck. Banks the ancient gate, and it is the one you fall back to while breaking the cracked walls over the chasm.
- Checkpoint 6, above the updraft shaft. The two fans at the bottom of that shaft run from the moment the room loads, so the fall into it is survivable.
- Checkpoints 7 and 8, the console deck and the final corridor. The last bank sits just past the eleventh sightline, a few steps short of chest 3.
Bilateral perspective alignment
The room names the action itself: Mobility compresses visual space so separated eye fragments overlap, and Skill 1 breaks cracked stone walls. Helgon’s own skill data calls the perspective action Bilateral, and an older tutorial line says Split-Sight; all three name one mechanic. The action is not called “Bilateral Vision.”
- Use the named normal-view landmark first. Reach the described landing and face the stated wall before entering the perspective view.
- Compress visual space. Use the Mobility prompt while Twined with Helgon.
- Move the camera in small increments. Join the separated eye halves without walking off the marked landing.
- Wait for confirmation. A registered eye turns gold and the relevant wall or route changes to cyan.
- Leave the view before traversal. Return to normal play before jumping, flying or manipulating an object.
Sightlines 1 to 3
The opening sequence sets the repeatable pattern: copy the standing point, face the marked wall, compress visual space and adjust until the eye registers. Sightline 1 is the one alignment the room lets you register before it hands you a trial Aniimo, so solve it in Pathfinder form. Collect the first chest immediately after sightline 2; it is not an upper-ledge reward after sightline 5.
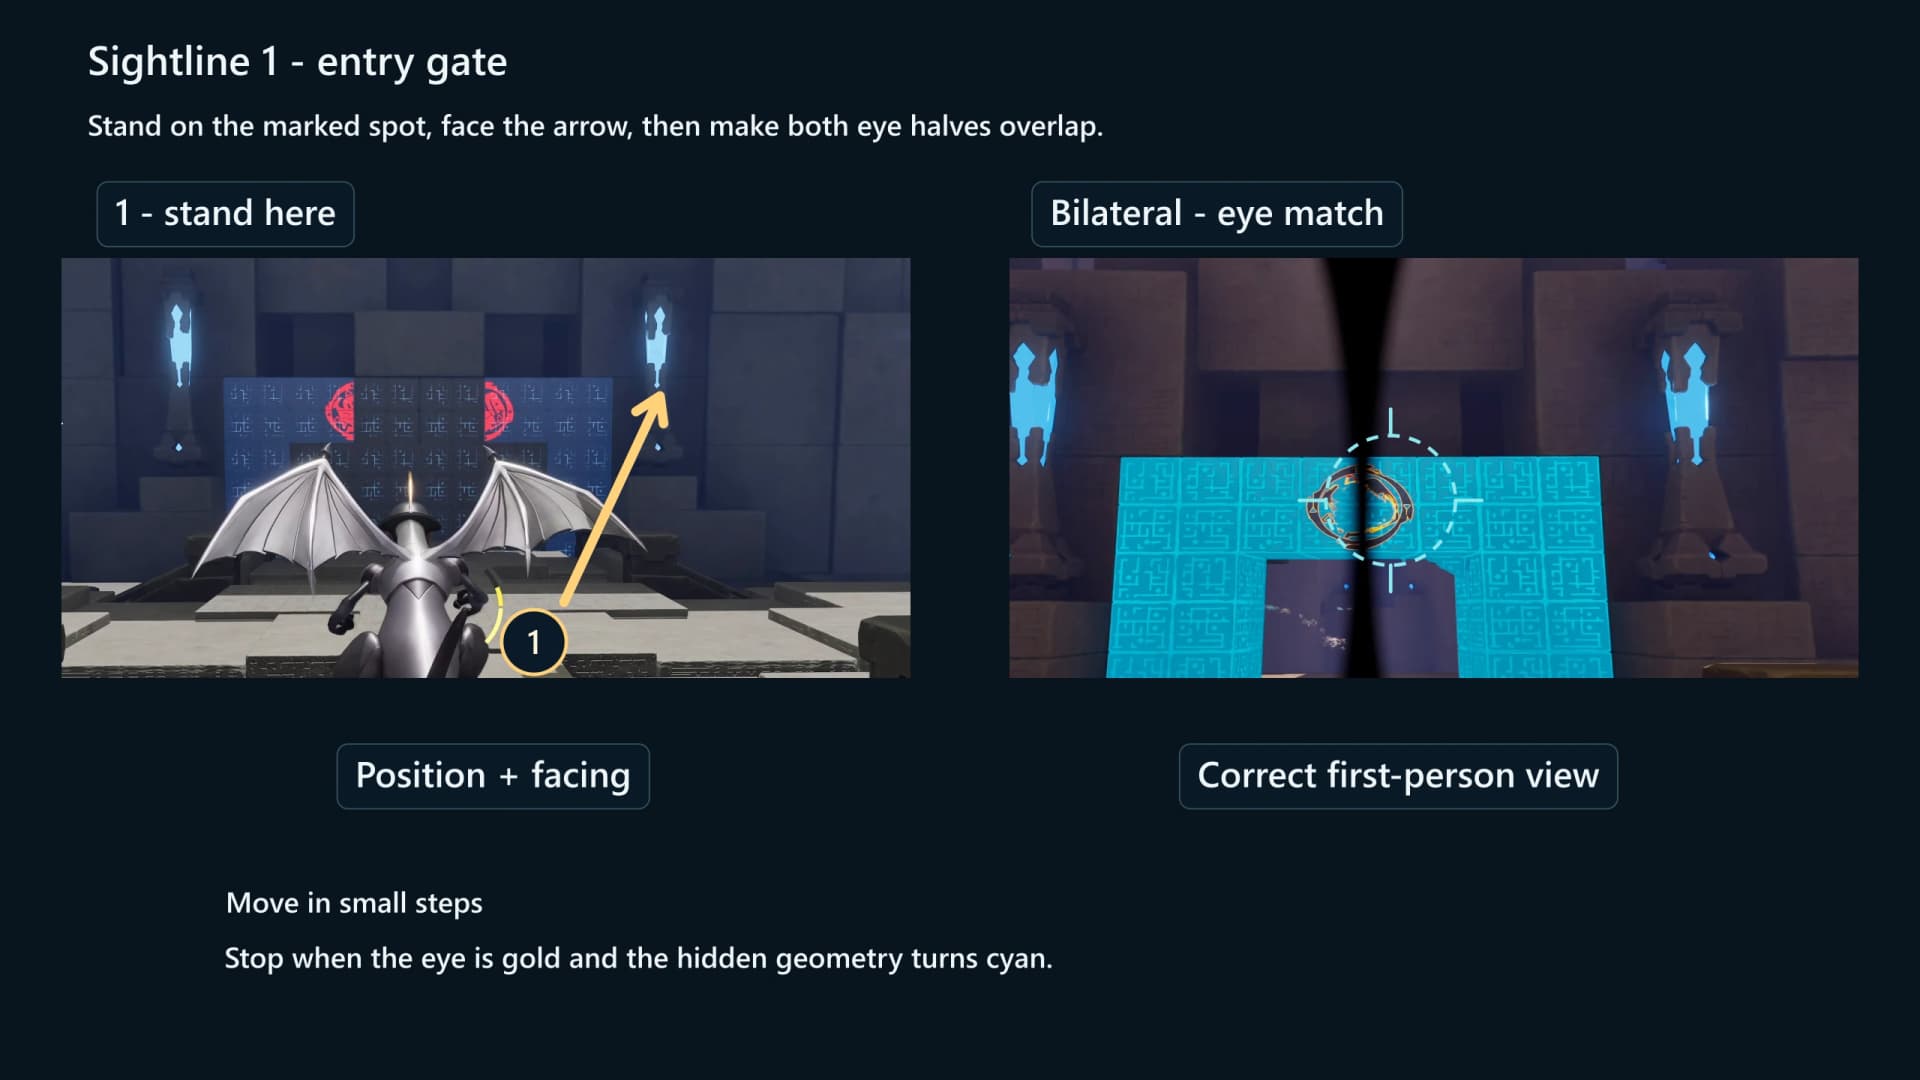
1. Entry gate
Stand here: stop on the center approach tiles before the first patterned wall. Face this: square the wall so the red eye halves sit at the same height. Enter Bilateral, center the seam between them and make a small horizontal correction until the eye turns gold and the doorway turns cyan.
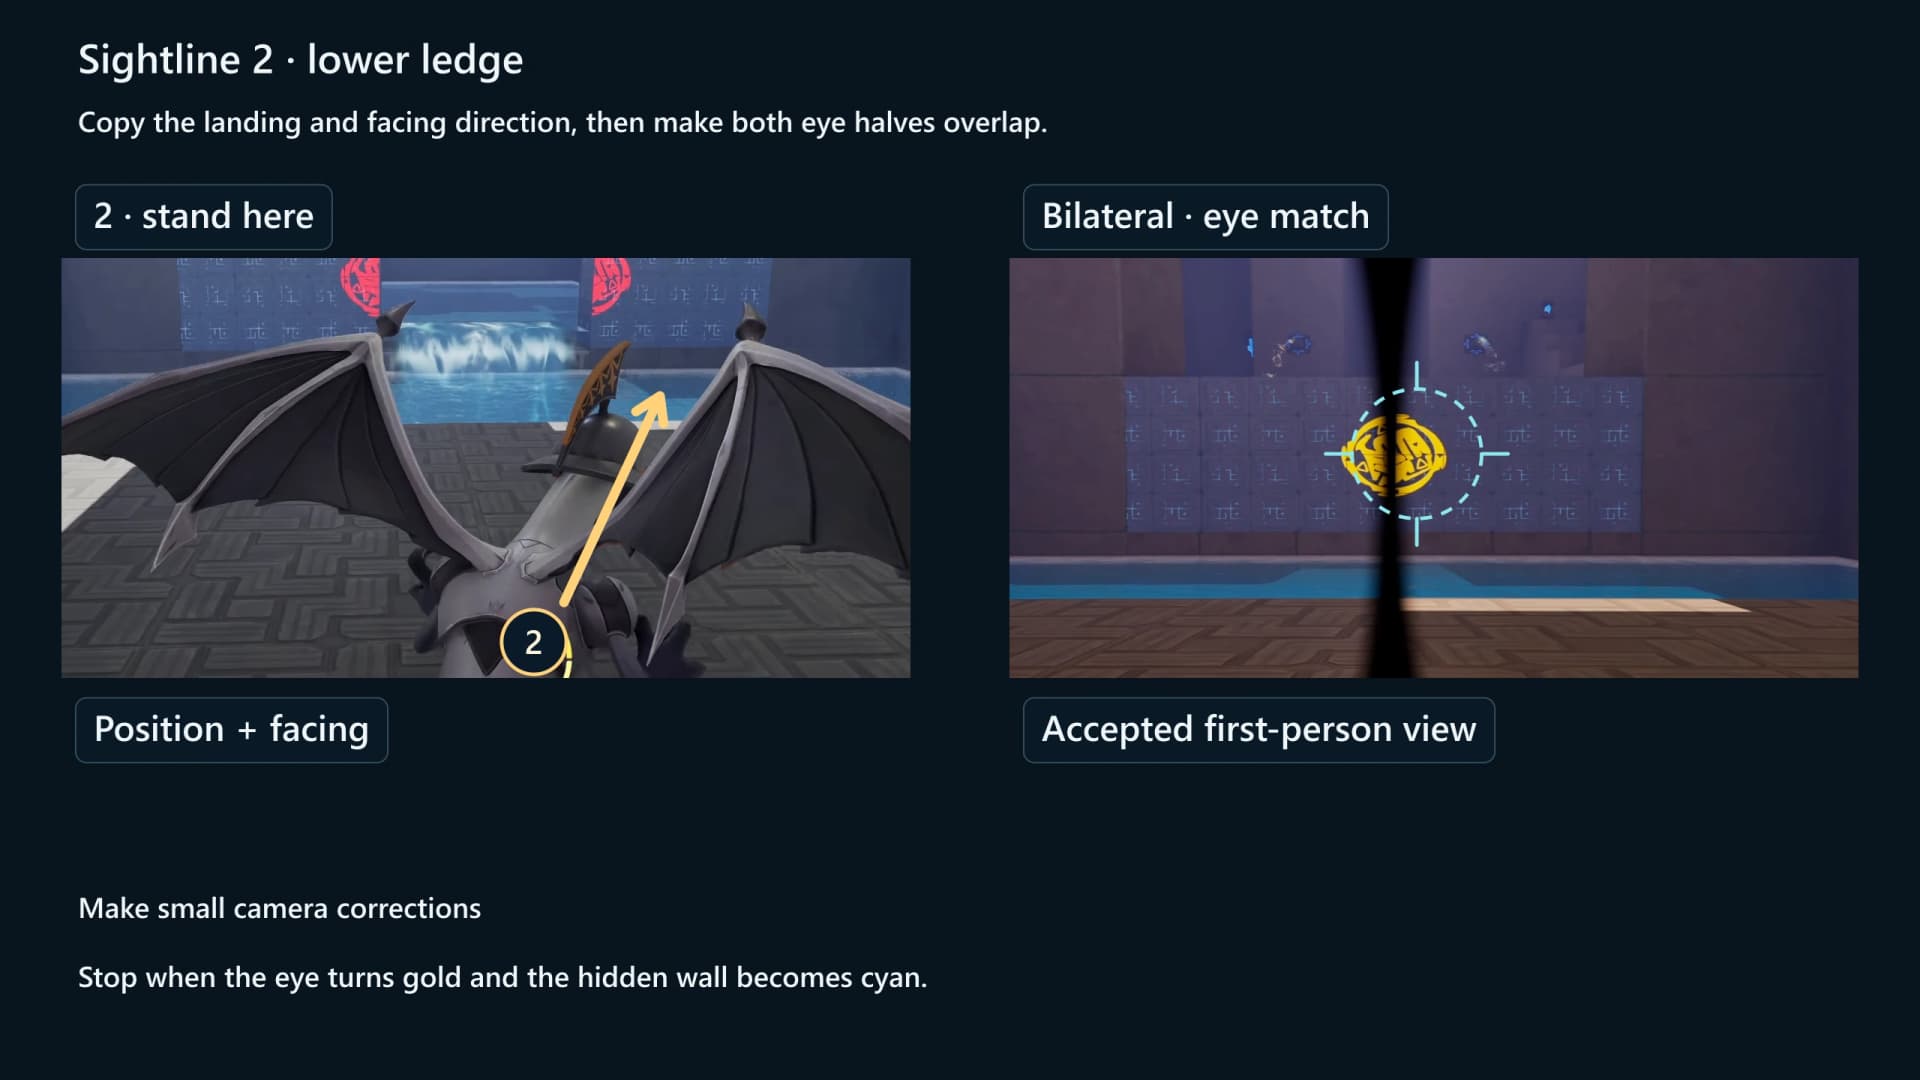
2. West gate, then chest 1
Stand here: cross the first gate and stop on the narrow lower ledge immediately beyond it. Face this: look toward the far patterned wall and slightly upward. Enter Bilateral and close the small gap between the eye halves; the accepted eye sits high in the view.
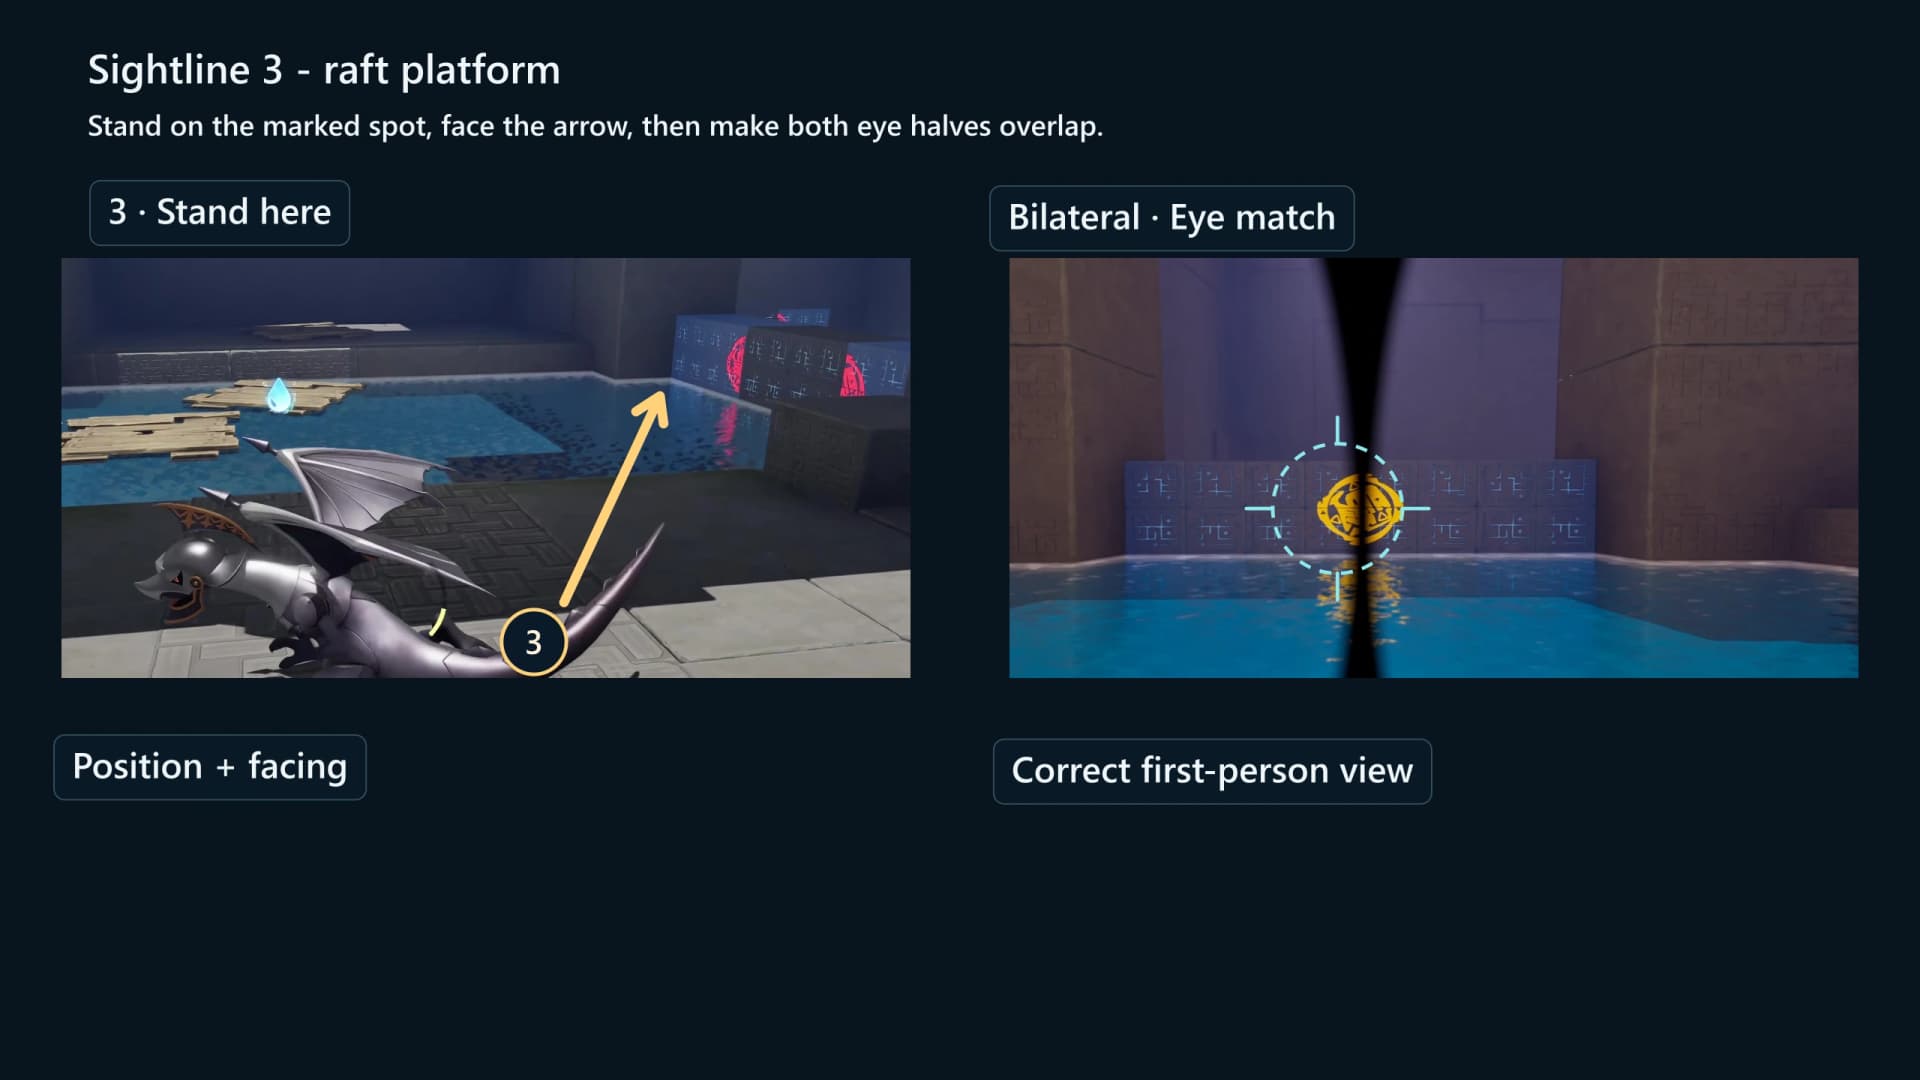
3. Raft platform
Stand here: move to the stone lip beside the first wooden raft, with water to the left. Face this: aim diagonally across the pool at the wall carrying the red fragments. Enter Bilateral and bring the halves together above the waterline. Wait for the registered eye and changed geometry before leaving the ledge.
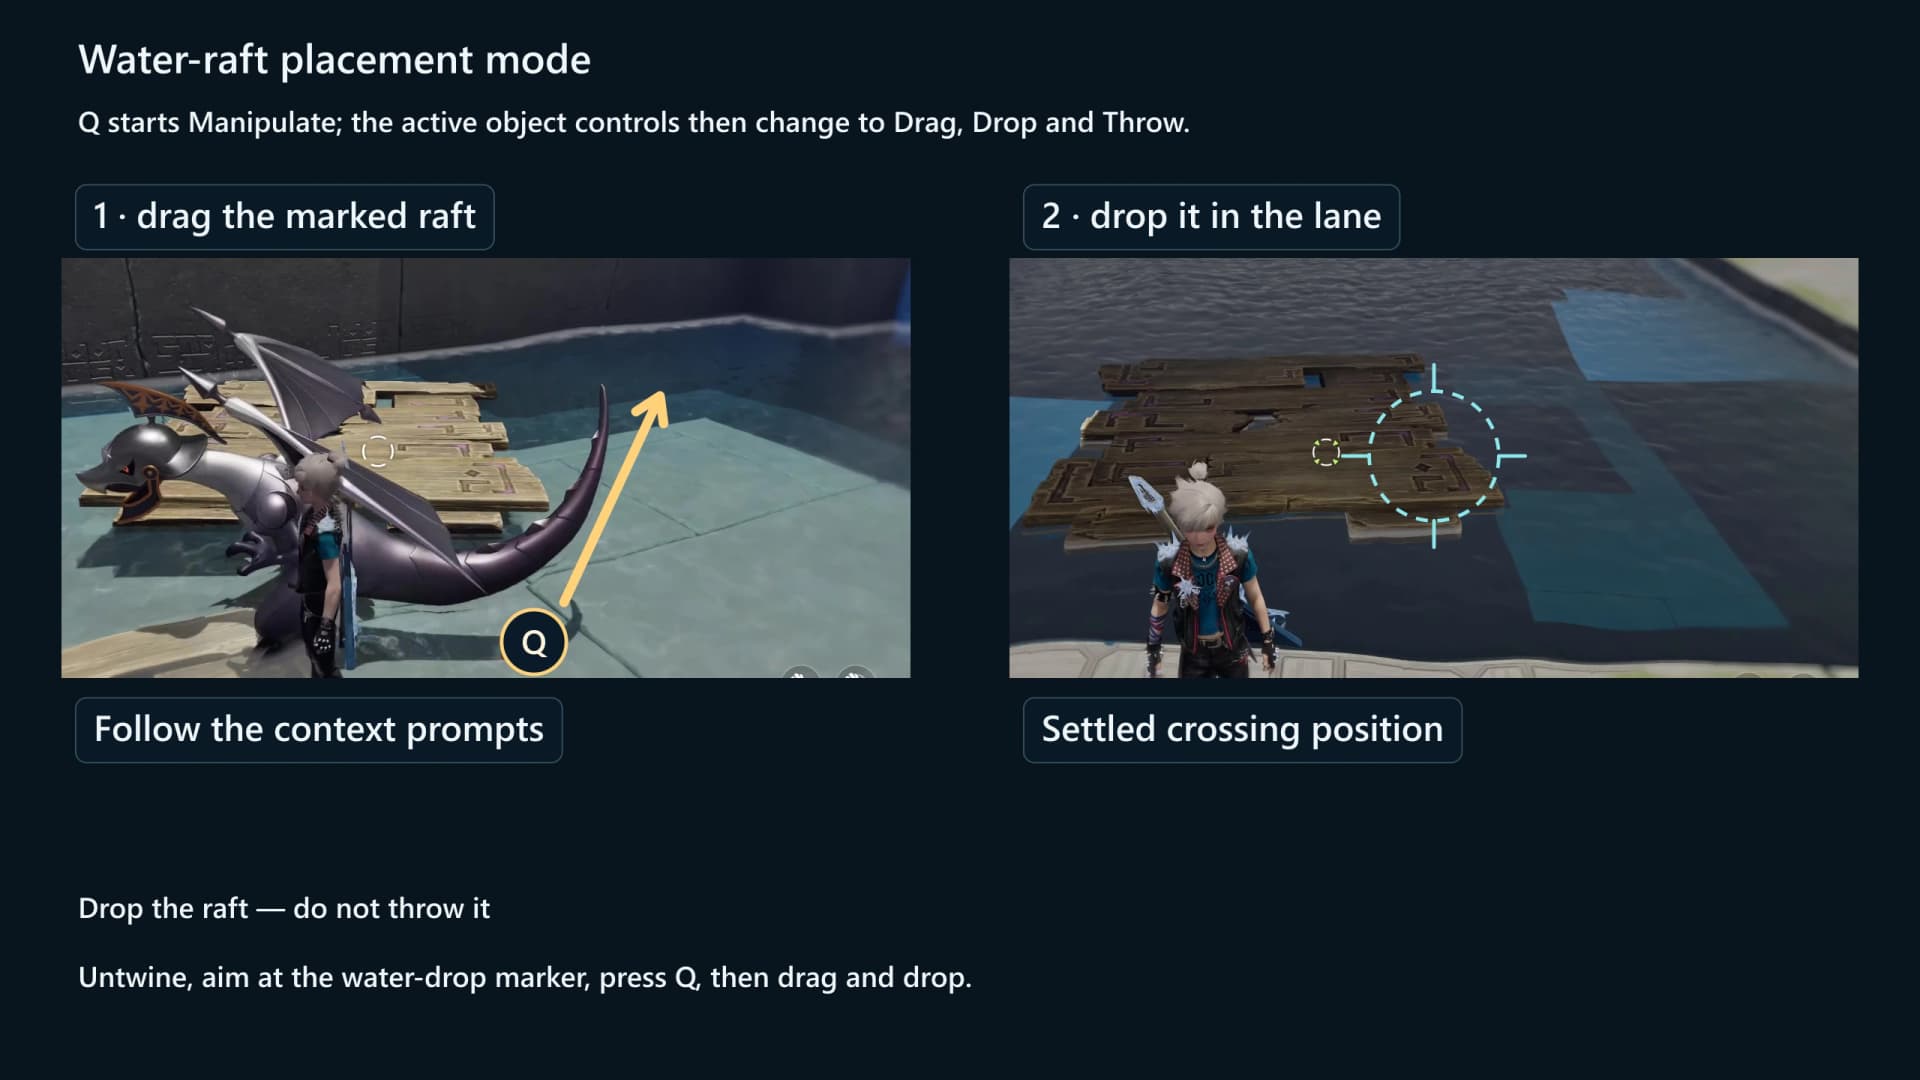
Place the water-marked raft with Drag and Drop
After sightline 3, Untwine to Pathfinder form and aim at the wooden raft carrying the water-drop marker. Press Q when the HUD says Manipulate. The active object controls then change to Drag / Stop dragging and Drop / Throw. Drag the raft into the crossing lane and choose Drop so it settles; do not Throw it. Cross, then Twine with Helgon again.
Sightlines 4 and 5 across the water
These two registrations use the raft basin from different heights, and each moves a pool rather than a door alone: the western pool drops by nearly three units, the eastern one rises by a little over three. Solve the low far-wall view, then climb to the upper view. No chest sits between sightline 5 and the lift.
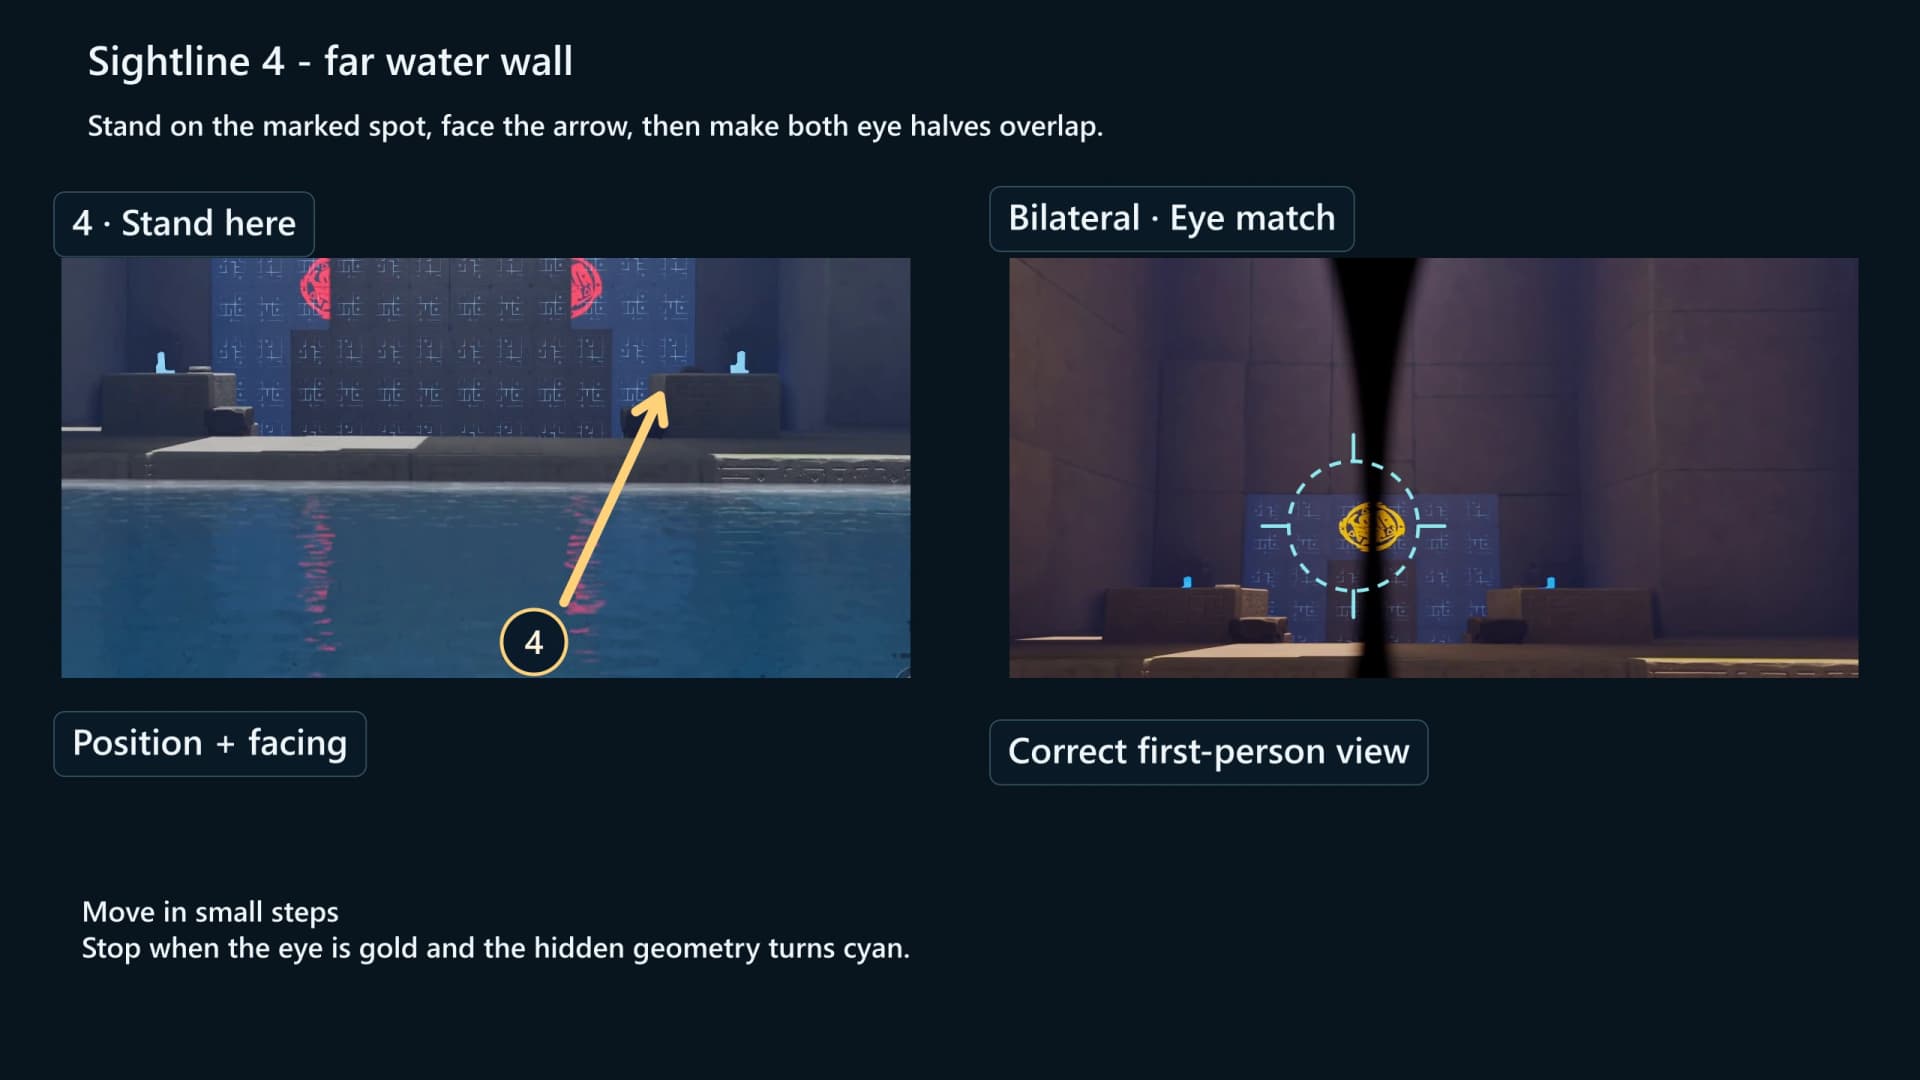
4. Far water wall
Stand here: step off at the shallow water edge and stay at that low height. Face this: center the distant wall and the low eye halves above its base. Enter Bilateral, tilt slightly downward and close the eye over the center block.
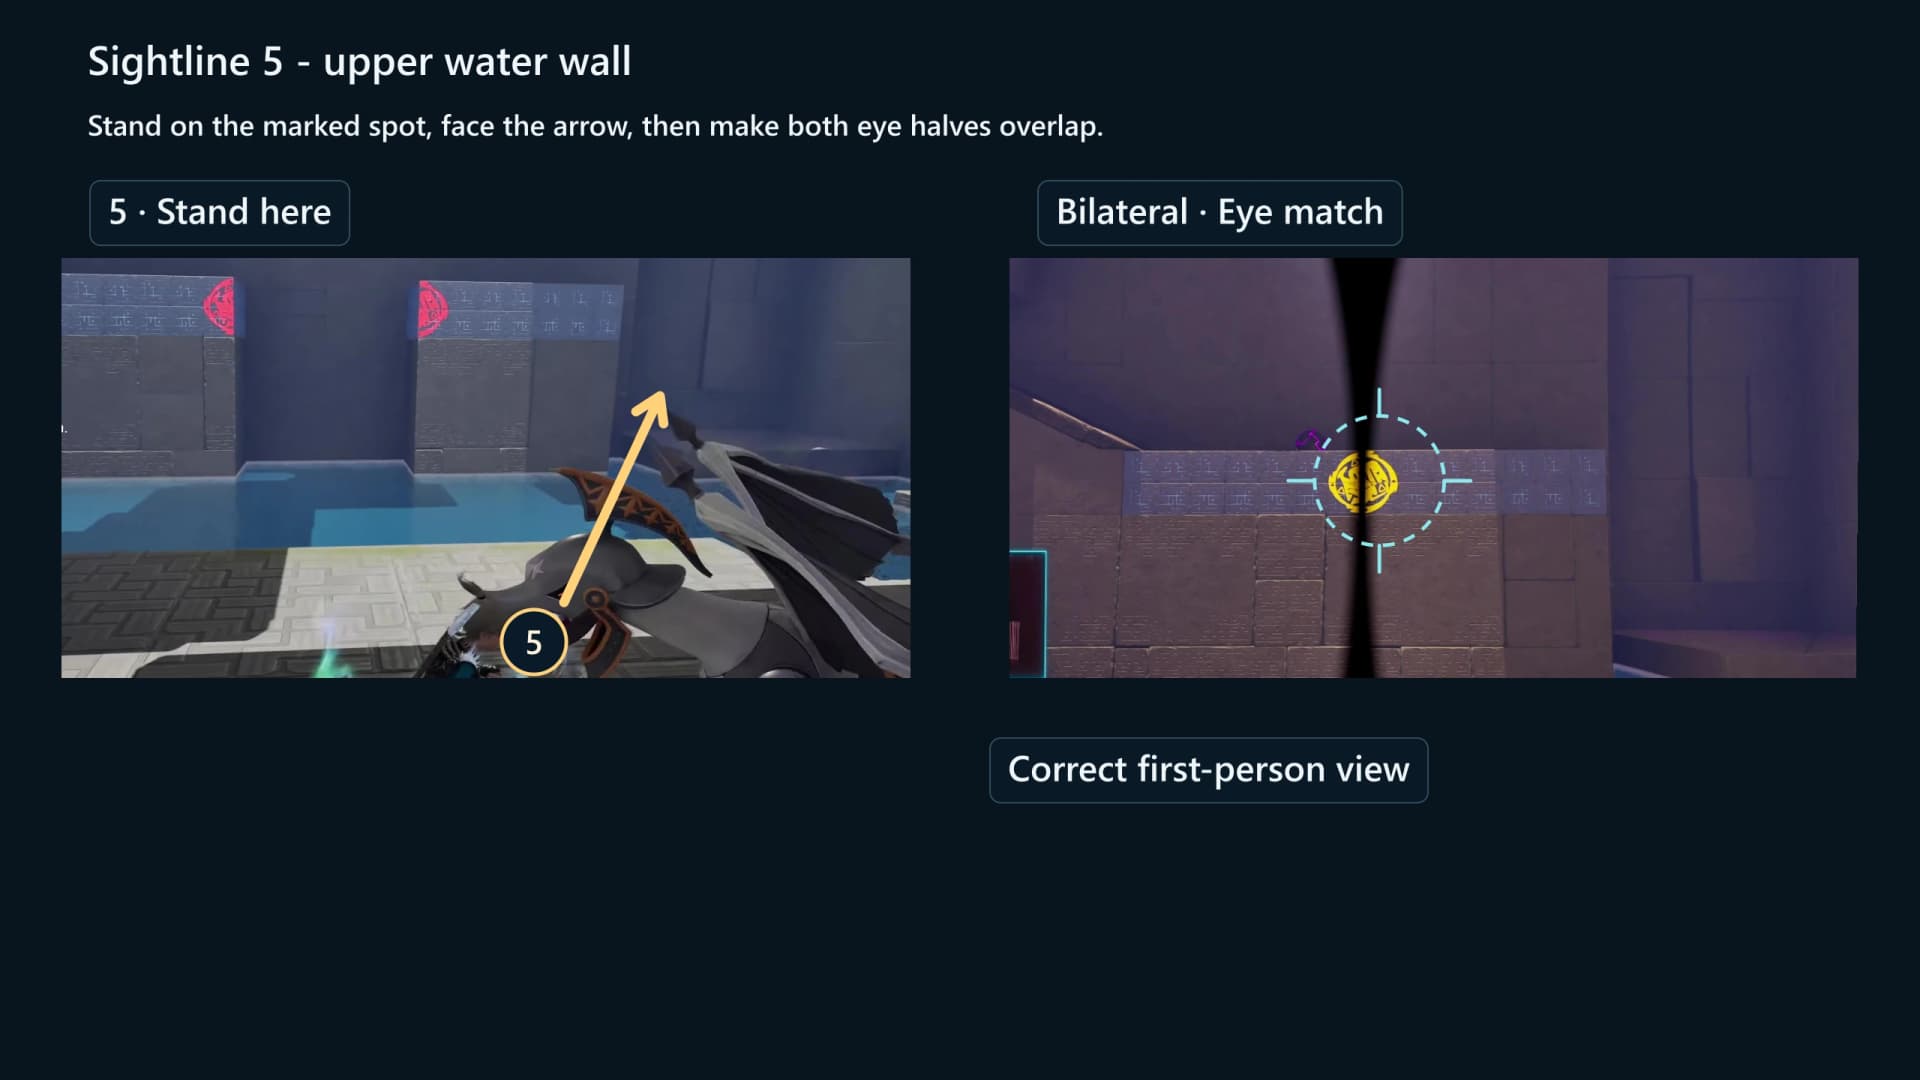
5. Upper water wall
Stand here: climb to the upper dry ledge beside the central pillar and stop at its lip. Face this: look across the pool, using the pillar edge to keep the fragments level. Enter Bilateral and make a short horizontal correction until the eye registers.
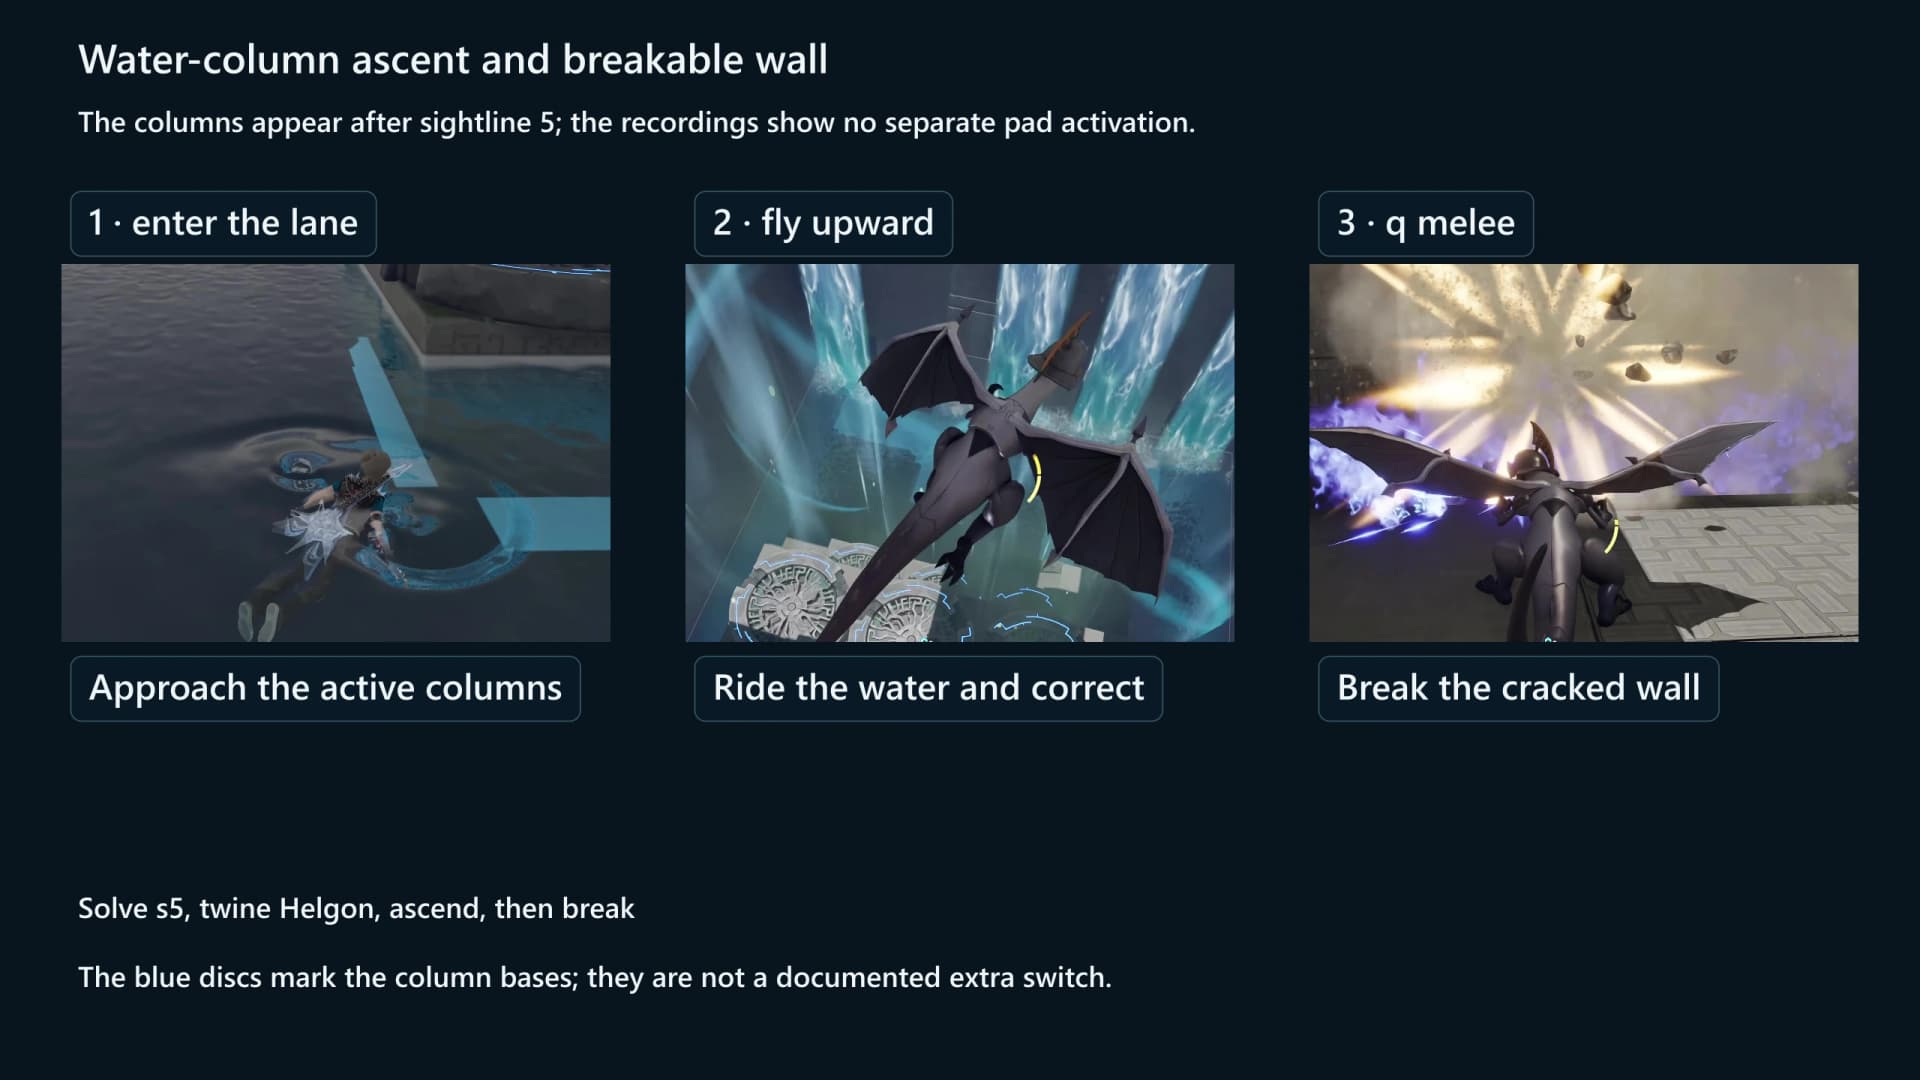
Ride the water columns
Sightline 5 opens the next doorway. Circular blue-rimmed fixtures sit at the base of the lane, but the water columns already running are the lift, and there is no separate pad interaction. Enter the lane, Twine Helgon, ride the columns upward and hold Jump to fly when the climb needs correcting. The cracked walls come much later, past the chasm and the ancient gate on the long west deck.
- Enter the active lane. Walk into the running water; there is no switch to find first.
- Ascend in Helgon form. Use the columns for height and flight for lateral correction.
- Fly over water freely. From the first checkpoint on, holding Jump lets you cross the pools instead of hunting for a ledge.
- Prepare sightline 6. The next pattern is the bridge over the chasm, not another wall in this lane.
Sightlines 6 to 11, the ball runs and chests 2 and 3
Six registrations remain. Sightline 6 conjures the bridge that carries the first Mechanical Ball across the chasm; sightline 7 is the alcove at the far west edge, and chest 2 sits on the way back east. Sightlines 8 and 9 are a left half and a right half of one gap, nine units apart at the same height, and the broken bridge below only holds once both have registered. Sightline 10 is the gate that answers to both human and dragon sight. Move Platform comes after sightline 10, followed by the eleventh alignment and chest 3.
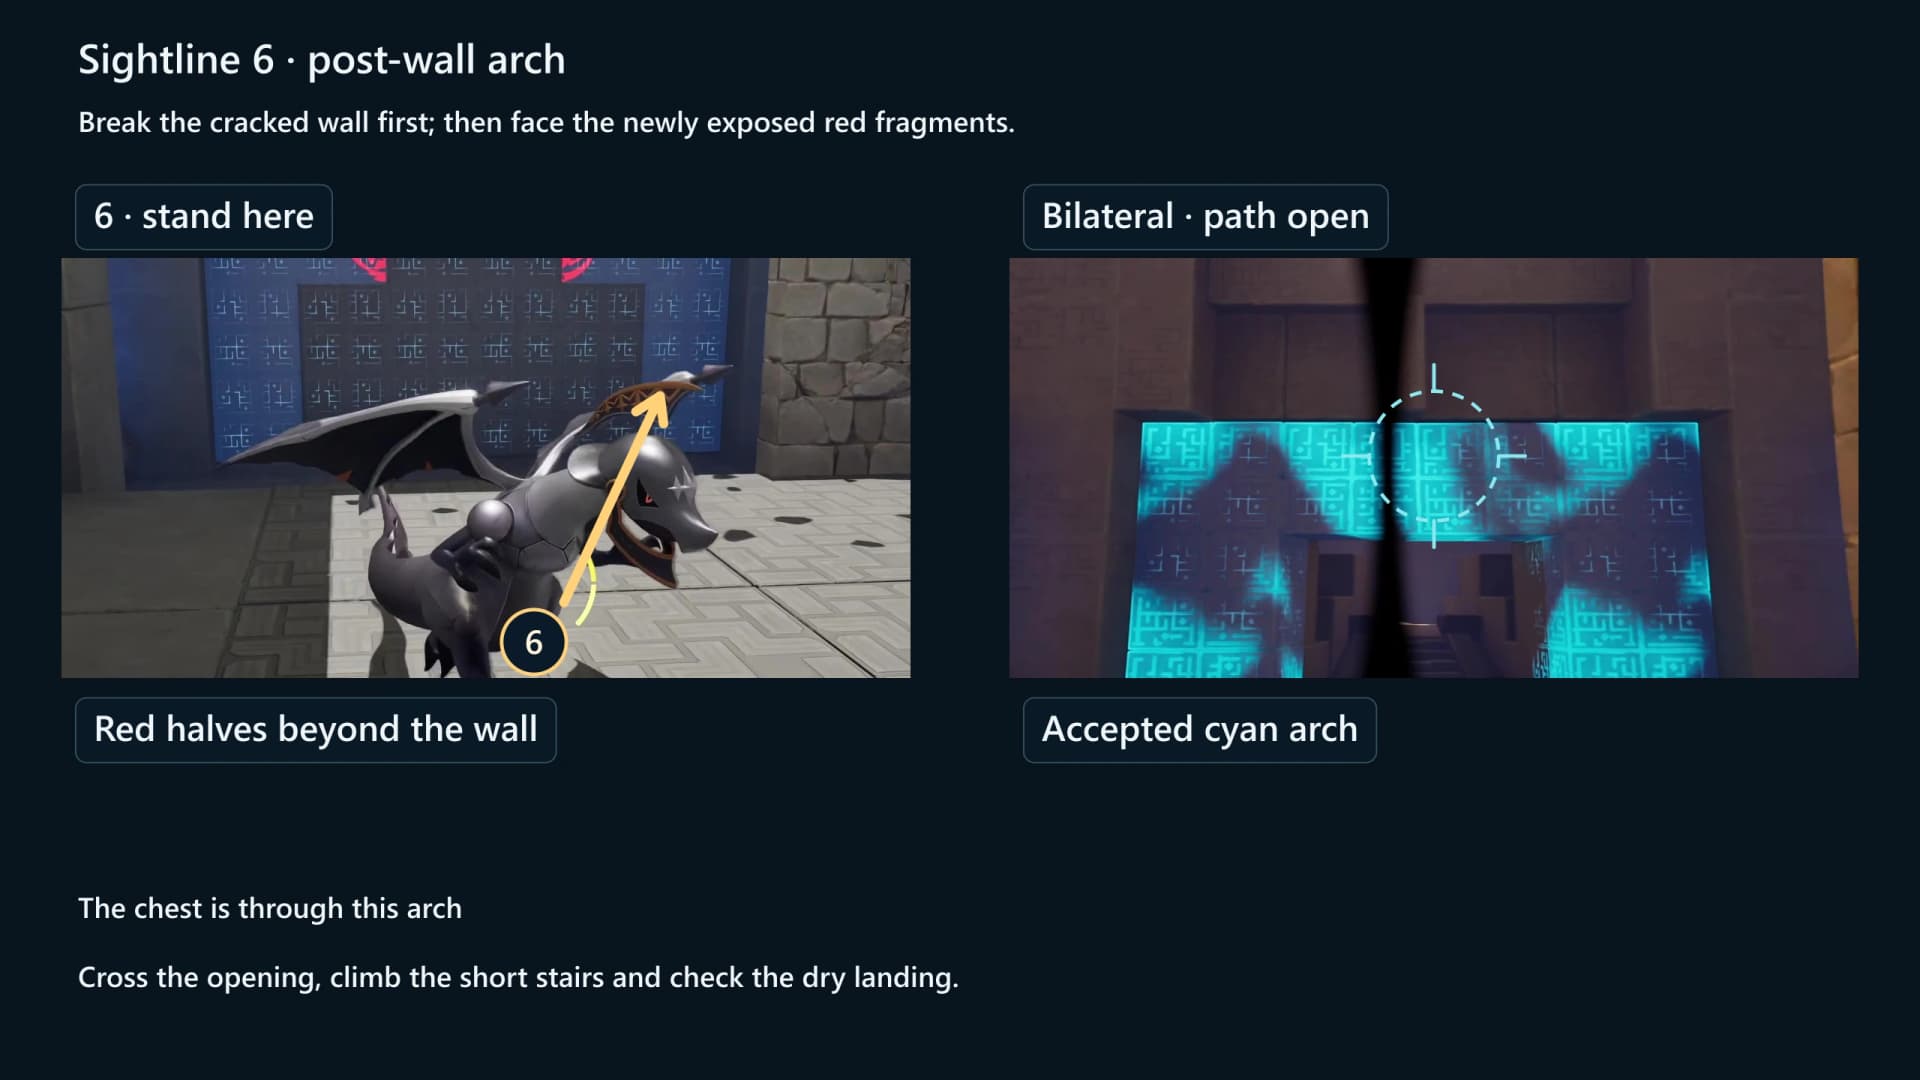
6. Chasm bridge, then the first ball run
Stand here: step onto the balcony past the fourth checkpoint and stay on it. Face this: look west across the chasm at the split pattern hanging over the drop. Compress visual space and close the halves from where you stand; a span forms over the gap and three assist winds start pushing north along the far lane. Keep the span standing while the winds carry the Mechanical Ball from the high south end into the socket at the far end. If the ball falls, the lever on your balcony puts a fresh one back at the top.
7. West-edge alcove, then chest 2
Stand here: past the ancient gate and the three cracked walls, stop in the alcove at the far west end of the long deck, the furthest west point in the Sanctum. Face this: center the last pattern of this chamber and compress visual space until the route through the stone door settles. Walk back east and open chest 2 on the dry landing above the chasm before you leave the chamber.
8. Bridge pair, left half
Stand here: ride the updraft out of the low shaft to the sixth checkpoint and take the shelf on your left first. Face this: look high at the split eye above the wall stack. Compress visual space and tilt upward until the eye closes near the top of the view. Keep Helgon still while the route changes.
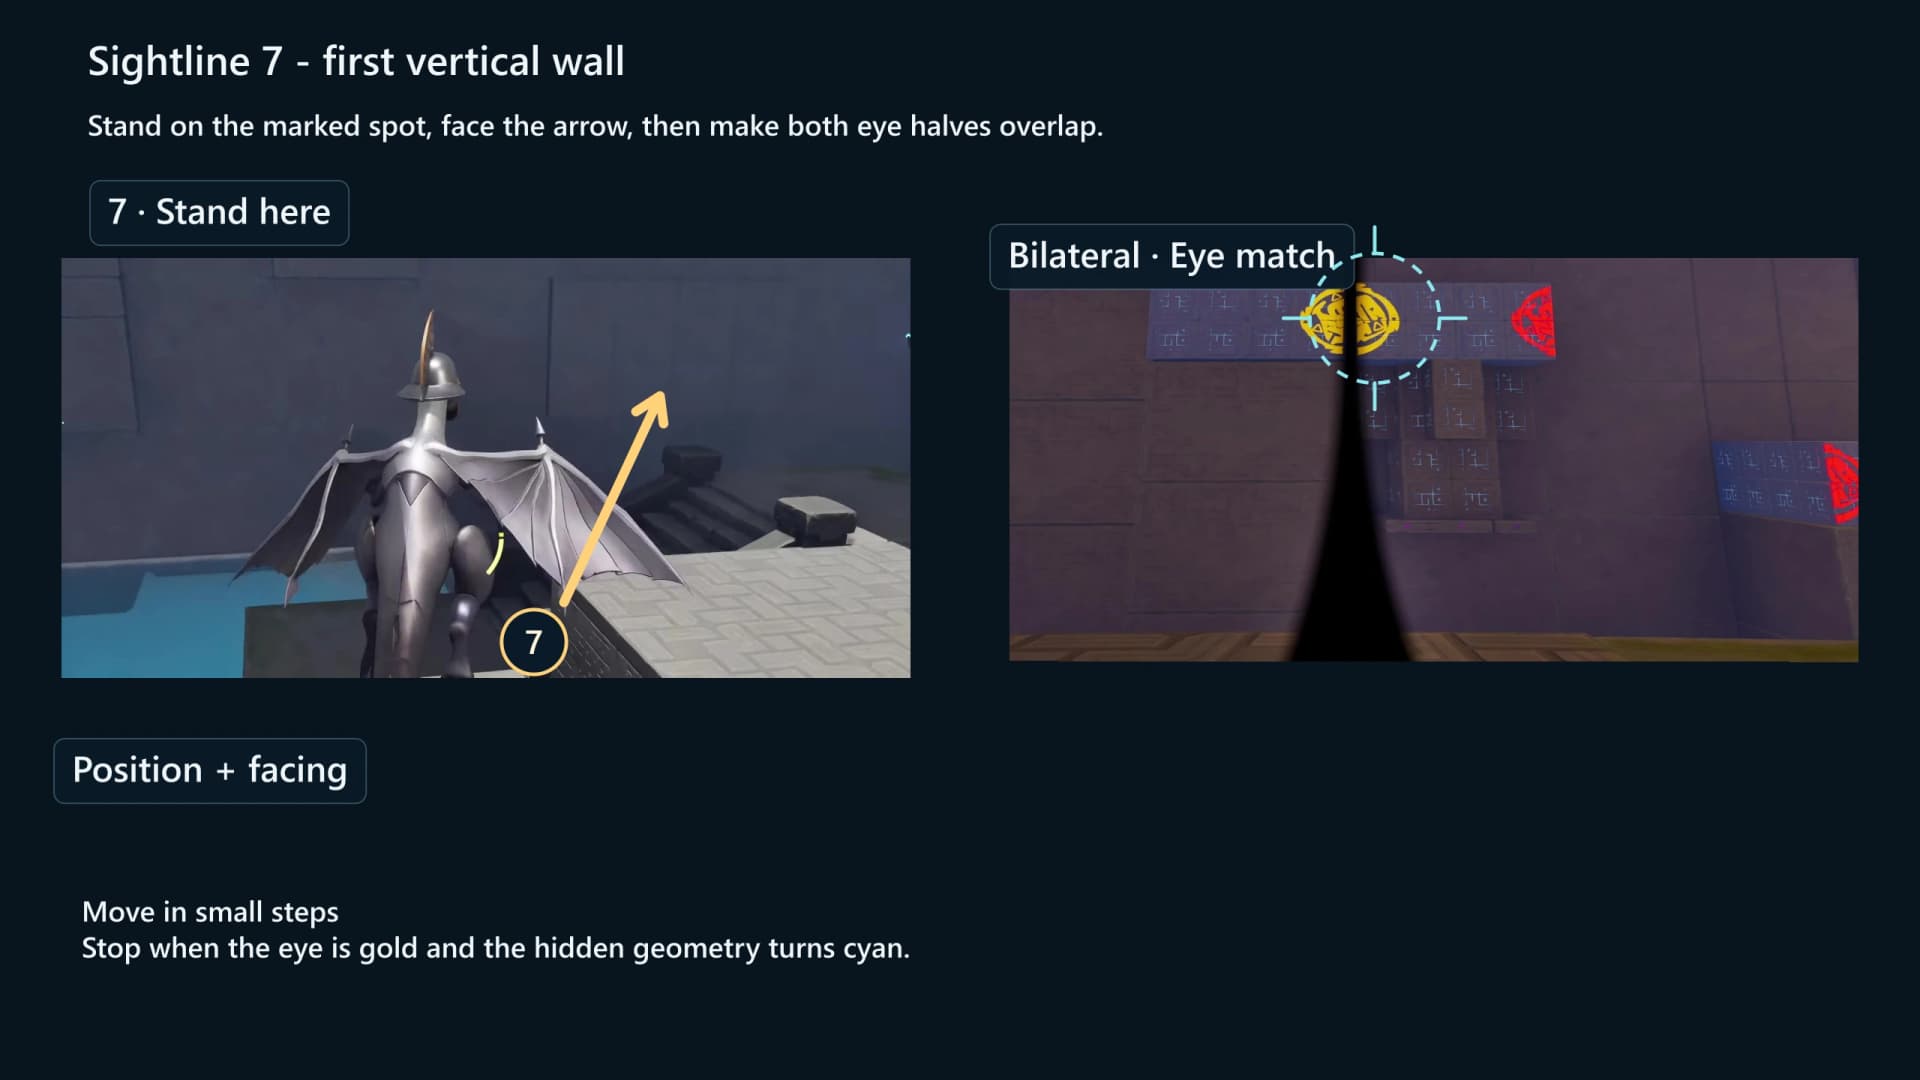
9. Bridge pair, right half
Stand here: move onto the pale corner platform about nine units to the right, at the same height as the left half. Face this: center the T-shaped stack on the opposite wall and align the eye at its horizontal crosspiece. The broken bridge in the lane below only holds once both halves of this pair have registered, so take them in either order and check the span before you commit to it.
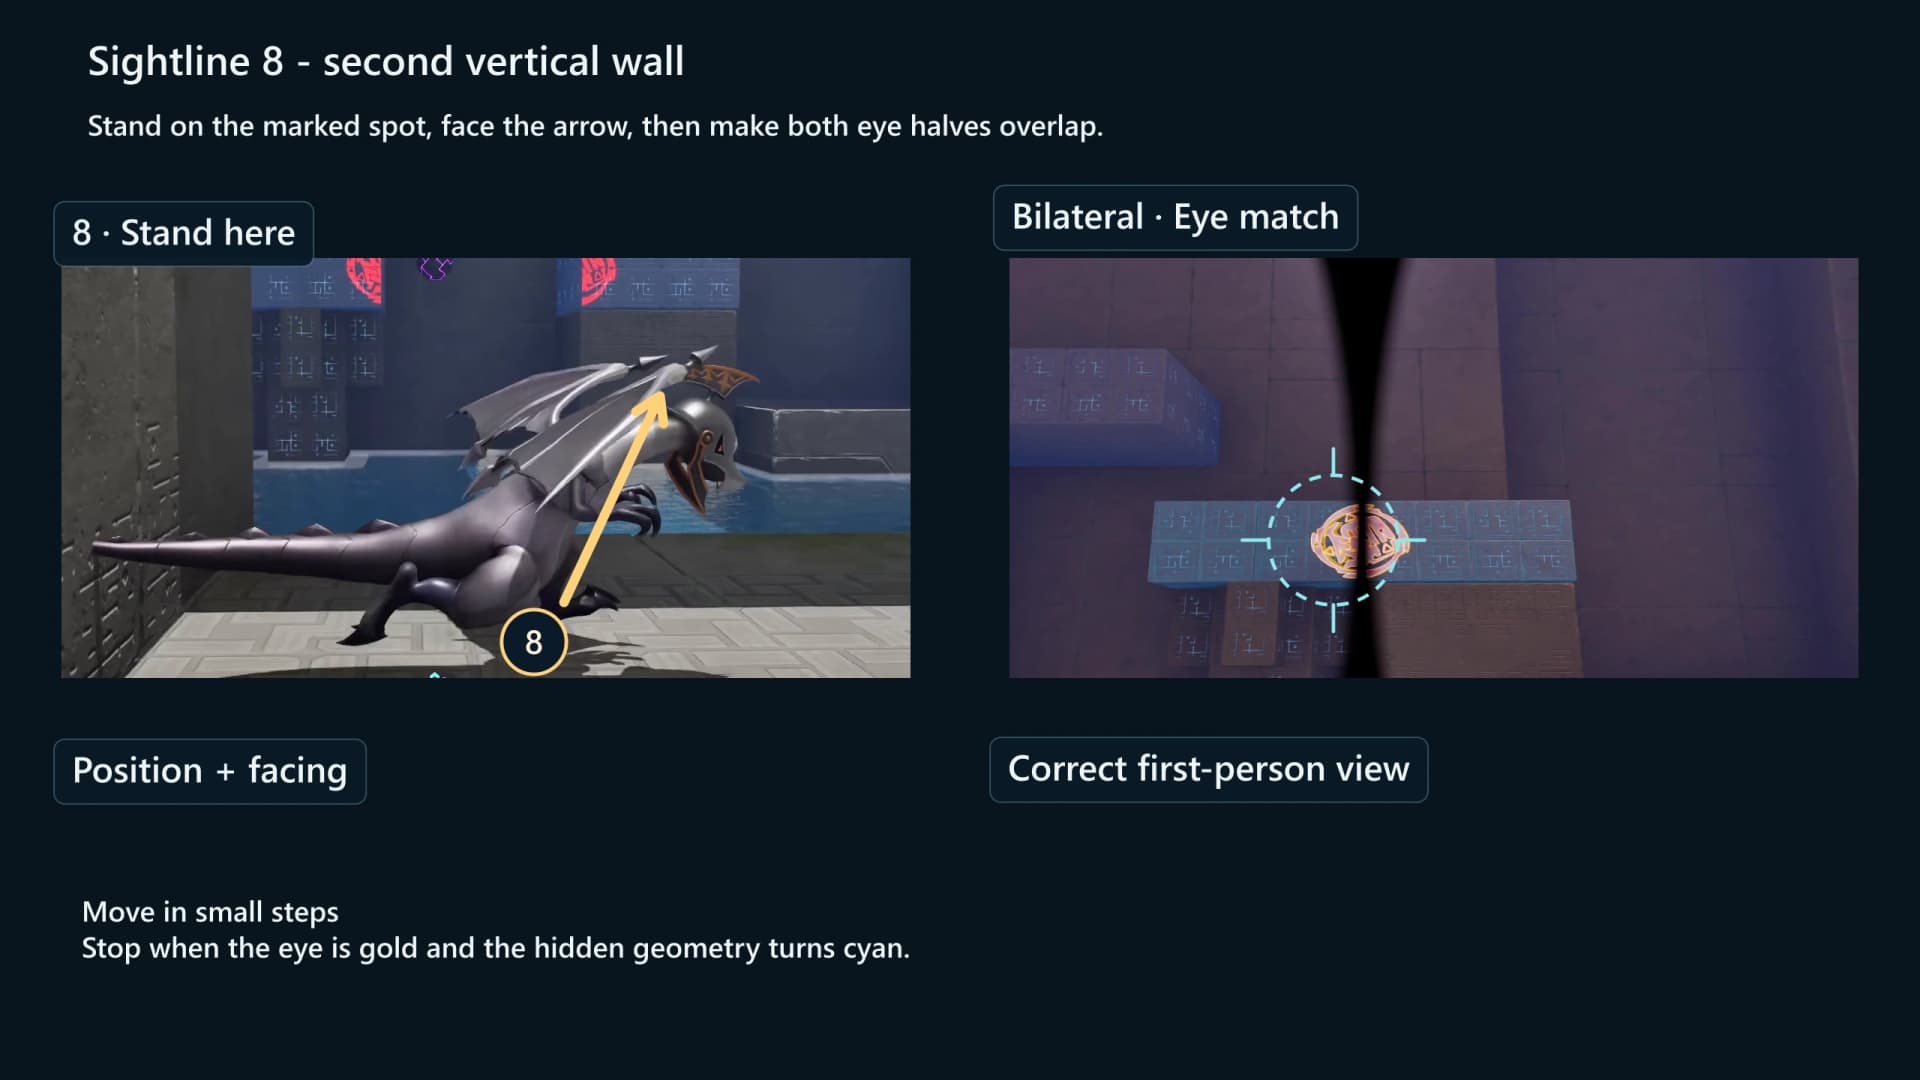
10. Upper eye gate
Stand here: work the square console and the second ball run, ride the three fans on the east side up to the seventh checkpoint, and stop on that deck. Face this: the pattern hangs almost directly overhead, so register it from the deck rather than walking toward the door. Stay put while you aim; walking toward the gate pulls the halves apart. This is the gate that answers to both human and dragon sight.
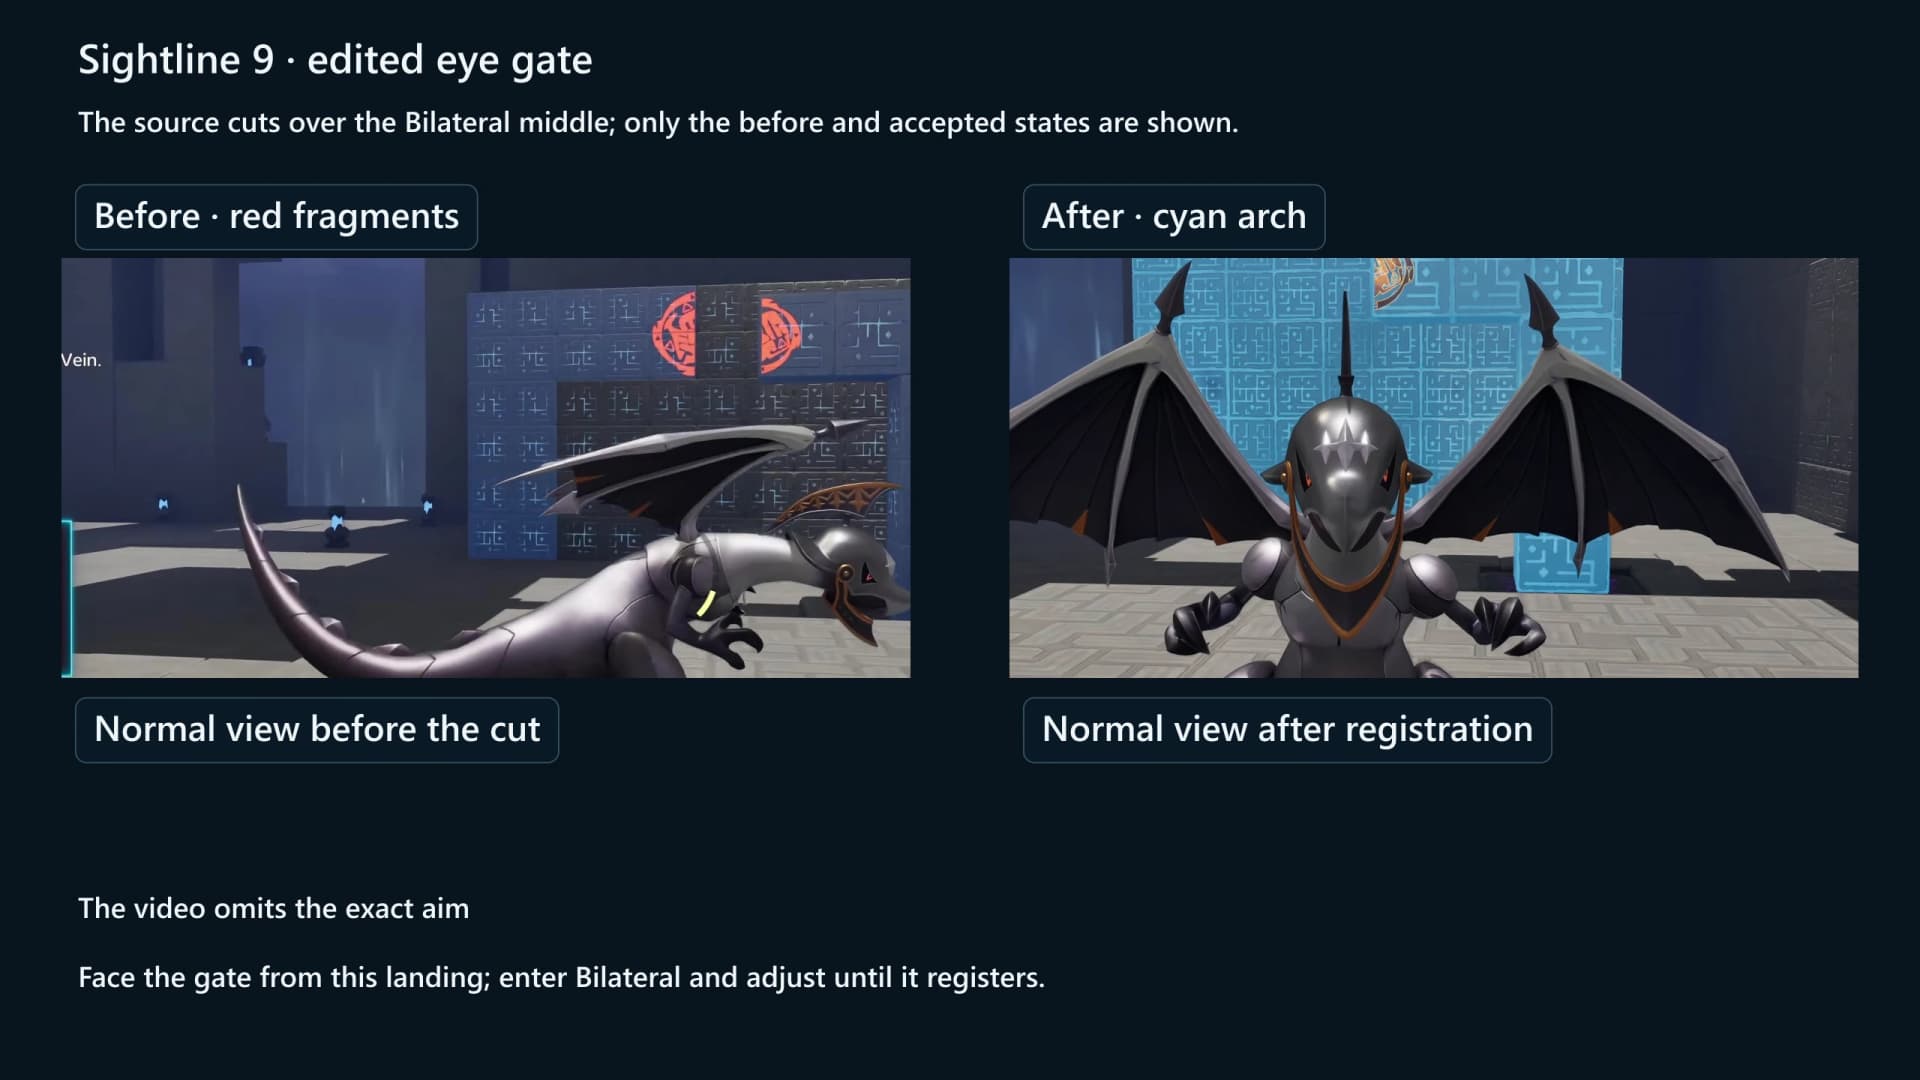
11. Final corridor, then chest 3
Stand here: after Move Platform, Untwine and stop on the open square at the final corridor, because this last pattern is a human sight piece like the very first. Face this: aim toward the separated eye fragments across the central block and make small corrections until the last eye turns gold. The eighth checkpoint comes on just past it. Follow the opened route to chest 3 on the final central landing and confirm 3/3 before continuing to the Sanctum Terminus.
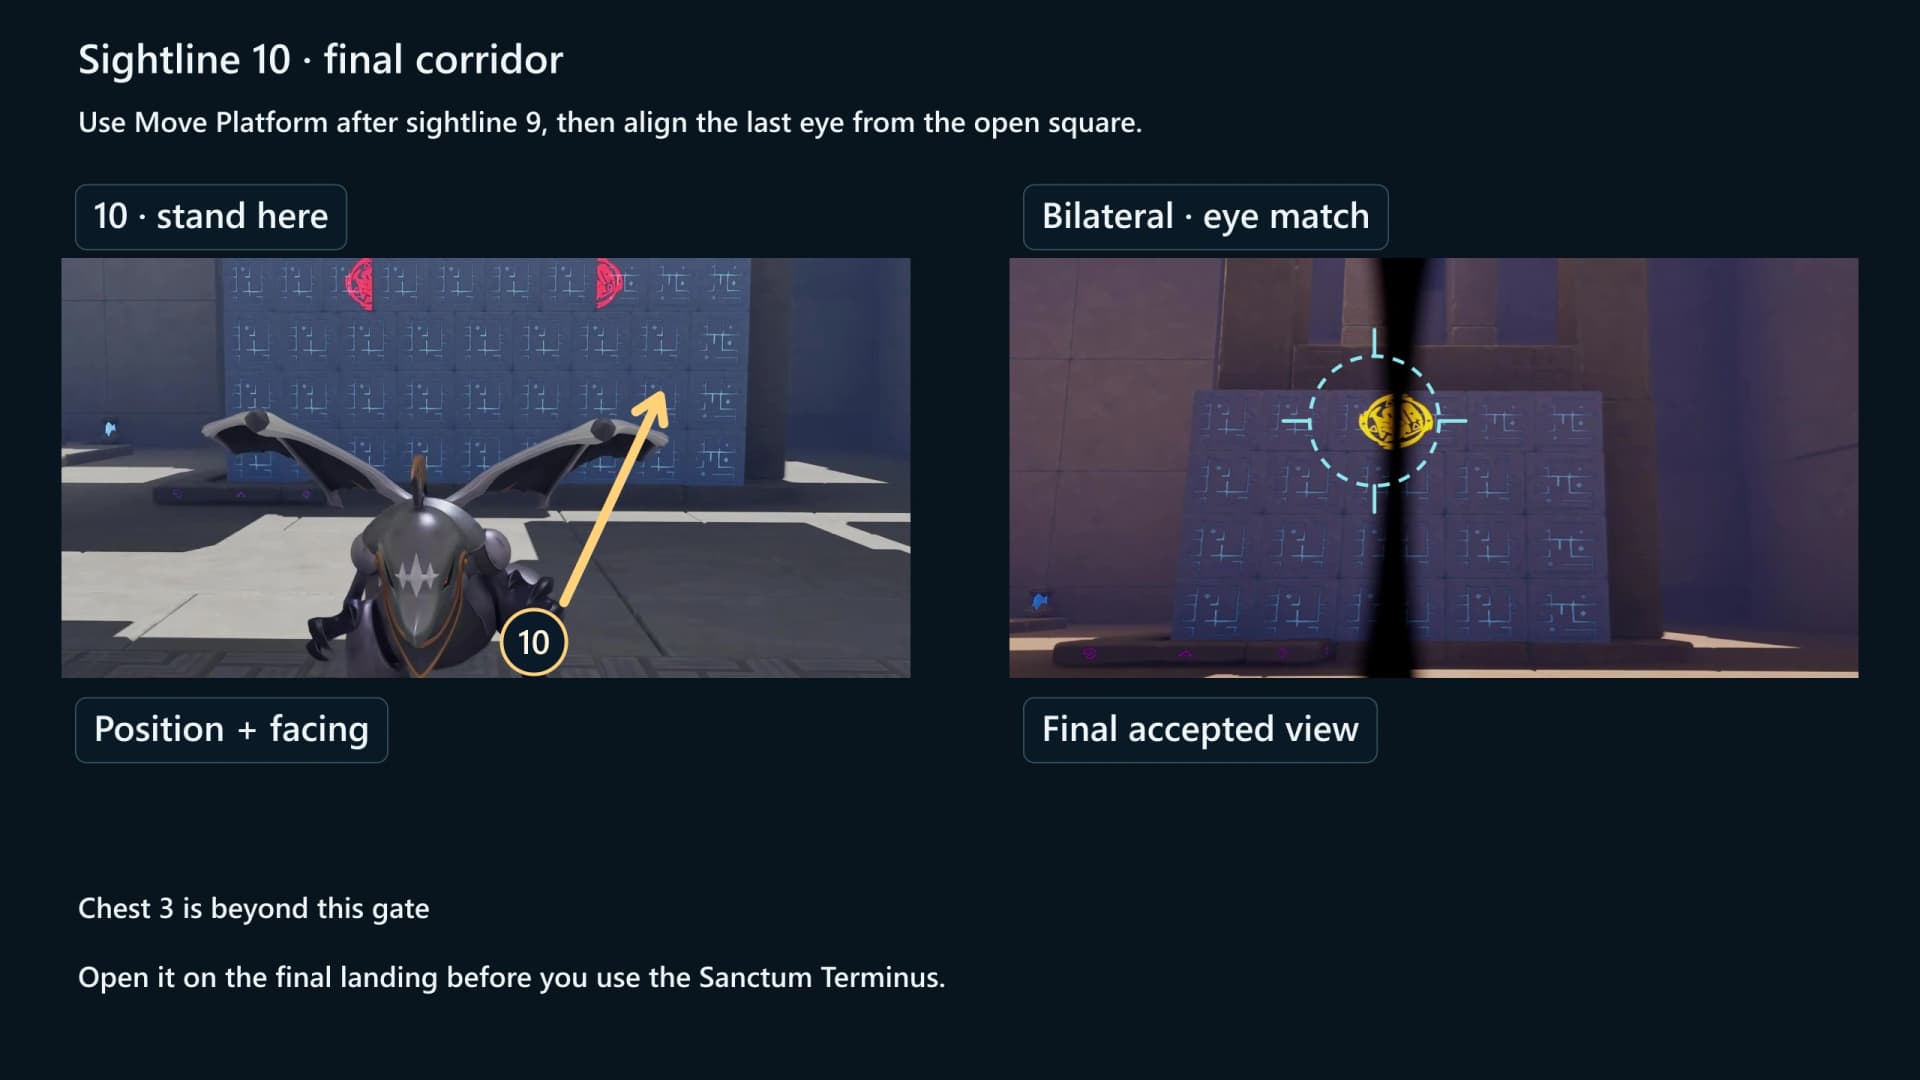
Three-chest checklist
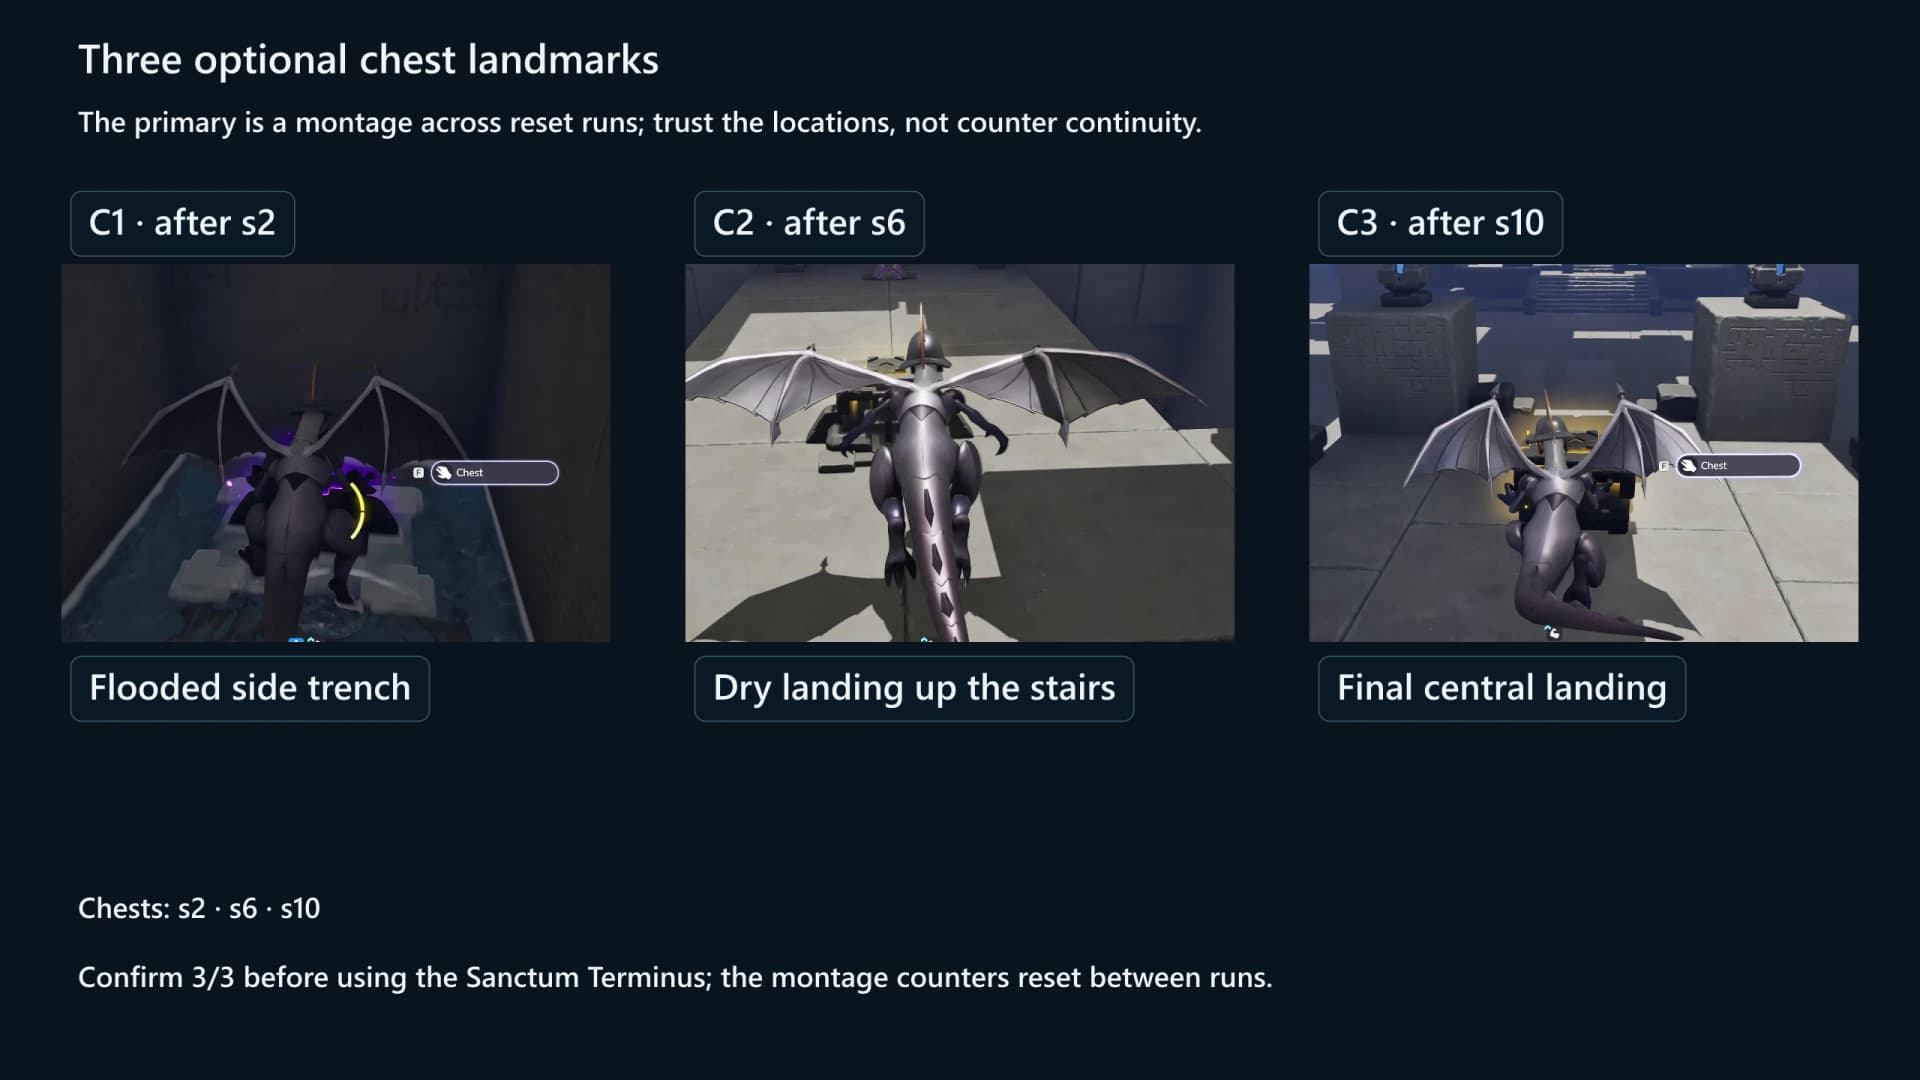
Chest 1 is the standard one in the flooded trench past the west gate. Chests 2 and 3 are both premium: the landing above the chasm on the long west deck, and the central landing in the final corridor.
| Chest | Tier | Contents |
|---|---|---|
| Chest 1 | Standard | Glimmer x10, Credits x10000, Sparkling Crystal x10, one Rare held item |
| Chest 2 | Premium | Glimmer x20, Credits x20000, Sparkling Crystal x15, one Epic held item |
| Chest 3 | Premium | Glimmer x20, Credits x20000, Sparkling Crystal x15, one Epic held item |
| First clear | Reward | Lumin Amber: Breezy Plains, EXP x500 |
Every held item: Spirited Feather, Fission Needles, Echoing Grimoire, Ferocious Fang, Miraculous Fleece, Lightning Needle, Gargantuan Horn, Marching Flask, Capacitous Battery, Heartseeker Pendant, Avenging Gear, Heritage Amulet, Explosive Gloves, Giant Tortoise Shell, Auspicious Bell.
Troubleshooting the route
| Problem | Check | Correction |
|---|---|---|
| The eye halves nearly meet | Normal-view landing and facing direction | Return to the named normal-view landmark, face the stated wall, then use smaller camera corrections in Bilateral. |
| The raft will not stay in the lane | Whether the context control says Drop or Throw | Drag it into position and choose Drop; Throw can send it past the intended crossing. |
| The water-column route seems inactive | Whether sightline 5 registered and its doorway opened | Enter the lane after S5. The columns run on their own, so there is no pad to activate. |
| The route stops after sightline 10 | Nearby Move Platform prompt | Use the separate geometry interaction, then solve the eleventh eye gate. |
| A Mechanical Ball is in a pit | The reset lever beside the balcony or the console | Throw the lever, wait for the fresh ball at the top of the lane and run the assist winds again. |
| The span over the bridge lane will not hold | Whether both halves of the sightline 8 and 9 pair registered | Register the other half from its own shelf; the broken bridge only holds with both. |
| The Sanctum Terminus is available at 2/3 | Chest landmarks after S2, S7 and S11 | Backtrack to the missed landmark before you finish the room. |
Finish the route and continue
After chest 3, verify 3/3, follow the opened route and interact with the Sanctum Terminus to restore the Vein and resolve the challenge. A first clear pays Lumin Amber: Breezy Plains ×1 plus 500 EXP, and it pays once: there is no repeat-clear reward. Clearing also lights the room’s node on the Leyline Tree and counts towards the Sanctum Delver badges at 3, 5, 10 and 15 clears.
Frequently asked
Where is the Vigilant Eyes Sanctum?
Vigilant Eyes is a solo Sanctum in Russet Highlands. Open the exact Vigilant Eyes atlas pin; the marker sits at 2775, 423 on the AniimoVerse atlas.
Is Helgon’s perspective skill called Bilateral or Split-Sight?
The room calls it Mobility and says it compresses visual space. Helgon’s skill data calls the action Bilateral and an older tutorial line says Split-Sight; all three name one mechanic.
How do I move the raft in Vigilant Eyes?
Untwine, aim at one of the floatable Ancient Large Planks on the west shore and use Manipulate. Follow the context prompts to Drag it into the crossing lane and Drop it. Do not Throw it, because a thrown plank overshoots the lane.
Where are all three Vigilant Eyes chests?
Chest 1 is in the flooded side trench after sightline 2, chest 2 is on the landing above the chasm after sightline 7, and chest 3 is on the final central landing after sightline 11. Confirm 3/3 before using the Sanctum Terminus.